
How to configure Jira to Fluid Boards integration
To help project managers and their development teams streamline their agile workflow processes, the integration of Jira with Fluid will enable managers to establish an agile workflow that aligns with their team's technical requirements, thereby fostering collaboration and driving progress.
This article will cover how to integrate Jira to Fluid Boards, allowing the the Project Owner to have visibility over the work and IT/Tech teams delivery without the complexity of Jira and the technical process.
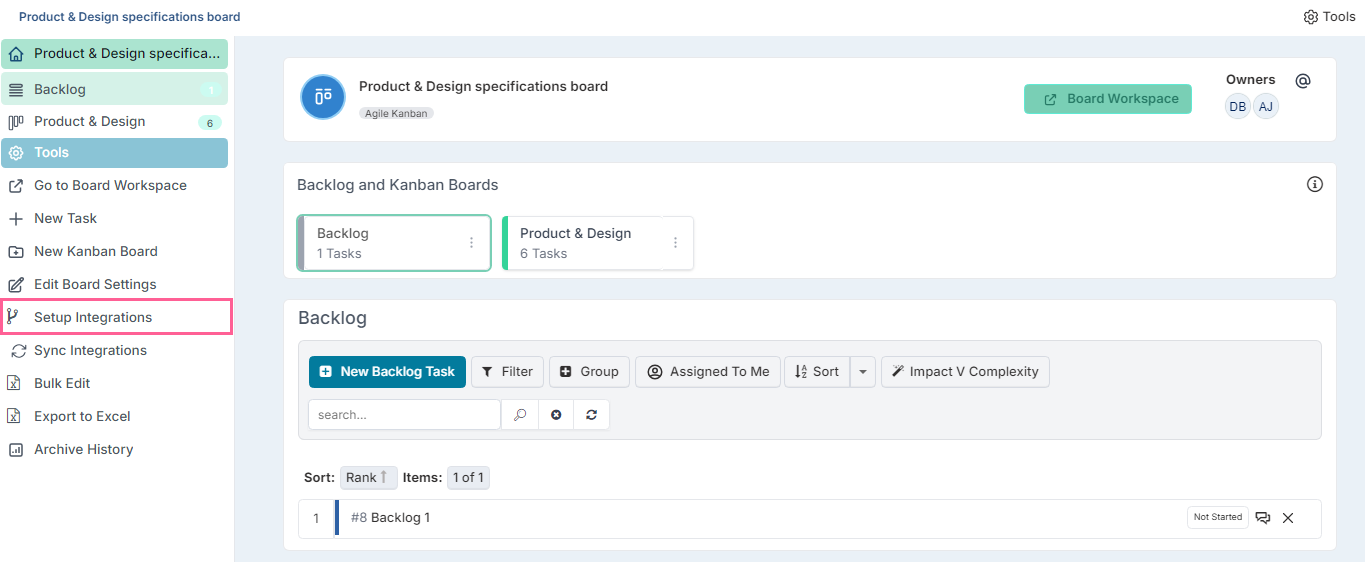
Access the Integrations option a board
To start off, navigate to the Setup Integrations options on your board from the the Tools tab.

For other board related views like the Backlog or Board Workspace view, the Setup Integration option can be found on the left column navigation. As a general rule, the left navigation is where you should look for options related to your current view. For views like the Kanban view above however, there is no left navigation, so options can instead be found under the tools menu.
Once the Integration options is selected and the dialog opens, you will then be able to select the integration for Jira.
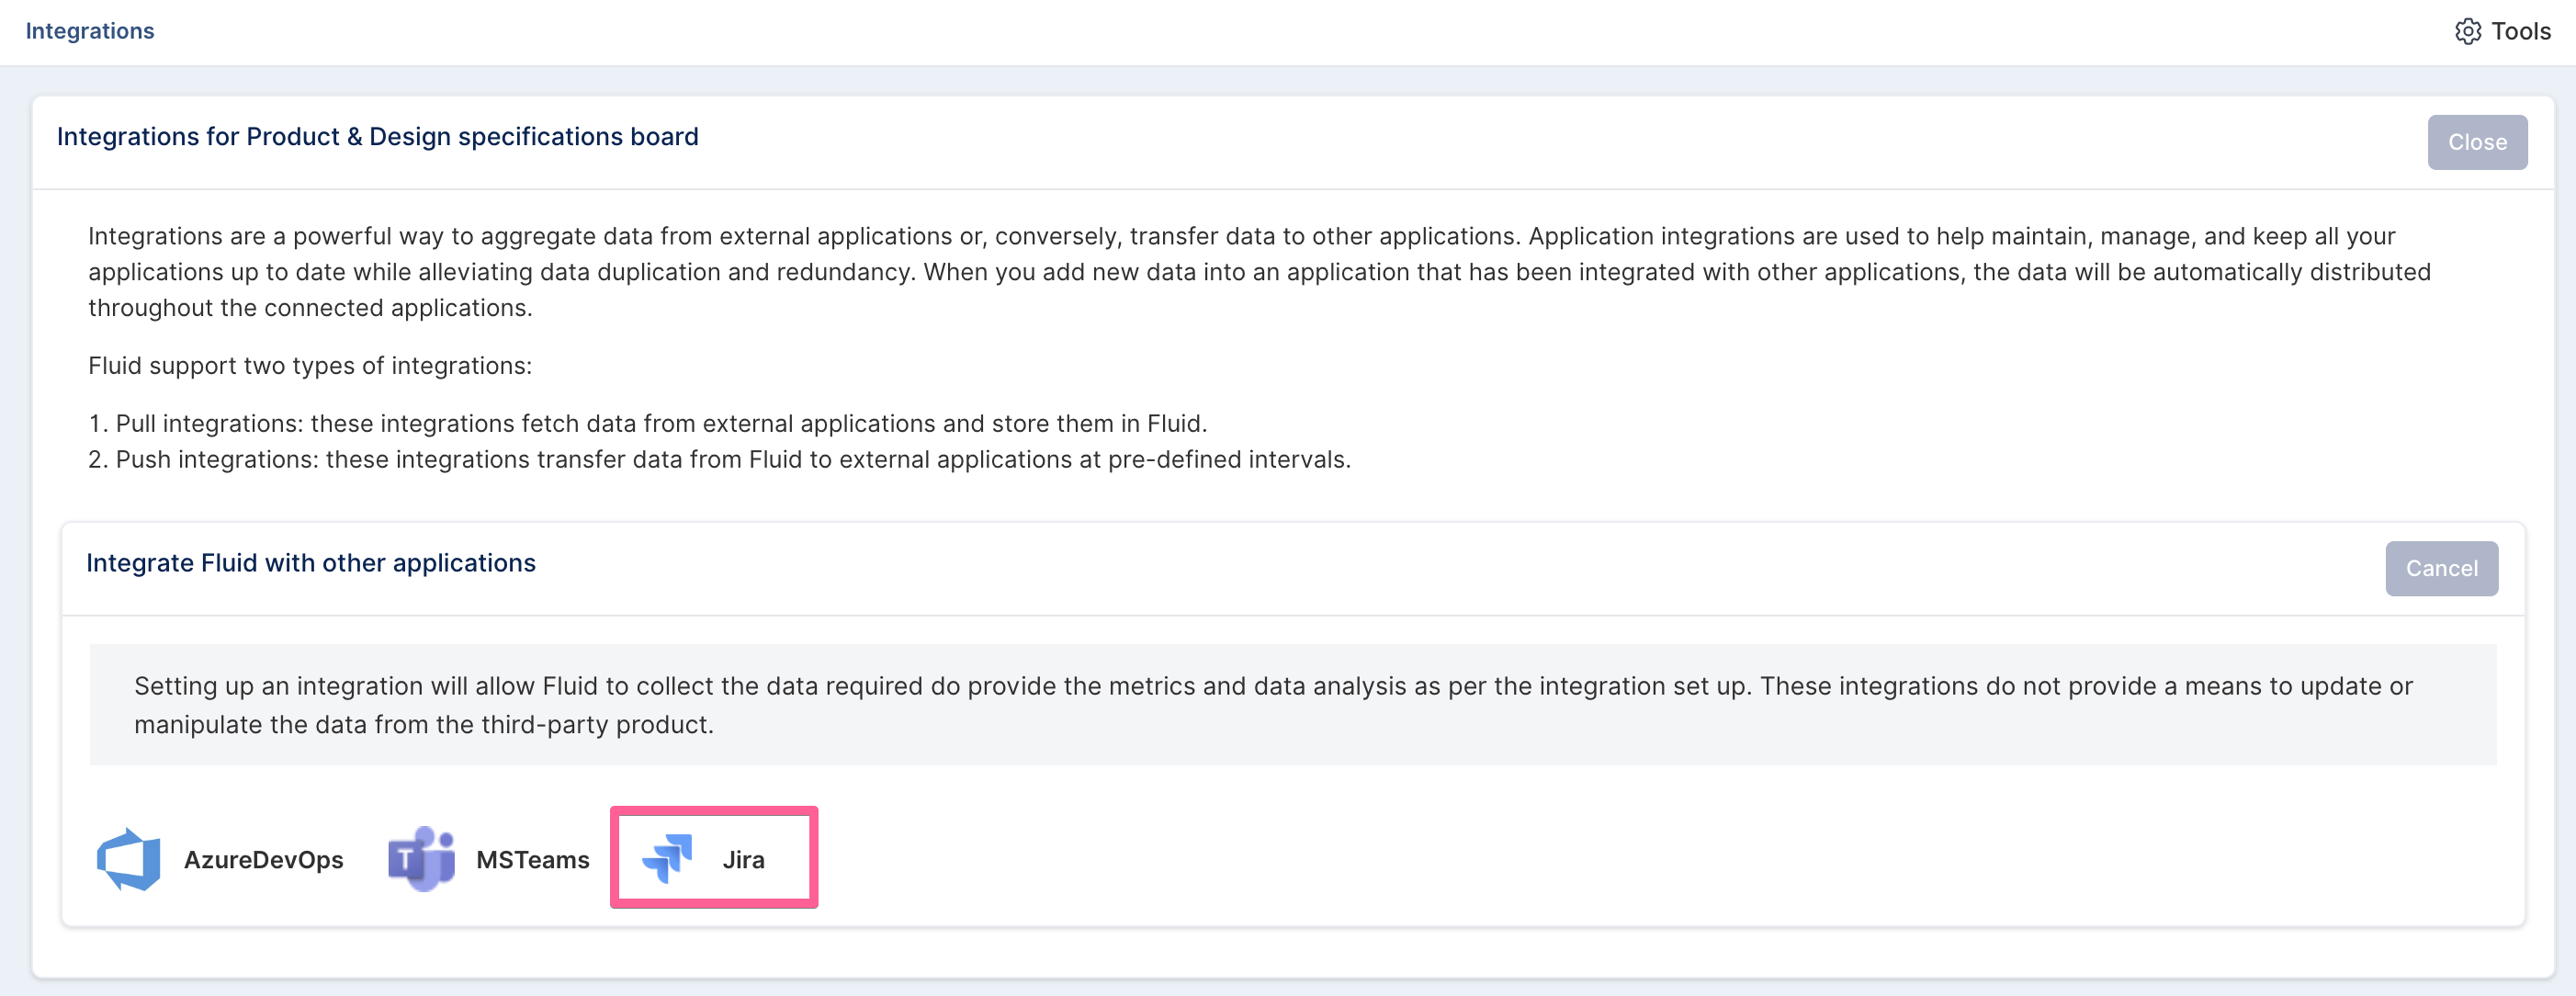
The following dialog will present the Set Up page where the integration details for the board can be completed.
You can learn more about how to initially create a board in Fluid by clicking here.
Complete the Integration details
Each of the sections for the integration details are as follows:
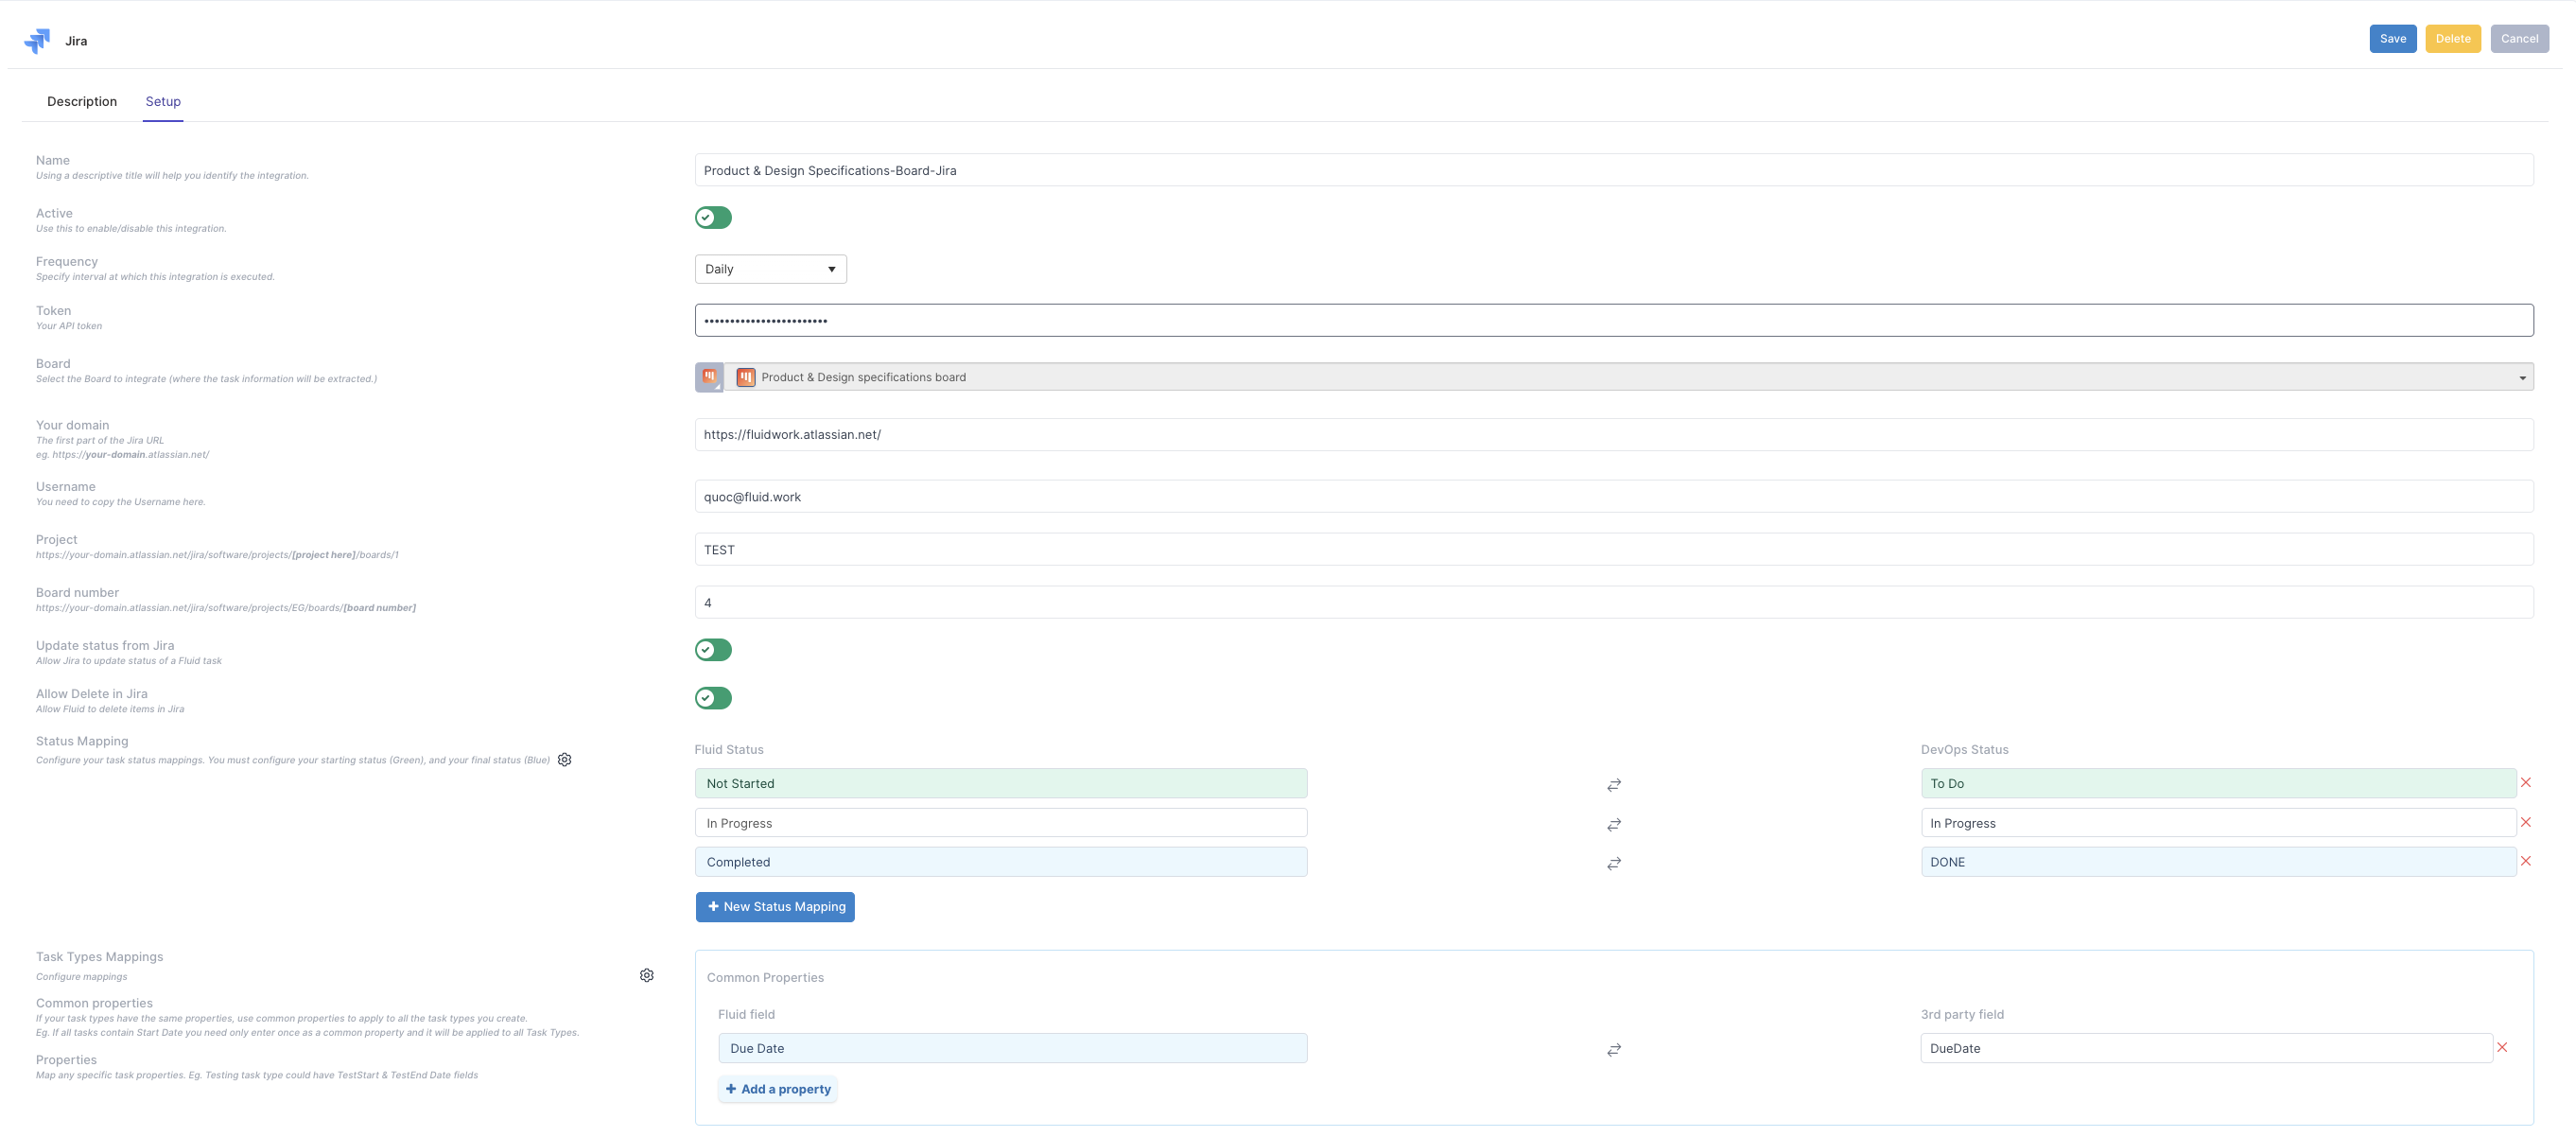
Name | The name of the board that will be reflected in Jira. |
Active | Whether integration is currently enabled for this board. |
Frequency | How frequent the job runs for any updates/changes made on the board. |
Block Create/Update tasks for Jira | Enables a hard block to prevent any requests from being sent to Jira. Use this option when you want Fluid to operate in read-only mode, pulling information from Jira without making any updates or modifications to Jira tasks. |
Authentication Provider | What authentication mechanism you want to use for connect to Jira. Jira at present only supports PAT for their restful service. |
Service Account | If the Jira account being used with Fluid is a System Account, enable this option. Jira System Accounts are specialized accounts intended for automation and integration tasks rather than individual user activity. |
Cloud Id | If Service Account is enabled, you must provide the Cloud ID of your Jira instance. To find this value, go to: https://your_domain.atlassian.net/_edge/tenantinfo The response will include a field named cloudId, which you should enter in this field. Be sure to replace your_domain with the actual name of your Jira domain. |
Email Address | The email address of the account that was used to generate the API PAT token. eg. first.last@yourdomain.com. |
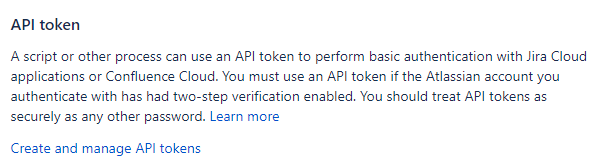
Token | The API PAT token that is generated for programmatic access. See how to generate a API PAT Token in this KB for more details. |
Your Domain | The URL of the Jira domain being integrated, for example: https://your_domain.atlassian.net/ Here, your_domain represents the name of your Jira organization. Enter the full url, including the https:// |
Board | Specifies the Jira board to be linked or integrated. This field is auto populated and cannot be changed. |
Control confidential issues from being synced | Enables control over which issues are synchronized from Jira into Fluid, allowing only approved issues to be imported. There are two configuration options: Blacklist or Whitelist. Blacklist – Defines labels used to exclude issues from syncing. If an issue contains a tag listed in the blacklist, it will not be imported into Fluid. Whitelist – Defines labels that explicitly allow syncing. Only issues containing a tag listed in the whitelist will be synced; all others will be excluded. |
Labels which will be used to BLOCK/ALLOW synchronisation of issues | If "Control confidential issues from being synced" is enabled, enter a comma delimited list of label values that will be compared to the Jira Issue Label. |
Project | Jira project that that items will exists under |
Board number | Specifies the unique board number assigned in Jira. For example: https://your_domain.atlassian.net/jira/software/projects/EG/boards/[board_number] Only enter the [board_number] portion of the URL. |
Allow Incoming Webhooks from Jira | Enables automatic creation and deletion of issues in Fluid based on actions in Jira. Newly created issues are automatically linked and will synchronize according to your configuration. When enabled, a URL is displayed—this URL should be provided in the Jira Webhook configuration to propagate Jira events to Fluid. |
Update status from Jira | [Two-Way Updates] – Enables bidirectional synchronization of task statuses between Fluid and Jira. Any status change made in Fluid will be sent to Jira, and any status update in Jira will be reflected in the corresponding Fluid card. This ensures that statuses in both systems remain fully synchronized. Note: If this option is not enabled, status changes in Fluid will not be synced to Jira, and status updates in Jira will not be reflected in Fluid. |
Allow Delete in Jira | Allow Fluid to delete tasks in Jira. Not this is a destructive action. The Jira item will be permanently deleted and cannot be recovered. |
Delete Backlog Work items from Jira | When enabled, moving items to the Backlog in Fluid will automatically delete their linked Jira issues. If this option is not enabled, Jira issues remain unchanged and continue to be linked to the corresponding Fluid Backlog items. |
Create Backlog Tasks in Jira | When enabled, creating a Backlog task in Fluid will also create and link a corresponding issue in Jira. If this option is not enabled, Jira issues are only created and linked when the Fluid task is moved out of the Backlog. |
Skip First Column Create in Jira | When enabled, any task in Fluid created in the first column for the board will not be created and linked to a corresponding issue in Jira. If enabled these tasks will only be created and linked when the Fluid task is moved to a subsequent column on the board. |
Allow Attachments to be sync from Fluid to DevOps | When enabled will link attachments from the Fluid Item to Jira. Attachments are links back to Fluid to view/download. |
Sync item after create or link | Once a Fluid item is created on the board, it is immediately synchronized with Jira. There is no need to wait for the scheduled sync or to manually click "Sync Schedule" at the top of the board to update its properties. |
% Progress calculator | Task progress can be calculated based on the status of its child items using one of the following methods: Status Frequency Progress is determined by the ratio of completed child items to the total number of child items. Formula: Progress = Number of completed child items ÷ Total number of child items Points Based Progress is determined by the proportion of points associated with completed child items relative to the total points of all child items. Formula: Progress = Sum of points of completed child items ÷ Total points of all child items Duration Based Progress is determined by the proportion of planned duration of completed child items relative to the total planned duration of all child items. Formula: Progress = Sum of durations of completed child items ÷ Total duration of all child items |
Include parent item in % progress calculation | Decide whether the parent Jira item should be included in the progress calculation. If the parent task serves only as a container for subtasks, you may not want it to contribute to the calculation. Enabled: The parent item is included in the progress calculation. Disabled: Only leaf-level child items are considered when determining progress. This ensures that container tasks do not artificially inflate or skew progress metrics. |
Include "Relates To" items in % progress calculation | Determines whether "Relates To" Jira-linked issues are included in the calculation of subtask progress. Enabled: Both direct child subtasks and "Related To" Jira issues are considered. Disabled: Only direct child subtasks are used to calculate progress. |
Show Jira Status on Child Issues | The actual Jira status of each child issue is shown inline on the progress bar. |
Verbose Logging | Used when initially setting up, turn this on to see detailed messages in the event of issues communicating between Fluid and Jira. |
Status Mapping | Configure the status columns that will be mapped in Jira for when tasks statuses are being updated. |
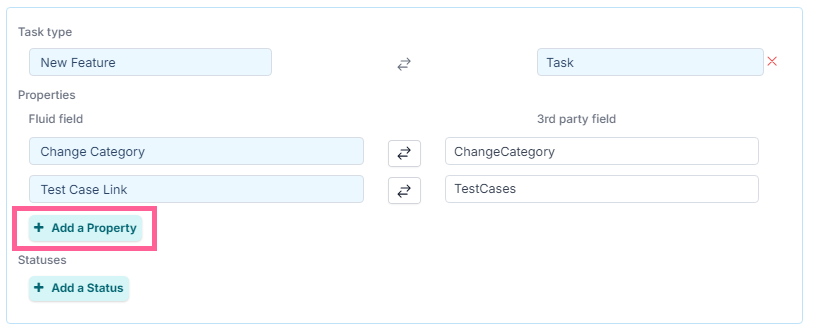
Task Types Mappings | Configure the task types that will be mapped to Jira. Only Tasks that have been configured and mapped will be used to integrate with Jira. |
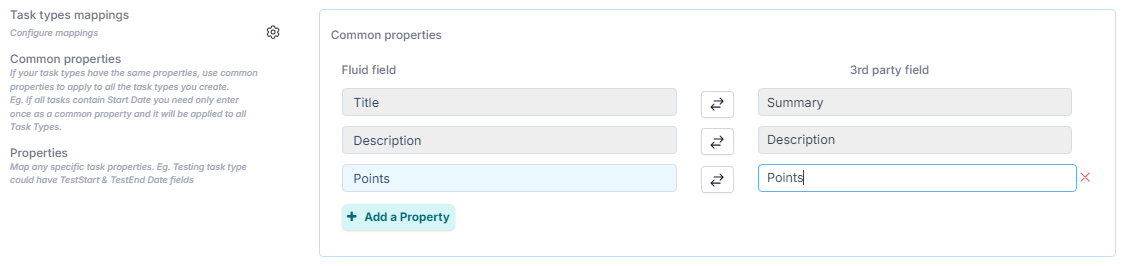
Common Properties | Configure which common properties will be associated with all mapped tasks to minimise duplication. The properties if defined will be sent downstream to Jira, on create and update of the fluid card. |
Task Properties | Configure specific properties for this task type only. Only properties mapped here will apply to the task in addition to the ones that have been defined as common. |
User PAT Token Generation
A user account is an account that is associated with a person. All users are allowed to create their own PATs, which will match their current permission level. To create the tokens, you may follow these steps:
Atlassian Jira cloud versions may vary in versions. As such the PAT token creation process may vary to the steps detailed below. For further information visit https://support.atlassian.com/jira-software-cloud/resources/
Jira’s OAuth2 API tokens and scopes are not currently supported. OAuth2 is a recently introduced authentication model in Jira, and we are actively working on adding support. In the meantime, integrations can only be configured using standard API tokens.
In your Atlassian application:
In Jira, select your profile picture at the top right of the screen, then choose Profile. Once you access your profile, Click on "Manage Your Account"
Select Security from the top menu

Scroll down and click on Create and Manage API tokens.
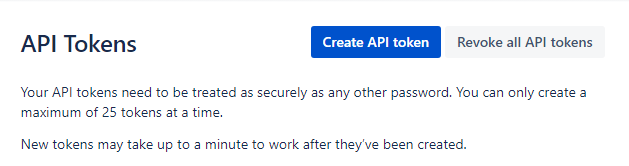
Click Create API Token
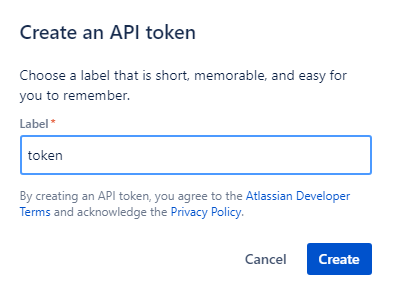
Give your new token a label name.
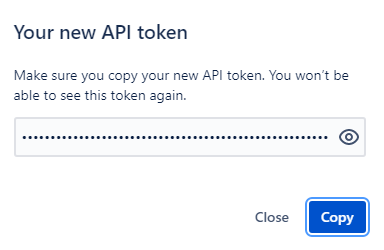
Keep this token secure, it will be used as part of the configuration process of your Fluid boards.
Service Account PAT Token Generation
A service account is an account that is not associated with a person. This means it doesn’t need a password to log in to your Atlassian organization.
You manage a service account lifecycle the same way you manage a user account. You can create and edit the account. You can also give the account app permissions, edit the details of the service account profile, and create credentials for the service account.
You’re able to create a service account in Atlassian Administration. You can assign app permissions to service accounts based on the app you select.
To create a service account:
Navigate to Administration admin.atlassian.com. Select an organization if you have more than one.
Select Directory > Service accounts.
Select Create a service account.
For the service account name, enter an alphanumeric name with 6 to 30 characters.
For the optional description, enter the name of an app that uses the account. eg. Fluid-Jira-Integration
Select the Jira app, this is the app we want to have access to and under Roles select the User role.

Select Create. Make note of the email address that is displayed, this is the username of this Service Account. When populating the username field of the Fluid integration config, this email address should be used.
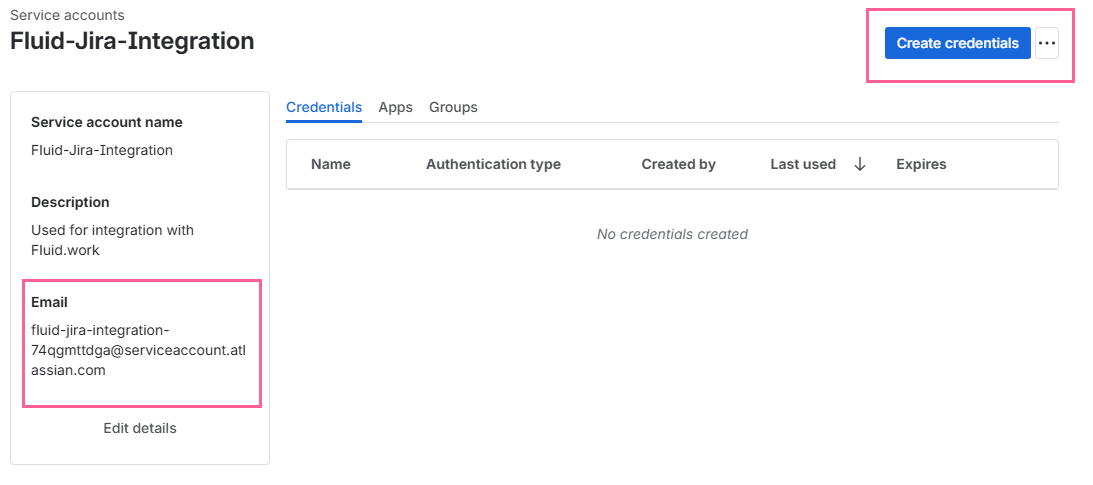
Click Create credentials
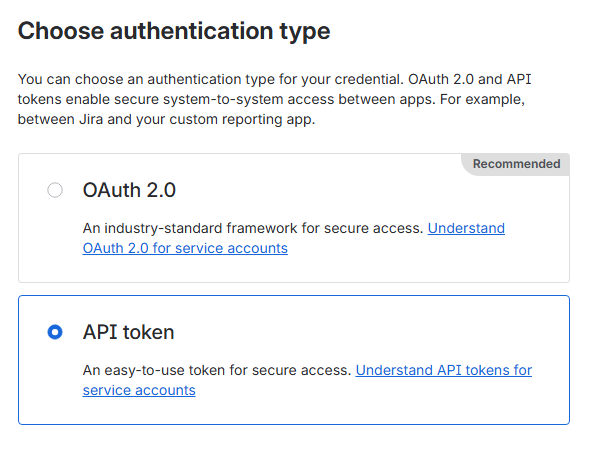
choose API token and click Next
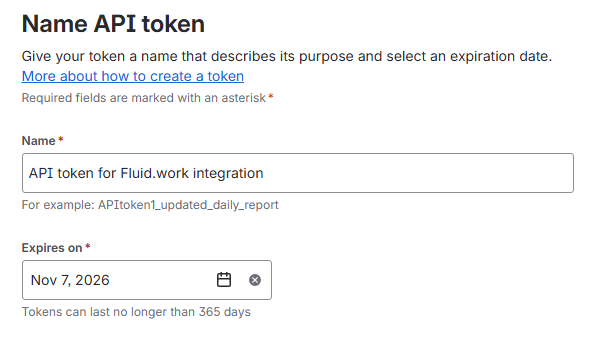
Enter a Name for the token and choose an Expires on date and click Next
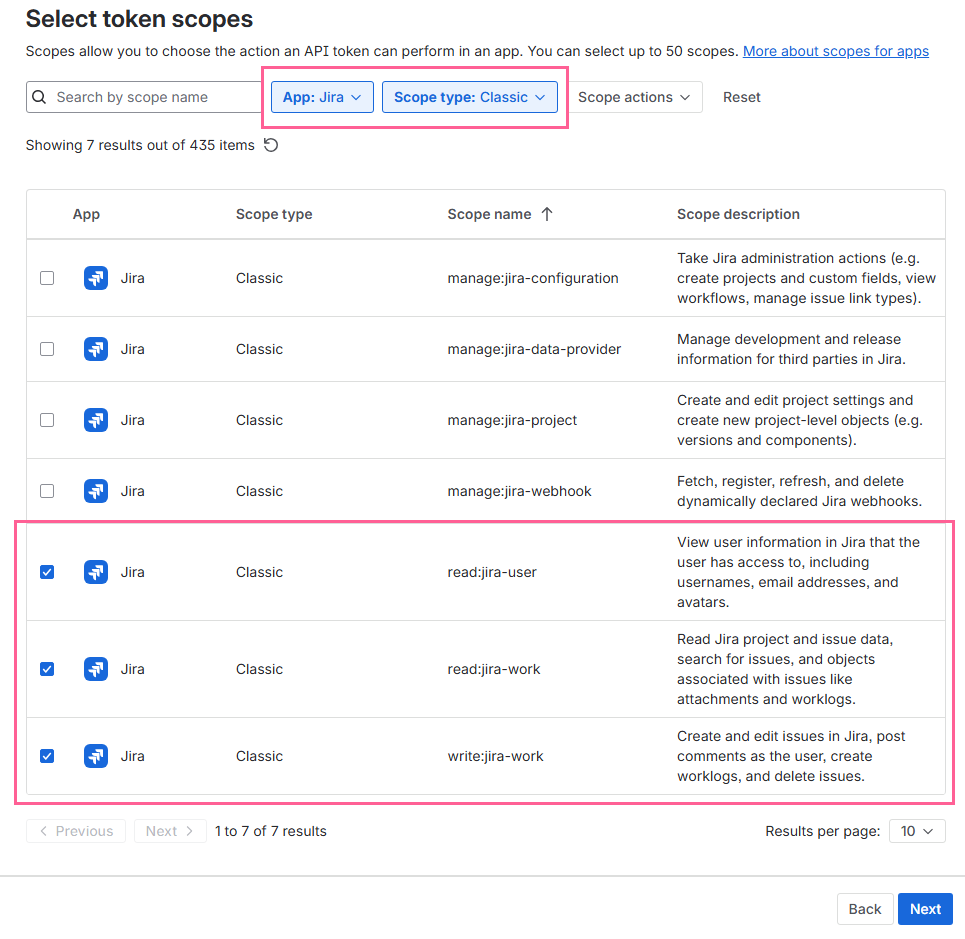
Under the App drop down list choose Jira and Scope type, choose Classic and click Next
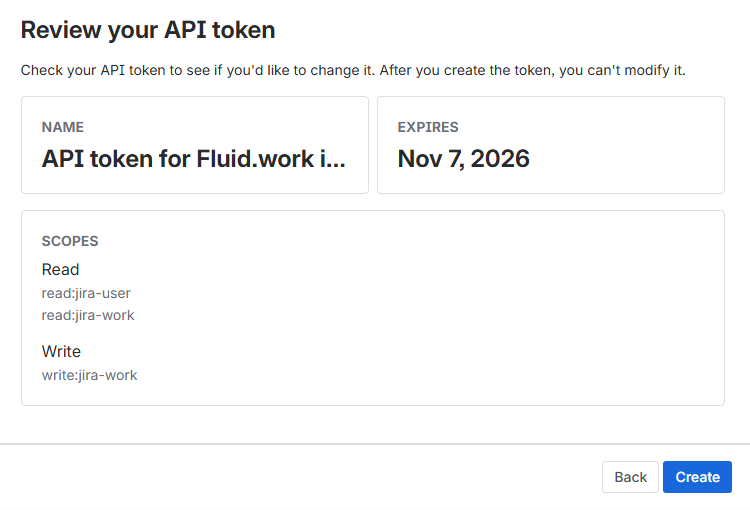
Click Create
Click Done

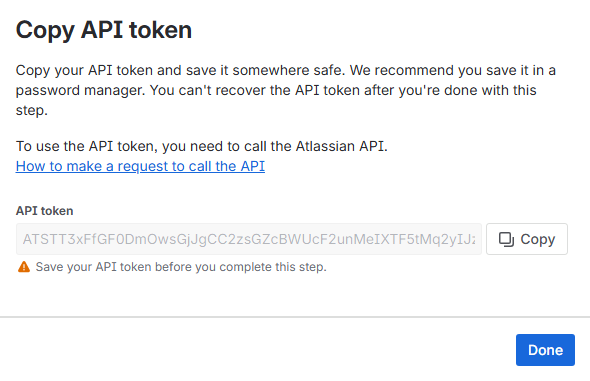
Click Copy to copy the PAT token to clipboard, save this in a secure location, you will need this later when setting up the Fluid integration later on in this guide. Click Done
Status Syncing

When enabled, this option controlled the behaviour of syncing status from Jira into fluid and vice versa. If this is enabled, it is considered a Two-Way syncing.
If Fluid status is changed this is pushed to jira and the item will be updated accordingly.
If Jira status is changed, when the configured synch job runs, the fluid card will be updated to match the status of the jira item.
Once synced, both items are matched in terms of their respective statuses based on the Status Syncing Mode (see below) and defined per the status mapping, see below "Status Mapping" section for more information.

When disabled, no status information will be sent as part of the jira item being created. Jira by default will create the jira item in its default status as defined for that task type within Jira itself. View your Jira configuration for each task type within the Jira application itself to know what default status is used.
Status Syncing Mode

If Status Sync is enabled, there will be a visible button as highlighted above that can be clicked to choose the Sync Mode you want to apply.
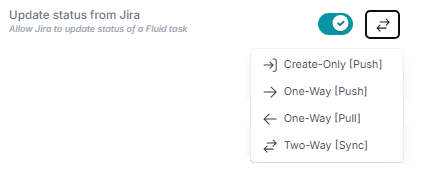
Create-Only [Push]
Fluid status is sent once and only on item create to Jira. Any subsequent changes in status in Fluid will not be reflected in Jira. You can continue to update the status in Fluid, and the status will appear changed in Fluid, but the linked item status in Jira will not be changed.
One-Way [Push]
Any change to the status in Fluid is sent to Jira. However, no status from Jira is pulled/updated back into Fluid. Use this if you intend Fluid to be the gold standard source of status data for the item.
One-Way [Pull]
Any change to the status for Jira item is pulled into Fluid and overrides the current status of the Fluid item, when sync occurs. Use this if you intend Jira to be the gold standard source of status for the item.
Two-Way [Sync]
The Fluid status and the Jira status are kept in sync. Any changes to Fluid are sent to Jira and vice versa any Jira changes to status are synced back into Fluid when the Sync process runs.
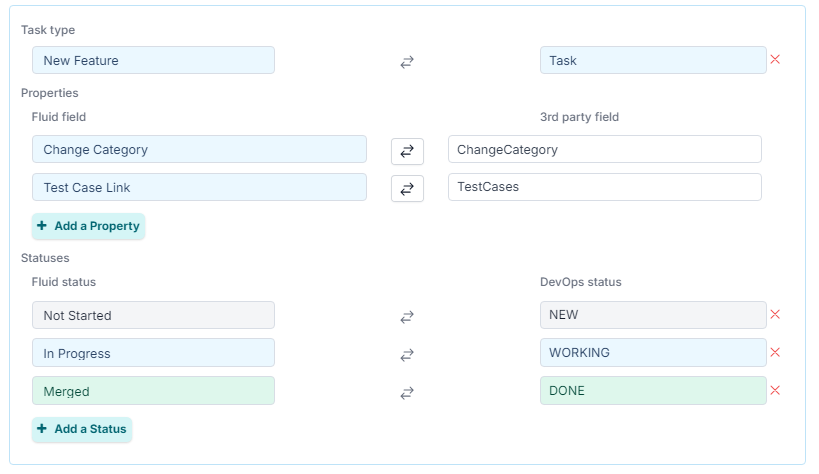
Status Mapping
In Fluid status columns for each board can be set up to move tasks as they progress through the agile workflow. It is important to map out which status columns should be included in Jira to ensure that when a task's status is updated in Fluid it is synced in Jira.

Note: If the statuses are not mapped out, the updates made in Fluid on the tasks will not be integrated to Jira.
Statuses can have a 1 : M ( 1 to Many ) relationship. for example "In Progress" and "Dev Complete" in fluid have been mapped to the same "In Progress" in Jira. In Addition, "Not Started" and "Returned" have both been mapped to "To Do" in jira.
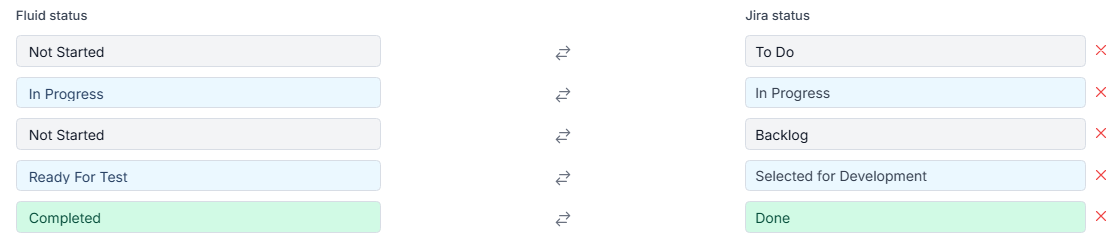
Note: The first row is coloured grey. This is to indicate this is the starting status for created items. The last row is coloured green to indicate this is the Final item status. All other statuses are coloured blue, by definition are considered an "In Progress" status.
Click on the [+ New Status Mapping ] to add a new row.

Select from a list of possible status options on the left.
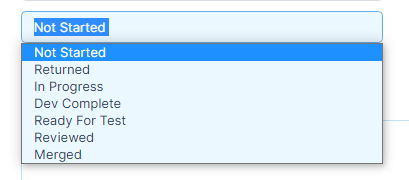
On the right hand side, type the name Status and the Fluid status should be applied to.

Click [ X ] to remove the row.
Common Properties
Configuring common properties provide the ability to establish properties that will apply consistency through out the task data that is streamlined in your workflow.
These properties are widely used and applied to multiple tasks which in turn reduces duplicated effort.
Only properties mapped will be sent to Jira.
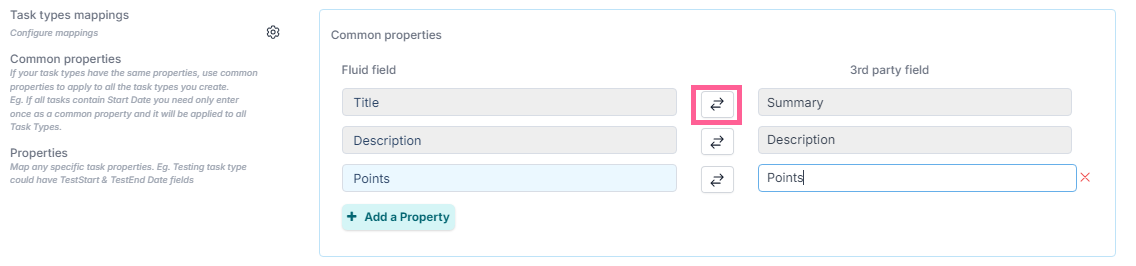
Common Properties Syncing Mode
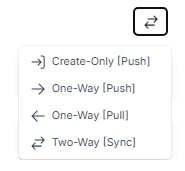
Create-Only [Push]
Fluid properties are sent once and only on item create to Jira. Any subsequent changes to properties in Fluid are not be reflected in Jira. You can continue to update properties in Fluid, and they will appear changed in Fluid, but the linked item properties in Jira will not be changed.
One-Way [Push]
Any changed properties in Fluid are sent to Jira. However, no properties from Jira are pulled/updated back into Fluid. Use this if you intend Fluid to be the gold standard source of properties for the item.
One-Way [Pull]
Any changed properties in Jira item are pulled back into Fluid and override the properties values of the Fluid item, when sync occurs. Use this if you intend Jira to be the gold standard source of properties for the item.
Two-Way [Sync]
The Fluid properties and the Jira properties are kept in sync. Any changes to Fluid are sent to Jira and vice versa, and any Jira changes to properties are synced back into Fluid when the Sync process runs.
Task Type
For each task that you want to create a Jira item in your workflow, the Task Type needs to be defined and mapped to the equivalent type in Jira.
If the a Fluid Task type is not mapped, then no corresponding item is created in Jira in the workflow.
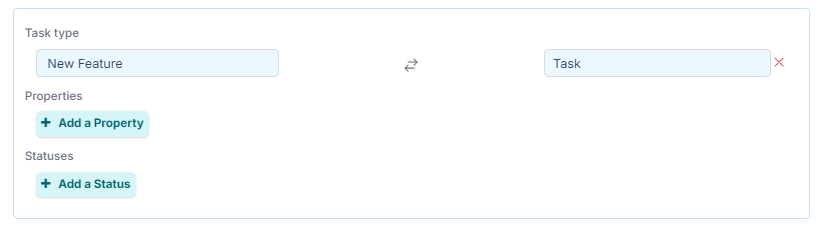
Task Type Properties
Task type properties provide additional reporting on the different types of activities that are carried out within a workflow. These relate specifically to this defined Task Type only.
If you have a property that is only set for a particular task type, then use this workflow. If you have a property that will be applied to all task types then use Common Properties as defined above. Common properties are included as a union set of properties for this task type.
Task Type Status
Task type status allows you to define any further specific status that only apply to this Task type. Note, you can still have Status mappings defined as mentioned previously in the Status mapping section of this document, but any status you define here at the Task Type level are in addition to the already defined Status mappings are are specific to this Task type only.
If you have already defined the mapping "Not Started"->"New", then adding a Task type status mapping of "In Progress"-> "Working" will mean for the Fluid Task type of New Feature, we have mapped Fluid "Not Started" and ""In Progress" mapped accordingly.
This allows you if you prefer to have completely different sets of statuses for each Task type, depending on how you have setup your status and rules in Jira.
Synchronising Fields from Jira into Fluid.
Each time a board task/card is updated, the changes are synced to the card on Jira.
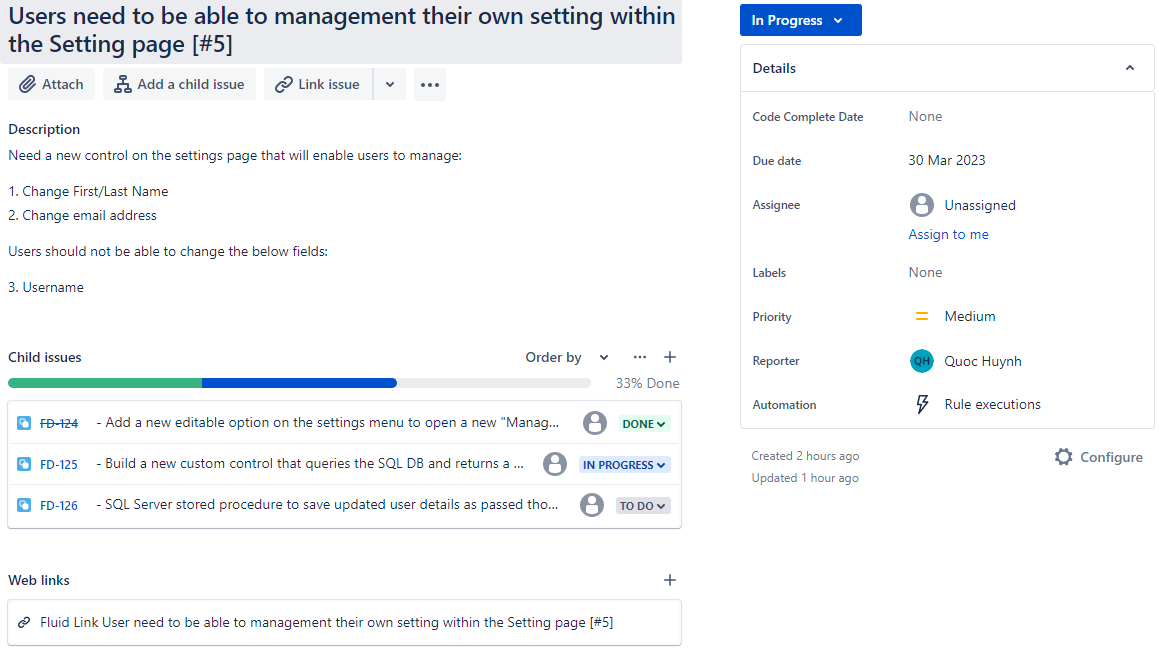
Below is an example of a card created on a fluid board and how it is represented in Jira.

This is the card created in jira as an issue.
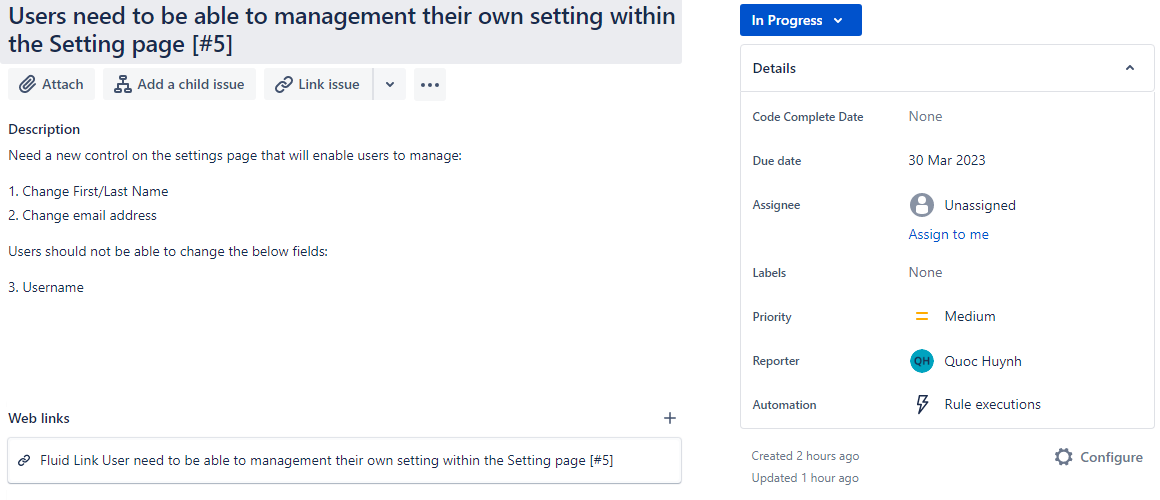
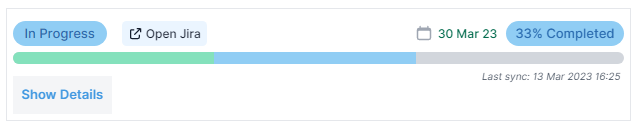
Clicking on the card in Fluid opens the edit dialog, the Integrations section is shown at the bottom of the board card where you can see the synchronisation of the jira item into fluid.
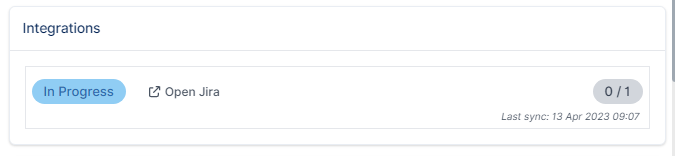
"In Progress" status shows the jira item is currently being worked on. You can click on the "Open Jira" option to view the actual item itself in jira.
"0/1" indicates there is 1 item associated with this integrations and 0 has been completed.
Note: You can manually start a synchronisation job by clicking on the "Sync Integrations" Button
located at the top of the board. This will manually run the job that fetches all the data from Jira. It is the same job that runs at the set frequency as defined in the earlier configuration.

To further illustrate, IT/Tech team has added 3 subtask in jira this parent item in the example below. This displays how IT/Tech team manages the jira issue themselves using their own agile methodology, outside of the Project Owner.
The 3 sub-tasks, are controlled by IT/Tech team, all fields are set by IT and IT is free to use these sub-task in any development methodology they so choose. As these SubTasks are updated by IT, the parent jira item is updated to show the change in subtasks status. IT has also put a Due Date on this parent item “30 Mar 2023”.
Note: It’s not a requirement of IT to use sub-tasks, they are free to work off of the parent jira issue and update it accordingly, use it in sprints etc. Subtasks are the recommended jira process of breaking a larger task into smaller components, that can be worked on separately and then roll up to a parent.
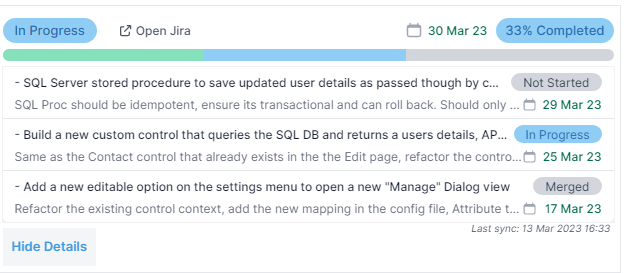
After the data has been synced. The below section on the action is displayed on the action edit dialog.
“In Progress” is the status of the jira item, clicking on “Open Jira” will link you directly to the jira item in a new browser tab.
The “30 Mar 23” is the due date that has been set on the jira item itself. This is NOT the Due Date of the Fluid item.
“33% complete” indicates the percentage of completed subtasks / total subtasks. The bar shows you a progress bar of how much work is left before complete, Green is “Completed”, Blue is “In Progress”, Grey is “Not Started”
Clicking on “show details” will show you an expanded view and you can see all the subtask assigned, a title/description, status and due date for each subtask
The Project Owner has visibility over the work and IT/Tech team itself, they can see that the IT/Tech team are 33% complete on this work and that current due dates align.
IT/tech team added the tasks into their sprint cycle and did the development within their own processes without having to change how they run as a team. The Project Owner also didn’t need to chase the IT tech lead for updates, the Project Owner can see this on the card/action itself.