Build a custom report template using Word or PowerPoint
In this article we will learn how to build a custom project report template in Word or PowerPoint.
How do templates work?
Templates contain a mix of regular text and binding elements. When a template is exported from a project, each binding element is replaced with the corresponding project data. As the binding elements do not represent a specific project, the same report template can be applied to any project.
Binding elements are identified by curly brackets { }, for example {Project.Name}. The object name before the dot identifies the data source, and the property name after it identifies the specific field.
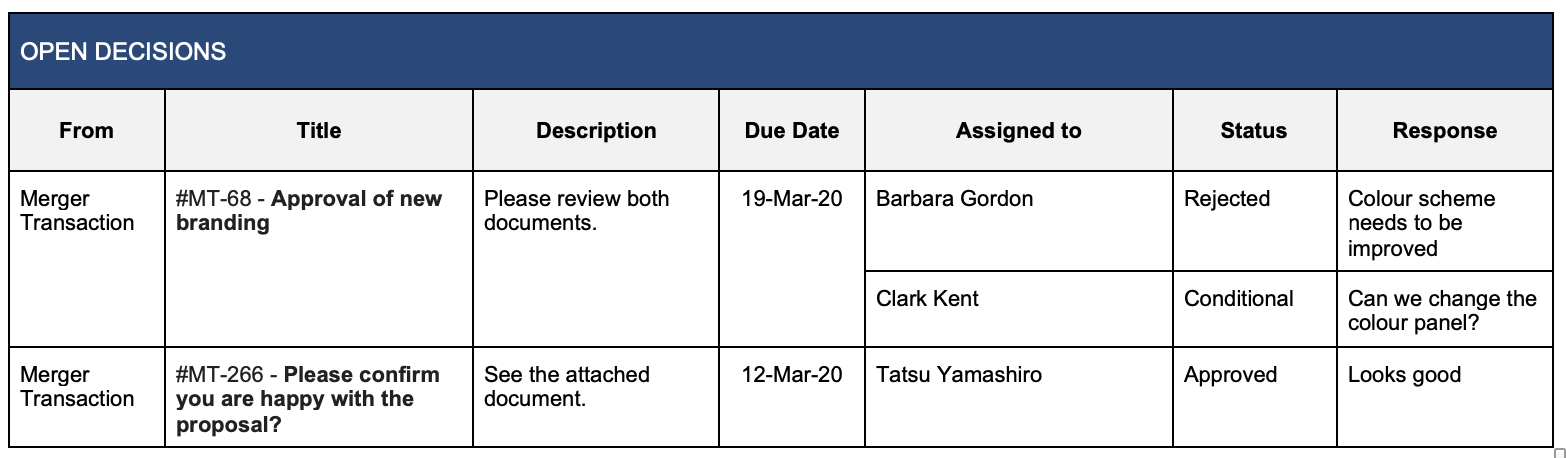
Here is an example of a template table that contains binding elements:
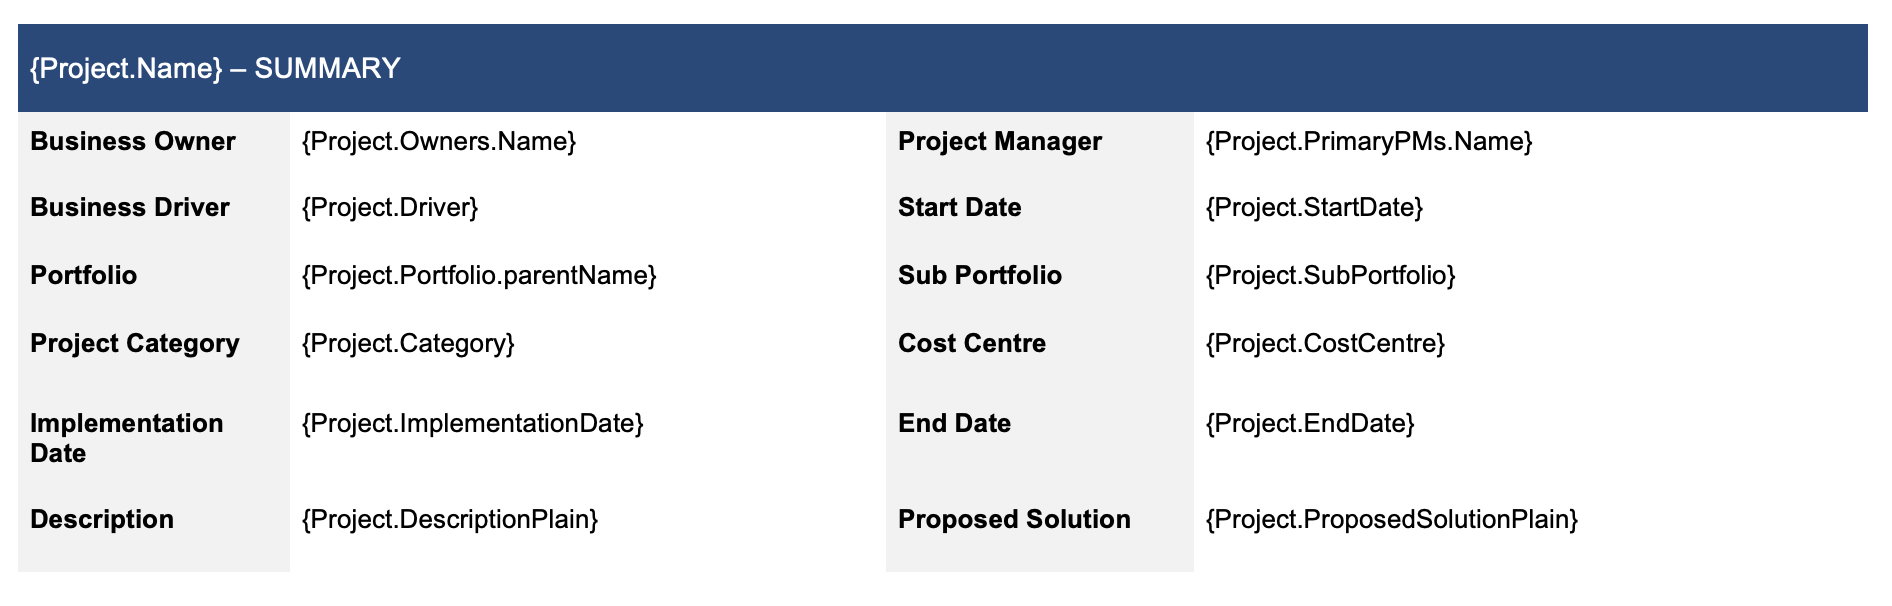
When the template is exported for a project(s), the binding elements are replaced by the values of the project metadata values that they represent.
Here is an example of output using the template table example above:
Word or PowerPoint?
The instructions given in this article apply to both Word and PowerPoint templates unless otherwise stated.
Deciding on whether using Word or PowerPoint is largely down to preference, although there are some advantages of each:
Word: Content flows automatically across pages, making it better suited to reports with tables containing large amounts of data.
PowerPoint: Gives greater flexibility for sub-project content, but does not create a new slide for content if a slide overflows, therefore you may need to adjust the layout of the generated output if this happens.
General Rules
Templates are built using binding elements that reference specific project data attributes in Fluid.
Curly brackets { } are used to identify binding elements.
Naming Conventions
The main object names used to retrieve project data include:
Project - Project metadata values
StatusReportThis - Status Report values
Schedule - Table that list Schedule items
Craid - Table that lists Impacts
Outgoingdep & Incomingdep - Table that list outgoing and incoming dependencies respectively
Subproject - Table that lists linked Subprojects on parent report
Actions - Table that list Actions and Decisions
QualitativeBenefit & QuantitativeBenefit - Table that lists Qualitative and Quantitative benefits respectively
QualitativeCost & QuantitativeCost - Table that lists Qualitative and Quantitative costs respectively
ProjectFinancials - Rolled up financial reporting values for a project
ProjectFinancialsByExpenseType - Table that lists a detailed breakdown of financial expense types for a project
Single Value Properties
For objects that return a single value, access properties by appending the property name directly to the object name.
For example:
{Project.Name} returns the project name; {StatusReportThis.Strapline} returns the status report strapline.
You are essentially saying: Give me the property value 'Name', for the object 'Project'.
List Properties (Tables)
For objects that return a list (schedule tasks, impacts, dependencies etc), a table must be used to iterate through the items. The table must have a header row, and the first cell of that row must contain the binding element for the list object, prefixed with @ to indicate that it is an iterative list item. For example, {@Schedule} to iterate through all schedule tasks.
The next row defines which properties to display. In a schedule table, for example, {Title} returns the title of each task. There is no need to prefix the property with the object name within the table rows as the table has already been defined as a list of project schedule tasks.
When the template is exported, one row is generated per item in the list e.g one row per schedule task.
Filtering Table Results
You can apply filters to table elements to return a subset of the available list items by appending them directly after the binding element in square brackets with a 'caret' symbol after the opening bracket and before the first filter name [^ ].
There should be no spaces between the binding element curly brackets and the filter square brackets.
As an example, if you want to return only the project's risks and issues that have a RAG status Amber or Red, you can do so by using the following syntax:
{@craid}[^Type=Risk,Issue && Rag=Red,Amber].
Operators
The following comparison operators are supported:
= equals
!= does not equal
< less than
> greater than
The && operator can be used to list more than one property that you want to filter by.
A comma ',' will allow you to list multiple values of a property that you want to filter by.
Date Filters
Date filters can compare against Today or a fixed date in yyyyMMdd format.
Examples:
[^DueDate<Today] returns items with a due date in the past; [^DueDate>20200518] returns items due after 18 May 2020.
Limiting the Number of Rows
Use [Rows(n)] to cap the number of rows returned, replacing 'n' with a number.
For example, the following returns up to four milestones that are not yet started or in progress:
{@Schedule}[^TaskType=Milestone&&Status=Not Started,In Progress][Rows(4)]
Sorting Table Results
Use [SORTBY(PropertyName)] to sort results. By default this sorts in ascending order (some dates my be an exception).
To specify direction, include Asc or Desc after the property name with a space:
[SORTBY(Title)] - ascending by title
[SORTBY(Activity.Name Desc,Title Asc)] - descending by activity name, then ascending by title
Binding Element | Ordered By |
Actions and Decisions {@actions} | 1. Principal name (ascending) |
Impacts (Risk, Issues etc) {@craid} | 1. Project name (ascending) |
Schedule Tasks {@schedule} | 1. Gantt order (ascending) |
Sub-projects {@subproject} | 1. Sub-project start date (ascending) |
Dependencies - Outgoing & Incoming {@outgoingdep , @incomingdep} | 1. Principal name (ascending) |
Benefits & Ongoing Costs (@qualitativebenefit, @quantitativebenefit, @qualitativecost, @quantitativecost) | No default sorting order. |
Rich Text Formatting (Word Templates Only)
By default, text properties return plain text. To preserve rich formatting (bullet points, bold, font changes) in Word templates, remove the word Plain from the binding element and append [RICH]:
{Project.DescriptionPlain} - returns plain text
{Project.Description}[RICH] - returns formatted text
Rich Formatting will pull through to word templates. If you would like your word template to pull through the rich formatting you have used in fluid you need to remove the word "Plain" from the binding element and add [RICH] after the binding element.
For e.g. {Project.DescriptionPlain} will return the description in plain format, if you would like your report to pull through the bullet points, bold, font changes then you need to use the following binding element {Project.Description}[RICH]
[RICH] can also be used in conjunction with table property values.
Uploading Templates
Once your template is ready, upload it to make it available:
All projects: upload to Reporting Templates page (system administrator access required). The template will appear on all projects and watchlist pages.
Specific project: upload to the Documents section of the project workspace and set the 'document type' to Dashboard Template. The template will appear alongside global templates in the export dialog for that project.
For guidance on how to upload and manage your templates in the 'Reporting Templates' page, click this link.
You can see examples on how to use the binding elements in the templates attached to the bottom of this article.
Binding Elements
In the following sections, you will find details of some of the key areas of project data and the corresponding binding elements which you can use to pull the project data points into your custom report exports.
1. Exporting Project Details
The object name to use to export the project details and meta-data is Project.
The format of the binding element for a project property therefore is {Project.PropertyName}
The table below lists the properties that can be used to retrieve the project information.
Property | Binding Element |
Project Title | {Project.Name} |
Project External Reference | {Project.ExternalReference} |
Project ID | {Project.Id} |
Project Short Code | {Project.ShortCode} |
Project Type | {Project.ProjectType} |
Project Status | {Project.Status} |
Project Category | {Project.Category} |
Project Funding Source | {Project.FundingSource} |
Project Methodology | {Project.Methodology} |
Project Start Date | {Project.StartDate} |
Project End Date | {Project.EndDate} |
Project Implementation Date | {Project.ImplementationDate} |
Project Percentage Complete (Progress %) | {Project.ProjectInfo.PercentageComplete}% |
Primary PMs | {Project.PrimaryPMs.Name} |
Project Owners | {Project.Owners.Name} |
Project Business Owners | {Project.BusinessOwners.Name} |
Project Executives | {Project.Executives.Name} |
Project Portfolio | {Project.Portfolio.parentName} |
Project Sub Portfolio | {Project.SubPortfolio} |
Project Funding Source | {Project.FundingSource} |
Project Cost Centre | {Project.CostCentre} |
Project Tier | {Project.Tier} |
Project Custom Property | {Project.ExtProperties.CustomPropertyName} |
Parent Project | {Project.ParentProject.Name} |
Program the project belongs to | {Project.Program.Name} |
Project Description(*) | {Project.DescriptionPlain} |
Project Proposed Solution(*) | {Project.ProposedSolutionPlain} |
Project Requirements(*) | {Project.RequirementsPlain} |
(*)Note that the bindings elements for the project description, proposed solution and requirements return the plain text with no formatting.
Exporting Project Phases
If you need to export the project phases, you need to use a table to embed the binding elements as each project can have a different number of phases. The first cell of the table must contain {@ActivityPhases} element to indicate that the table should list all phases. Phases only have two properties:
{Phase} - the name of the phase
{StartMonth} - the month and year the phase starts on.
{EndMonth} - the month and year the phase finishes on.
{Order} - the phase order number.
Here is an example on how to export the project phases:

Exporting Project Custom Properties
The syntax to export project custom properties is as follows: {Project.ExtProperties.CustomPropertyName}.
As an example, if the name of a custom property is 'Program Delivery Lead', then its corresponding binding element is: {Project.ExtProperties.Program Delivery Lead}.
2. Exporting Project Status Data
You can use the binding elements to retrieve the details of the current status report as well as the previous status report.
Prefix the status report properties with {StatusReportThis.-} to retrieve the information of the latest status report
Prefix the status report properties with {StatusReportLast.-} to retrieve the information of the previous status report
The table below lists the properties that can be used to retrieve the status report details. The table shows the properties for the current status report but just change the prefix of the binding elements to StatusReportLast if you need the previous status report data.
Property | Binding Element |
Status Report Date | {StatusReportThis.ReportDate} |
Status Report Current RAG | {StatusReportThis.RAGStatus} |
Status Report Strapline | {StatusReportThis.Strapline} |
Status Report Executive Summary | {StatusReportThis.ExecutiveSummaryPlain} |
Status Report Achievements(*) | {StatusReportThis.AchievementsPlain} |
Status Report Next Steps(*) | {StatusReportThis.NextStepsPlain} |
Status Report Custom Properties | {StatusReportThis.ExtProps.CustomPropertyName} |
Status Report's Component RAGs commentaries (aggregates the commentaries of component RAGs that have been set to Amber or Red) | {StatusReportThis.PathToGreenForNonGreenRAGs} |
(*)Note that the bindings elements for the status report achievements and next steps return the plain text with no formatting.
Exporting the project status component RAGs
There are two ways of exporting the project status component RAGs.
The first option is to use a table to iterate through the component RAGs. The benefits of using this approach is that you do not have to explicitly name the component RAGs in the binding elements and therefore the template does not need to be updated should the component RAG names change.
When creating a table to export the component RAGs data,
the first cell of the header column must start with either {@StatusReportThis.ComponentRags} or {@StatusReportLast.ComponentRags} to indicate that the table should iterate though the current or previous status report component RAG data.
any of the below binding elements can then be used.
Property | Binding Element |
Component RAG Name | {Key} |
Component RAG Status | {Value} |
Component RAG Strapline | {Commentary} |
Component RAG Path To Green Date | {GreenDate} |
Component RAG Owner | {Name} |
Component RAG Linked Risk/Issue Title | {CraidName} |
Component RAG Linked Risk/Issue Mitigation | {Mitigation} |
Here is an example of a table returning component RAG data:

Few things to note in the above example:
In the first cell,
StatusReportThis indicates that this data should be for the most recent status report.
The filter [^Value=Red,Amber] indicates that only component RAGs that are amber or red should be returned.
The next row specifies which properties of the component RAGs should be retrieved.
In the case of the RAG value property, it is possible to apply the value as the cell background colour, i.e. display the cell with a red background colour if the RAG is red. To do so, you need to append [BK_COLOR] immediately after the binding element with no space in between, e.g. {Value}[BK_COLOR].

Use {Value}[BK_COLOR_RAG] to set the background color, while writing the full Rag text into the cell e.g. Green.

The second option to export the project status component RAGs is to explicitly reference the component RAGs to retrieve their value. For instance, if Financials is one of the project status component RAG, you can retrieve its properties by using {StatusReportThis.ComponentRags.Financials.PropertyName}.
The list of properties that can be used is detailed in the table below. Name represents the name of the component RAG. {StatusReportThis} can be replaced by {StatusReportLast} if needed.
Property | Binding Element |
Component RAG Status | {StatusReportThis.ComponentRags.Name.Value} |
Component RAG Strapline | {StatusReportThis.ComponentRags.Name.Commentary} |
Component RAG Path To Green Date | {StatusReportThis.ComponentRags.Name.GreenDate} |
Component RAG Owner | {StatusReportThis.ComponentRags.Name.OwnerPerson.Name} |
Component RAG Linked Risk/Issue Title | {StatusReportThis.ComponentRags.Name.CraidName} |
Component RAG Linked Risk/Issue Mitigation | {StatusReportThis.ComponentRags.Name.Mitigation} |
3. Exporting Project Schedule Tasks
A table must be used to export schedule tasks.
The first cell of the table must start with {@Schedule}.
The following binding elements can be used to retrieve schedule task data.
Property | Binding Element |
Schedule Task Title | {Title} |
Schedule Task Short Code | {ShortCode} |
Schedule Task Type | {TaskType} |
Schedule Sub Types | {SubType} |
Schedule Task Description(1) | {DescriptionPlain} |
Schedule Task Start Date | {StartDate} |
Schedule Task End Date | {DueDate} |
Schedule Task Effort | Schedule Task |
Schedule Task Alternate Date | {AlternateDate} |
Schedule Task Baseline Start Date | {BaselineStartDate} |
Schedule Task Baseline End Date | {BaselineDueDate |
Schedule Task Priority | {Priority} |
Schedule Task Status | {Status} |
Schedule Task Percent Complete | {PercentComplete} |
Schedule Task Current Status RAG | {Rag} |
Schedule Task Current Status Strapline | {Strapline} |
Schedule Task Current Status Date | {StatusDate} |
Schedule Task Previous Status RAG | {PreviousRag.RagStatus} |
Schedule Task Previous Status Strapline | {PreviousRag.Strapline} |
Schedule Task Previous Status Date | {PreviousRag.Created} |
Schedule Task status updates (all)(2) | {AllStatusUpdates} |
Schedule Task assignees | {Owner.Name} |
Schedule task custom properties | {ExtProps.CustomPropertyName} |
Schedule task document links | {AttachedDocumentDetails} |
Project the schedule task belongs to | {Activity.Name} |
(1)This is the plain description with no formatting.
(2){AllStatusUpdates} returns the date and the status update strapline for all status updates. The list is displayed in the reverse chronological order.
Here is an example of a table returning schedule tasks data.

Exporting the Gantt image
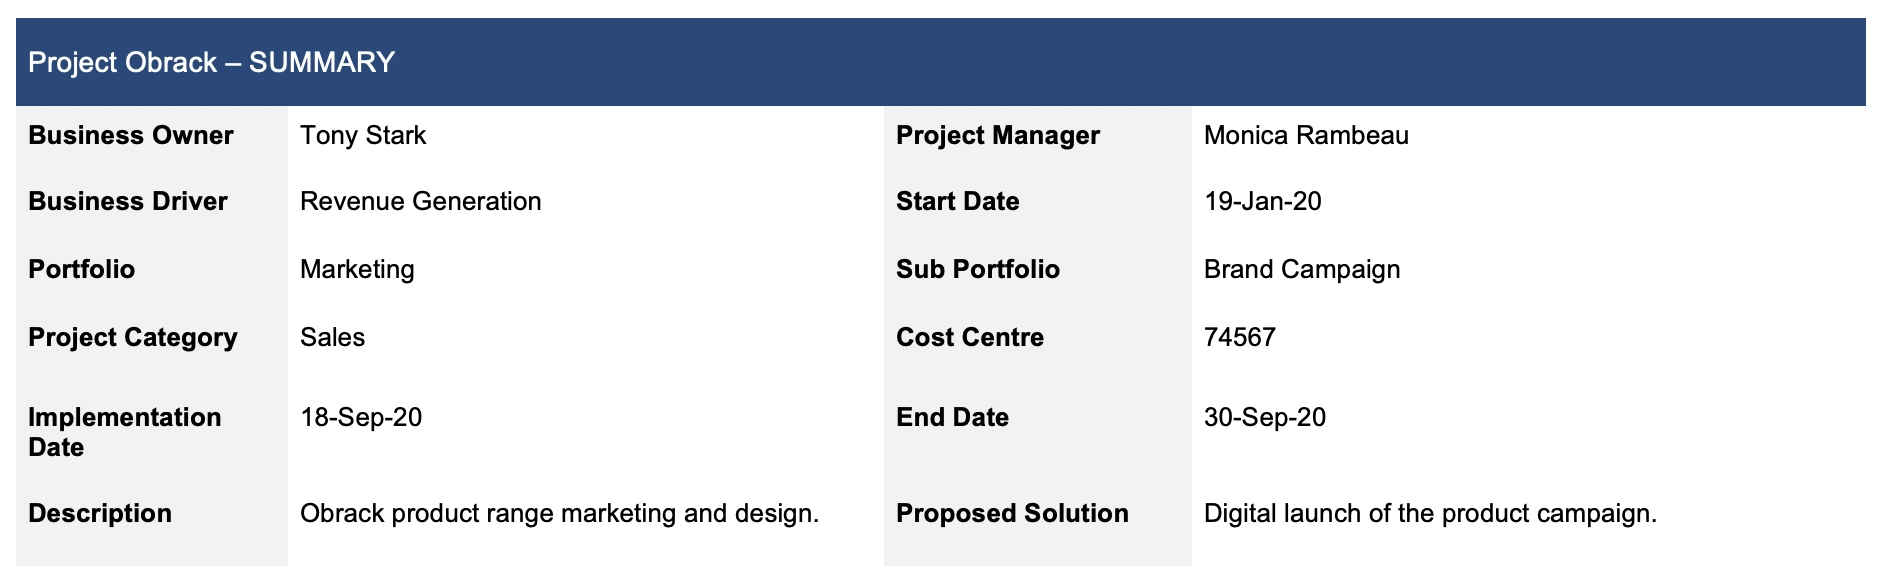
You can also include an image of the Gantt chart.
To do so, you need to use the fooling binding element in a table: IMAGE_SCHEDULE. The Gantt image will then render all the schedule tasks that have been set to PROMOTED.
The below images show an example of a template using the image binding element and how it renders when exported from a project.

4. Exporting Project Impacts
Exporting project impacts is very similar to exporting schedule tasks. A table must be used to iterate through the project impacts.
The first cell of the table must start with {@Craid}.
The following binding elements can be used to retrieve impact data.
Property | Binding Element |
Impact Title | {Title} |
Impact Short Code | {ShortCode} |
Impact Type | {Type} |
Impact Sub Type | {SubType} |
Impact Description(1) | {DescriptionPlain} |
Impact Due Date | {DueDate} |
Impact Resolution Date | {ResolutionDate} |
Impact Severity | {Impact} |
Impact Probability | {Probability} |
Risk Rating | {RiskRating} |
Impact Status | {Status} |
Impact Mitigation(1) | {MitigationPlain} |
Impact current status RAG | {Rag} |
Impact current status strapline | {Strapline} |
Impact current status date | {StatusDate} |
Impact previous status RAG | {PreviousRag.Rag} |
Impact previous status strapline | {PreviousRag.Strapline} |
Impact status updates (all)(2) | {AllStatusUpdates} |
Impact owner | {Owner.Name} |
Impact custom properties | {ExtProps.CustomPropertyName} |
Impact document links | {AttachedDocumentDetails} |
Project the Impact belongs to | {Activity.Name} |
(1)This is the plain description with no formatting.
(2){AllStatusUpdates} returns the date and the status update strapline for all status updates. The list is displayed in the reverse chronological order.
Below is an example of a table returning only risks and issues.
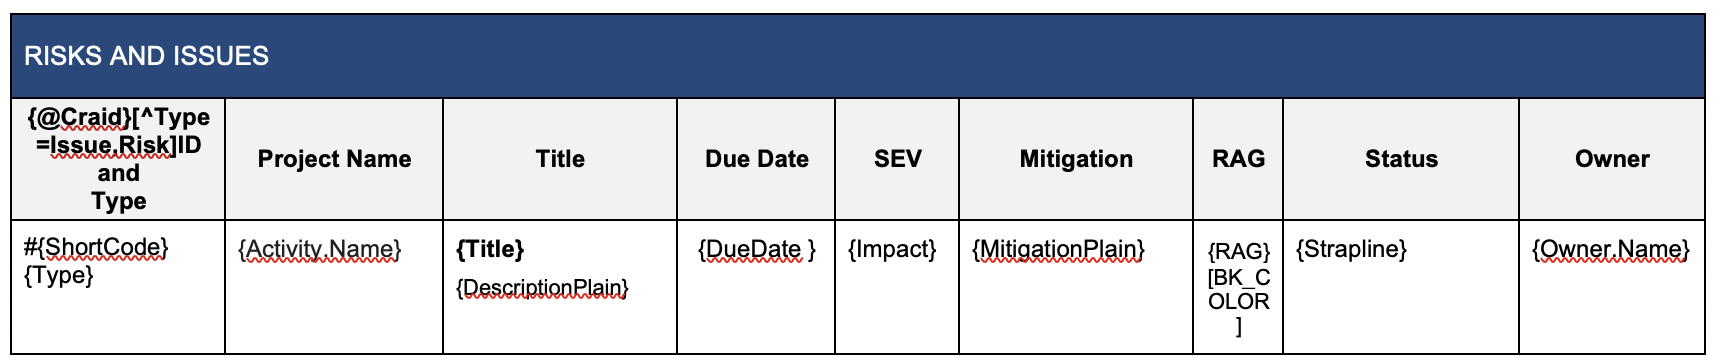
5. Exporting Project Incoming and Outgoing Dependencies
A table must again be used to export incoming or outgoing dependencies.
The first cell of the table must start with {@OutgoingDep} to iterate though the project outgoing dependencies.
Use {@IncomingDep} to iterate though the project incoming dependencies.
The following binding elements can then be used to retrieve the outgoing or incoming dependency properties.
Property | Binding Element |
Dependency Title | {Title} |
Dependency Short Code | {ShortCode} |
Dependency Description(1) | {DescriptionPlain} |
Dependency Due Date | {DueDate} |
Dependency Impact | {Impact} |
Dependency Status | {Status} |
Dependency current status RAG | {Rag} |
Dependency current status strapline | {Strapline} |
Dependency current status date | {StatusDate} |
Dependency status updates (all)(2) | {AllStatusUpdates} |
Dependency owner | {Owner.Name} |
Dependency custom properties | {ExtProps.CustomPropertyName} |
For Outgoing Dependencies | |
Project the Dependency belongs to | {Activity.Name} |
Project the Dependency is on | {DependencyOn} |
For Incoming Dependencies | |
Project the Dependency is from | {Activity.Name} |
(1)This is the plain description with no formatting.
(2){AllStatusUpdates} returns the date and the status update strapline for all status updates. The list is displayed in the reverse chronological order.
The image below gives an example on how to use these properties.
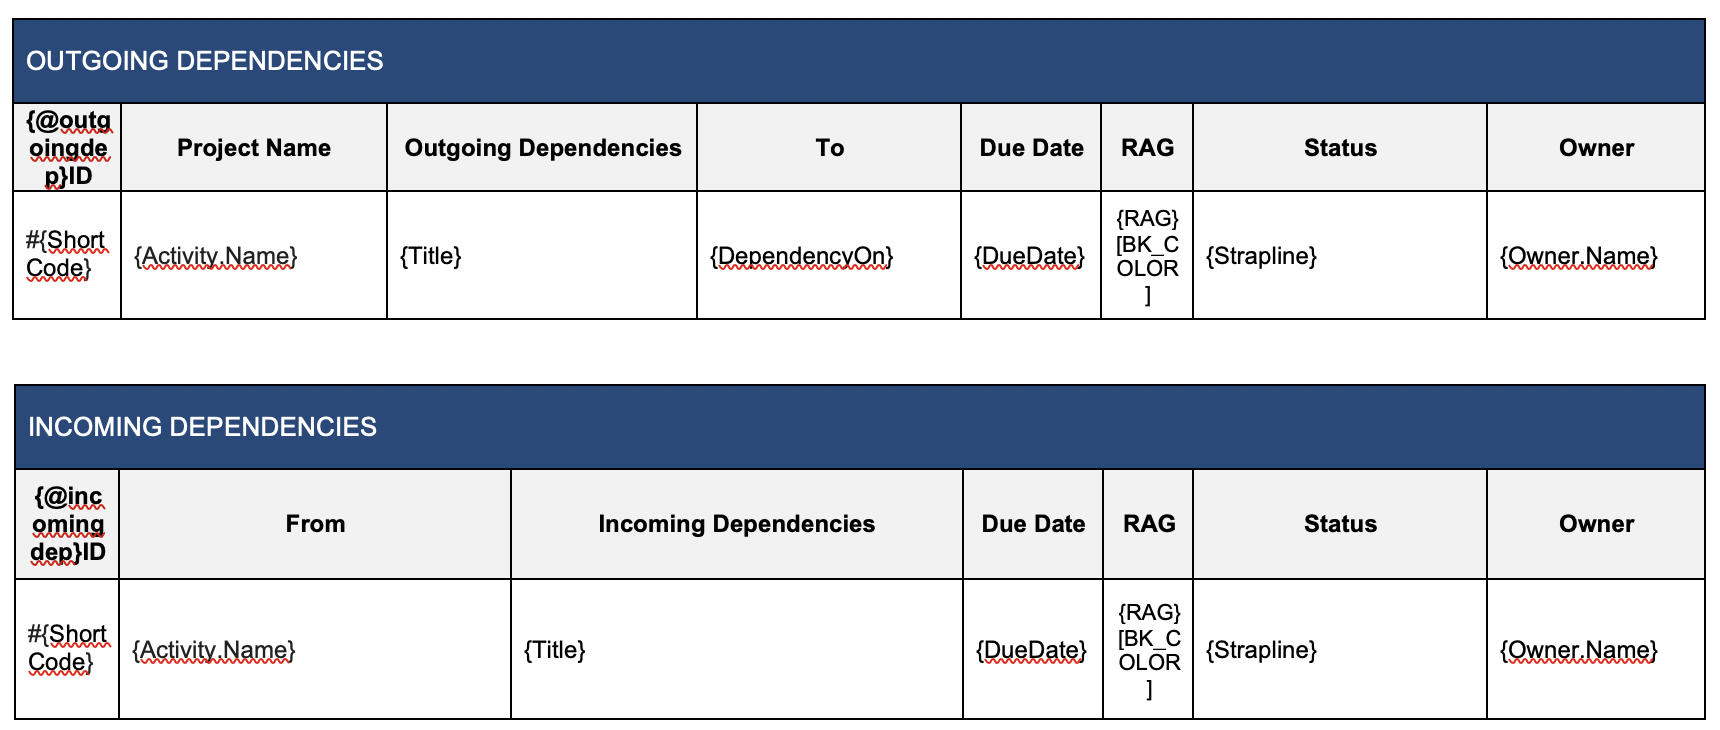
6. Exporting Project Financials
The object name to use to export project financials is ProjectFinancials.
The format of the binding element for a project property therefore is {ProjectFinancials.PropertyName}
The table below lists each financial value available for extract with the following info for each:
Input vs. System: Whether the value is a manually entered value or whether it is a value generated by Fluid based of other input values and configuration.
Binding element: The string to use in the reporting template to populate the required value out of Fluid.
Property | Description | Input vs. System | Binding element | |
Current Financial Year | The current financial year. | Input | {ProjectFinancials.CurrentFinancialYearValue} | |
Current Financial Year Start | The start date of the current financial year. | Input | {ProjectFinancials.CurrentFinancialYearStartValue} | |
Current Financial Year End | The end date of the current financial year. | Input | {ProjectFinancials.CurrentFinancialYearEndValue} | |
PROJECT FUNDING | ||||
A | Project Funding | The overall budget for the project duration. | Input | {ProjectFinancials.FundingAmountReleasedValue} |
B | Project Funding (Capex) | Capital Expenditure on the overall budget. | Input | {ProjectFinancials.FundingAmountReleasedCapexValue} |
C | Project Funding (Opex) | Operating Expenses on the overall budget. | Input | {ProjectFinancials.FundingAmountReleasedOpexValue} |
D | Life to Date Project Funding | Budget released for the project since the project inception up to the end of the current financial year. | Input | {ProjectFinancials.LifeToDateFundingAmountValue} |
E | Life to Date Project Funding (Capex) | Capital Expenditure on the life to date budget. | Input | {ProjectFinancials.LifeToDateFundingAmountCapexValue} |
F | Life to Date Project Funding (Opex) | Operating Expenses on the life to date budget. | Input | {ProjectFinancials.LifeToDateFundingAmountOpexValue} |
G | Current Year Project Funding | Current financial year budget. | Input | {ProjectFinancials.CYFundingAmountValue} |
H | Current Year Project Funding (Capex) | Capital Expenditure on the current financial year budget. | Input | {ProjectFinancials.CYFundingAmountCapexValue} |
I | Current Year Project Funding (Opex) | Operating Expenses on the current financial year budget. | Input | {ProjectFinancials.CYFundingAmountOpexValue} |
TOTAL PROJECT COST | ||||
J | Life to Date Actuals | Sum of the project actuals since the project inception up to the lock date in the current financial year. | System | {ProjectFinancials.LifeToDateActualsValue} |
K | Life to Date Actuals (Capex) | Capital Expenditure on life to date actuals. | System | {ProjectFinancials.LifeToDateCapexActualsValue} |
L | Life to Date Actuals (Opex) | Operating Expenses on life to date actuals. | System | {ProjectFinancials.LifeToDateOpexActualsValue} |
M | Prior Year Actuals | Sum of actuals since the project inception up to the start of the current financial year. | System | {ProjectFinancials.PriorYearActualsValue} |
N | Future Years Forecast | Forecast amount from the end of the current financial year up to the end of the project. | System | {ProjectFinancials.FutureYearsForecastValue} |
O | Estimated Project Cost at completion | Life to Date Actuals (J) + Current Year Forecast (Y) + Future Years Forecast (N). | System | {ProjectFinancials.TotalProjectEACValue} |
P | Remaining budget | Project Funding (A) - Life to Date Actuals (J). | System | {ProjectFinancials.FullFundingVFullActualsValue} |
Q | Remaining budget (Capex) | Project Funding (Capex) (B) - Life to Date Actuals (Capex) (K). | System | {ProjectFinancials.FullFundingVFullCapexActualsValue} |
R | Remaining Budget (Opex) | Project Funding (Opex) (C) - Life to Date Actuals (Opex) (L). | System | {ProjectFinancials.FullFundingVFullOpexActualsValue} |
S | Percentage of budget spent | Life to Date Actuals (J) / Life to Date Project Funding (D) | System | {ProjectFinancials.FundingSpentPercentValue} |
T | Percentage of budget spent (Capex) | Life to Date Actuals (Capex) (K) / Life to Date Project Funding (Capex) (E) | System | {ProjectFinancials.FundingSpentPercentCapexValue} |
U | Percentage of budget spent (Opex) | Life to Date Actuals (Opex) (L) / Life to Date Project Funding (Opex) (F) | System | {ProjectFinancials.FundingSpentPercentOpexValue} |
CURRENT FINANCIAL YEAR PROJECT COST | ||||
V | Current Year Approved Forecast | The amount formally approved to be spent on the project in the current financial year. | Input | {ProjectFinancials.CYApprovedForecastValue} |
W | Current Year Actuals | Actuals for the current financial year up to the lock date. | System | {ProjectFinancials.YTDCashActualValue} |
X | Current Year Actuals (Capex) | Capital Expenditure on current year actuals. | System | {ProjectFinancials.YTDCapActualValue} |
Y | Current Year Actuals (Opex) | Operating Expenses on current year actuals. | System | {ProjectFinancials.YTDOpexActualValue} |
Z | Current Year Forecast | Sum of project forecast for all open months in current financial year. | System | {ProjectFinancials.ROYCashForecastValue} |
AA | Current Year Forecast (Capex) | Capital Expenditure on current year forecast. | System | {ProjectFinancials.ROYCapForecastValue} |
AB | Full Year Forecast | Current Year Actuals (W) + Current Year Forecast (Z). | System | {ProjectFinancials.CYCashEACValue} |
AC | Full Year Forecast (Capex) | Current Year Actuals (Capex) (X) + Current Year Forecast (Capex) (AA). | System | {ProjectFinancials.CYCapEACValue} |
AD | Current Year Capex Percentage | The percentage of capex amount. | System | {ProjectFinancials.TotalCapPercentFYValue} |
AE | Current Year Amort Actuals | Amortisation amount based on current year actuals (W). | System | {ProjectFinancials.YTDAmortActualValue} |
AF | Current Year Remaining Amort Forecast | Amortisation amount based on current year actuals (Z). | System | {ProjectFinancials.ROYAmortForecastValue} |
AG | Full Year Amort Forecast | Current Year Amort Actuals (AE) + Current Year Amort Forecast (AF). | System | {ProjectFinancials.CYAmortEACValue} |
AH | Current Year Project Expense | Current Year Actuals (W) - Current Year Actuals (Capex)(X). | System | {ProjectFinancials.YTDProjectExpActualValue} |
AI | Current Year Remaining Net Cost Forecast | Current Year Forecast (Z) - Current Year Forecast (Capex) (AA). | System | {ProjectFinancials.ROYProjectExpForecastValue} |
AJ | Current Year Net Cost Expected at Completion | Full Year Forecast (AB) less Full Year Forecast (Capex) (AC). | System | {ProjectFinancials.CYProjectExpEACValue} |
PROFIT & LOSS | ||||
AK | Current Year P&L Actuals | Current Year Actuals (W) - Current Year Actuals (Capex)(X) + Current Year Amort Actuals (AE). | System | {ProjectFinancials.YTDPandLActualValue} |
AL | Current Year P&L Forecast | Current Year Forecast (Z) - Current Year Forecast (Capex)(AA) + Current Year Remaining Amort Forecast (AF). | System | {ProjectFinancials.ROYPandLForecastValue} |
AM | Current Year P&L Full Year Forecast | Full Year Forecast (AB) - Full Year Forecast (Capex)(AC) + Full Year Amort Forecast (AG). | System | {ProjectFinancials.CYPandLExpEACValue} |
CURRENCY | ||||
Default currency | Financials default currency | Input | {ProjectFinancials.CurrencyCode} | |
Below is an example on how to export project financials data.
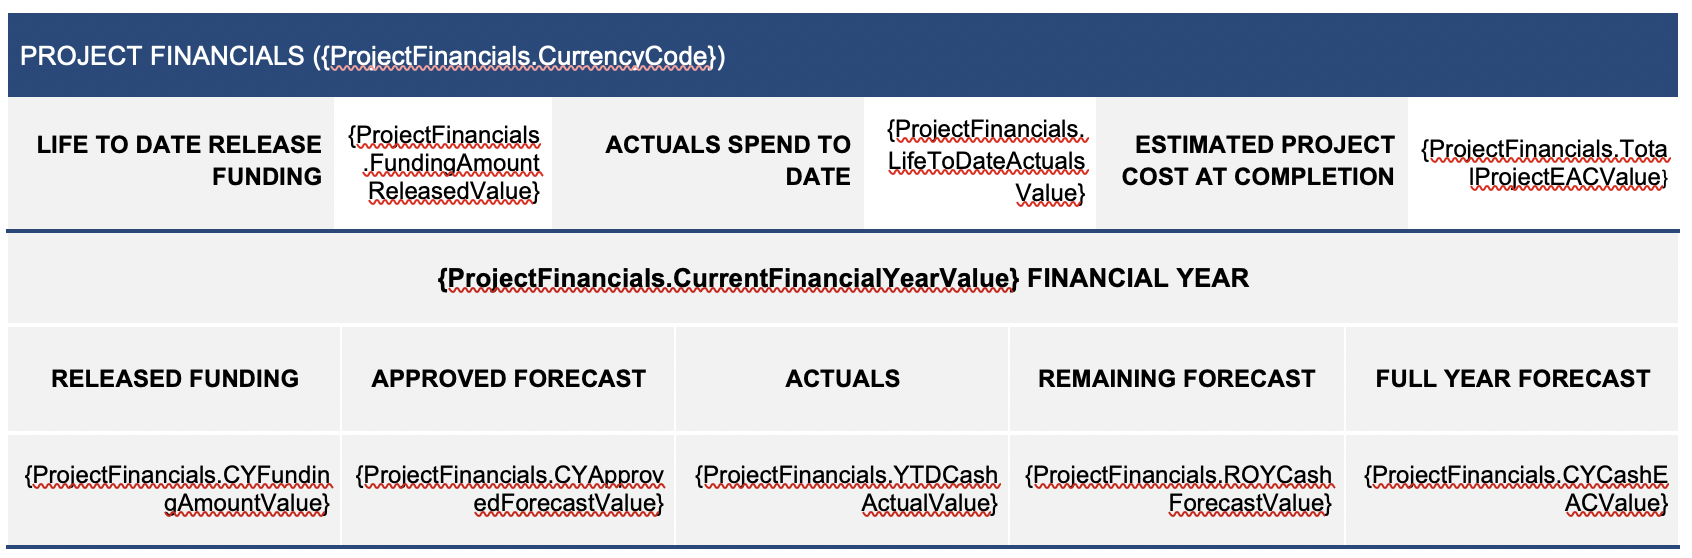
7. Exporting Project Benefits
You can export both quantitative and qualitative benefits. To do so, you need to use separate tables with the following elements:
{@QualitativeBenefit} to display the list of qualitative benefits.
{@QuantitativeBenefit} to display the list of quantitative benefits.
The list of benefit properties that can be exported are listed in the table below.
Property | Binding Element |
Benefit Title | {Title} |
Benefit Id | {Id} |
Benefit Type (quantitative or qualitative) | {Type} |
Benefit Sub Type | {SubType} |
Benefit Description(*) | {DescriptionPlain} |
Benefit Start Date | {StartDate} |
Benefit current status RAG | {RagStatus} |
Benefit current status strapline | {Strapline} |
Benefit owner | {Owner.Name} |
Benefit Owner Status | {OwnerStatus} |
Benefit custom properties | {ExtProperties.CustomPropertyName} |
For Quantitative Benefits | |
Quantitative Benefit Year 0 | {DataYearWise.0.Year} |
Quantitative Benefit Year 0 Amount | {DataYearWise.0.Value} |
Quantitative Benefit Year 1 | {DataYearWise.1.Year} |
Quantitative Benefit Year 1 Amount | {DataYearWise.1.Value} |
Quantitative Benefit Year 2 | {DataYearWise.2.Year} |
Quantitative Benefit Year 2 Amount | {DataYearWise.2.Value} |
Quantitative Benefit Year 3 | {DataYearWise.3.Year} |
Quantitative Benefit Year 3 Amount | {DataYearWise.3.Value} |
Quantitative Benefit Year 4 | {DataYearWise.4.Year} |
Quantitative Benefit Year 4 Amount | {DataYearWise.4.Value} |
Quantitative Benefit Year 5 | {DataYearWise.5.Year} |
Quantitative Benefit Year 5 Amount | {DataYearWise.5.Value} |
Quantitative Benefit Total Amount | {TotalValue} |
(*)This is the plain description with no formatting.
You can see examples on how to export qualitative and quantitative benefits below.
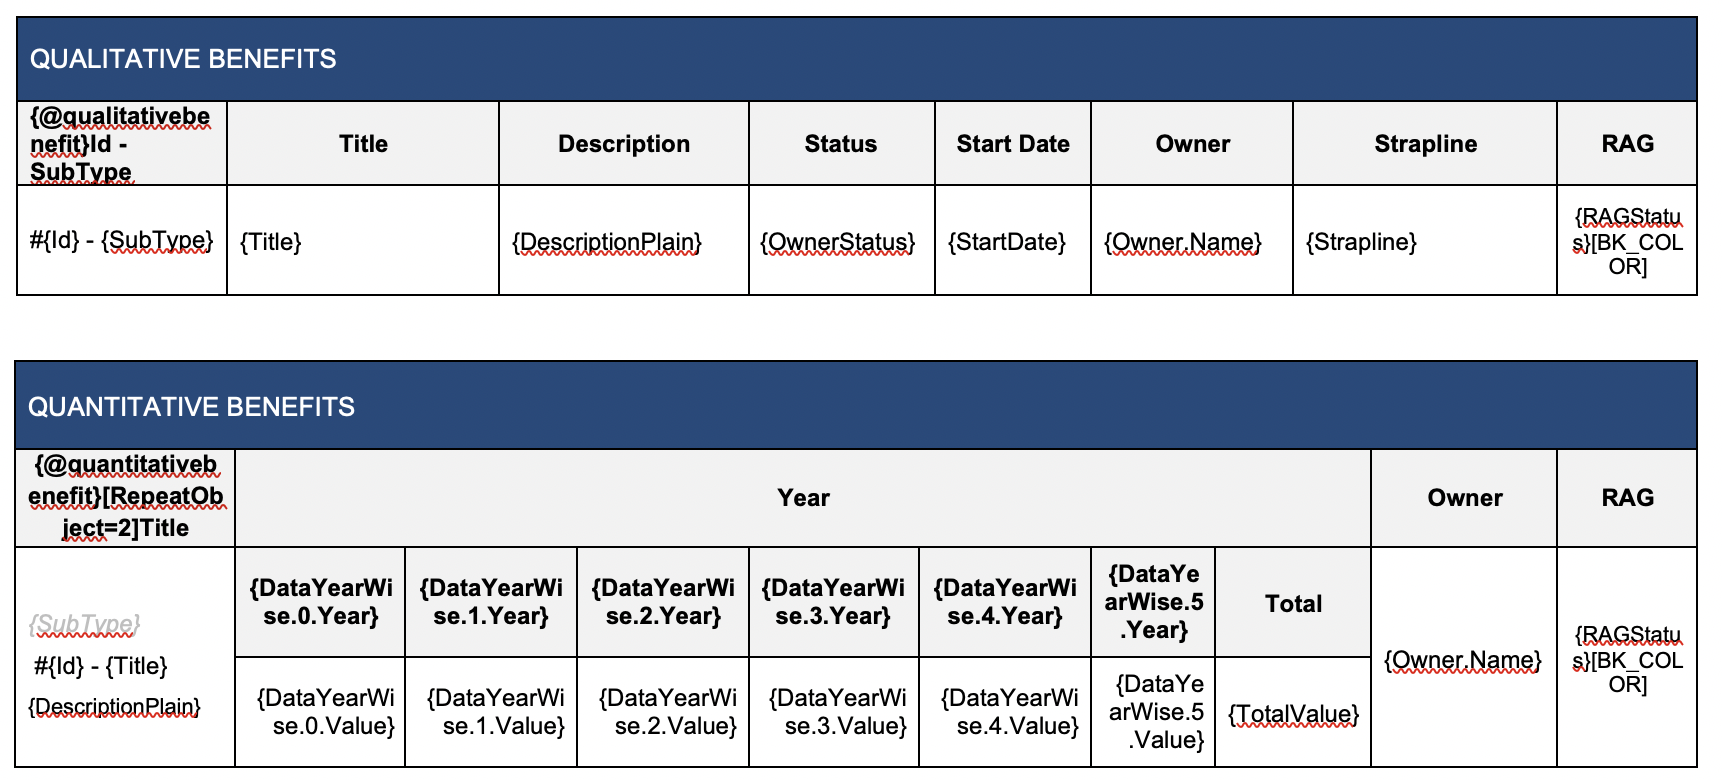
8. Exporting Project Ongoing Costs
Exporting ongoing costs works in the same as as exporting benefits. You need to use separate tables with the following elements:
{@QualitativeCost} to display the list of qualitative ongoing costs.
{@QuantitativeCost} to display the list of quantitative ongoing costs.
The list of ongoing costs properties that can be exported are listed in the table below.
Property | Binding Element |
Ongoing Cost Title | {Title} |
Ongoing Cost Id | {Id} |
Ongoing Cost Type (quantitative or qualitative) | {Type} |
Ongoing Cost Sub Type | {SubType} |
Ongoing Cost Description(*) | {DescriptionPlain} |
Ongoing Cost Start Date | {StartDate} |
Ongoing Cost current status RAG | {RagStatus} |
Ongoing Cost current status strapline | {Strapline} |
Ongoing Cost owner | {Owner.Name} |
Ongoing Cost Owner Status | {OwnerStatus} |
Ongoing Cost custom properties | {ExtProperties.CustomPropertyName} |
For Quantitative Ongoing Costs | |
Quantitative Ongoing Cost Year 0 | {DataYearWise.0.Year} |
Quantitative Ongoing Cost Year 0 Amount | {DataYearWise.0.Value} |
Quantitative Ongoing Cost Year 1 | {DataYearWise.1.Year} |
Quantitative Ongoing Cost Year 1 Amount | {DataYearWise.1.Value} |
Quantitative Ongoing Cost Year 2 | {DataYearWise.2.Year} |
Quantitative Ongoing Cost Year 2 Amount | {DataYearWise.2.Value} |
Quantitative Ongoing Cost Year 3 | {DataYearWise.3.Year} |
Quantitative Ongoing Cost Year 3 Amount | {DataYearWise.3.Value} |
Quantitative Ongoing Cost Year 4 | {DataYearWise.4.Year} |
Quantitative Ongoing Cost Year 4 Amount | {DataYearWise.4.Value} |
Quantitative Ongoing Cost Year 5 | {DataYearWise.5.Year} |
Quantitative Ongoing Cost Year 5 Amount | {DataYearWise.5.Value} |
Quantitative Ongoing Cost Total Amount | {TotalValue} |
(*)This is the plain description with no formatting.
9. Exporting Project Actions and Decisions
The complexity in exporting action and decision data is due to the varying number of assignees actions and decisions may have. Actions and decisions are represented differently depending on whether they have one or more assignees and therefore different binding elements need to be used.
As it is not possible to filter actions and decision based on their number of assignees, the table used to return action data must support both types of actions and decisions if you want to export the assignee names and the action or design status.
Let's first look at the binding elements that can be used for actions and decisions.
Property | Binding Element |
Action / Decision Title | {Title} |
Action / Decision Id | {Id} |
Action / Decision ShortCode | {ShortCode} |
Action / Decision Type | {Type} |
Action / Decision Description(*) | {DescriptionPlain} |
Action / Decision Due Date | {DueDate} |
Action / Decision Priority | {Priority} |
Action / Decision current status RAG | {ItemLatestStatus.Rag} |
Action / Decision current status strapline | {ItemLatestStatus.Strapline} |
Action / Decision current status date | {ItemLatestStatus.StatusDate} |
Action document links | {AttachedDocumentDetails} |
For action and decision with a single assignee | |
Action / Decision Assignee | {AssignedTo.Name} |
Action / Decision Status | {Status} |
Action / Decision Response(*) | {ResponseCommentPlain} |
For action and decision with multiple assignees | |
Action / Decision Assignee | {Children.AssignedTo} |
Action / Decision Status | {Children.Status} |
Action / Decision Response(*) | {Children.ResponseCommentPlain} |
(*)This is the plain description with no formatting.
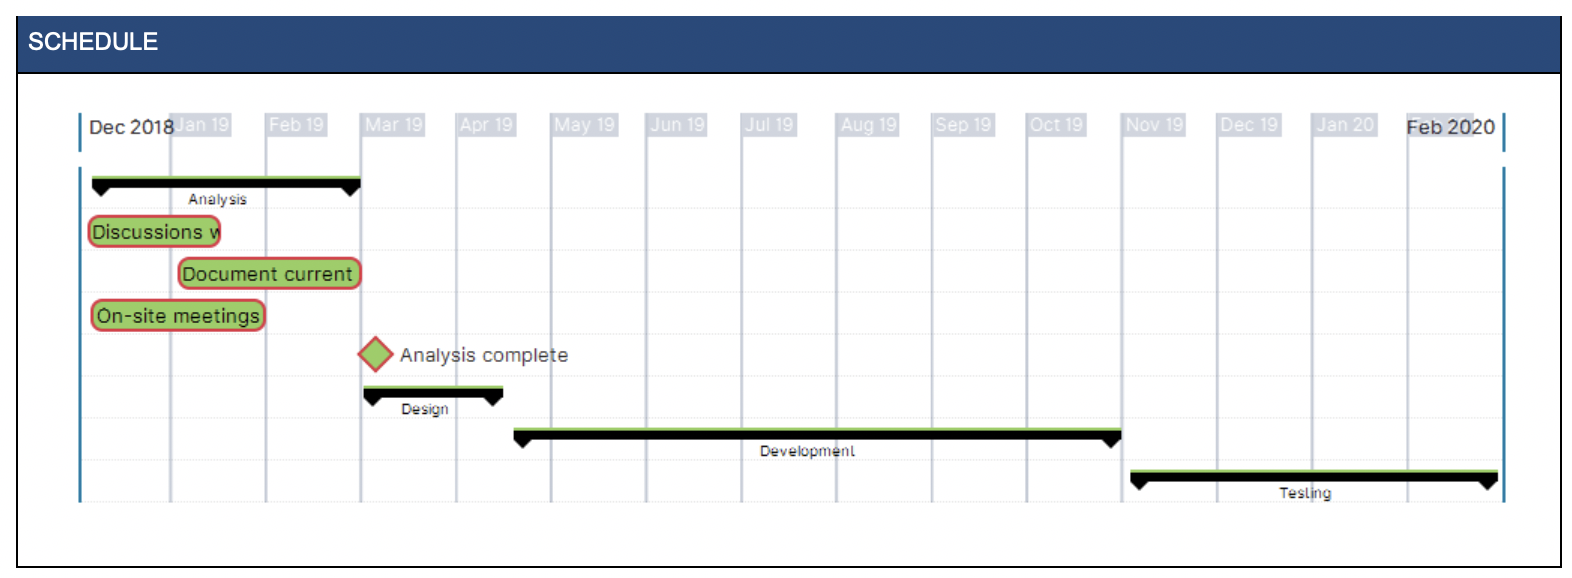
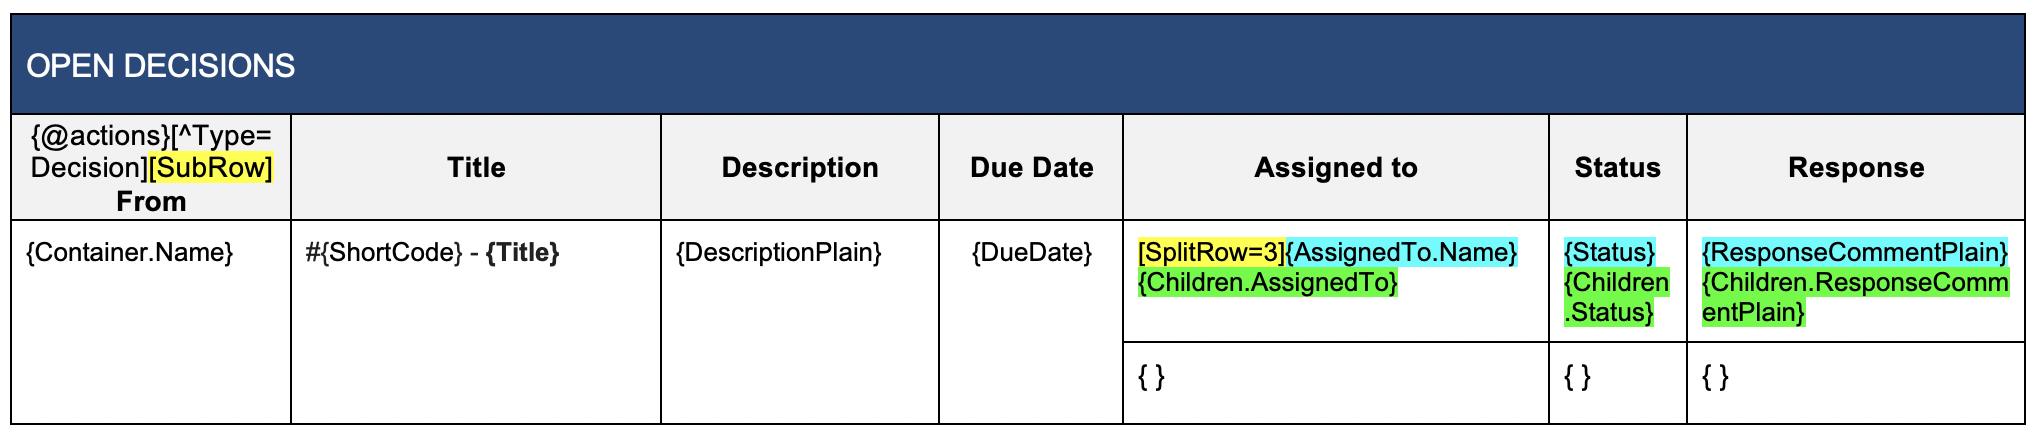
Now let's look at how to build a table that returns decisions with the list of assignees and the response of each assignee.
The following examples of how the tables are built to return decisions apply Word & PowerPoint templates.
Word template
PowerPoint template

A few points to note from the above examples:
Elements in the first cell of the header row:
The first cell of the header row starts with {@actions} to indicate that the table should return actions and decisions data.
The filter element [^Type=Decision] then indicates that only decisions should be exported.
Finally, [SubRow] element needs to be added to indicate that the decision assignee and response should be returned.
The columns containing the assignee names, status and response must be consecutive and the cells need to be split in two rows.
The order of these columns does not matter but the fist column must indicate how many columns are used to return assignee data. In the above example, [SplitRow=3] indicates that the next three columns are used to export the response of the decision assignees. If you decided to return only the assignee name and status, then you would need to specify [SplitRow=2].
You then need to use the binding elements for both single assignee and multiple assignee actions as highlighted in blue and green in the above example.
Finally, {} on the second row indicates where rows will be inserted in the case of multiple assignees. This final step only applies for Word Templates.
The image below shows an example of how the decision data is exported using the above template.