
October 2025 Release Notes
30th October Release (v. 16.3.32841)
New - Hierarchical Custom Properties
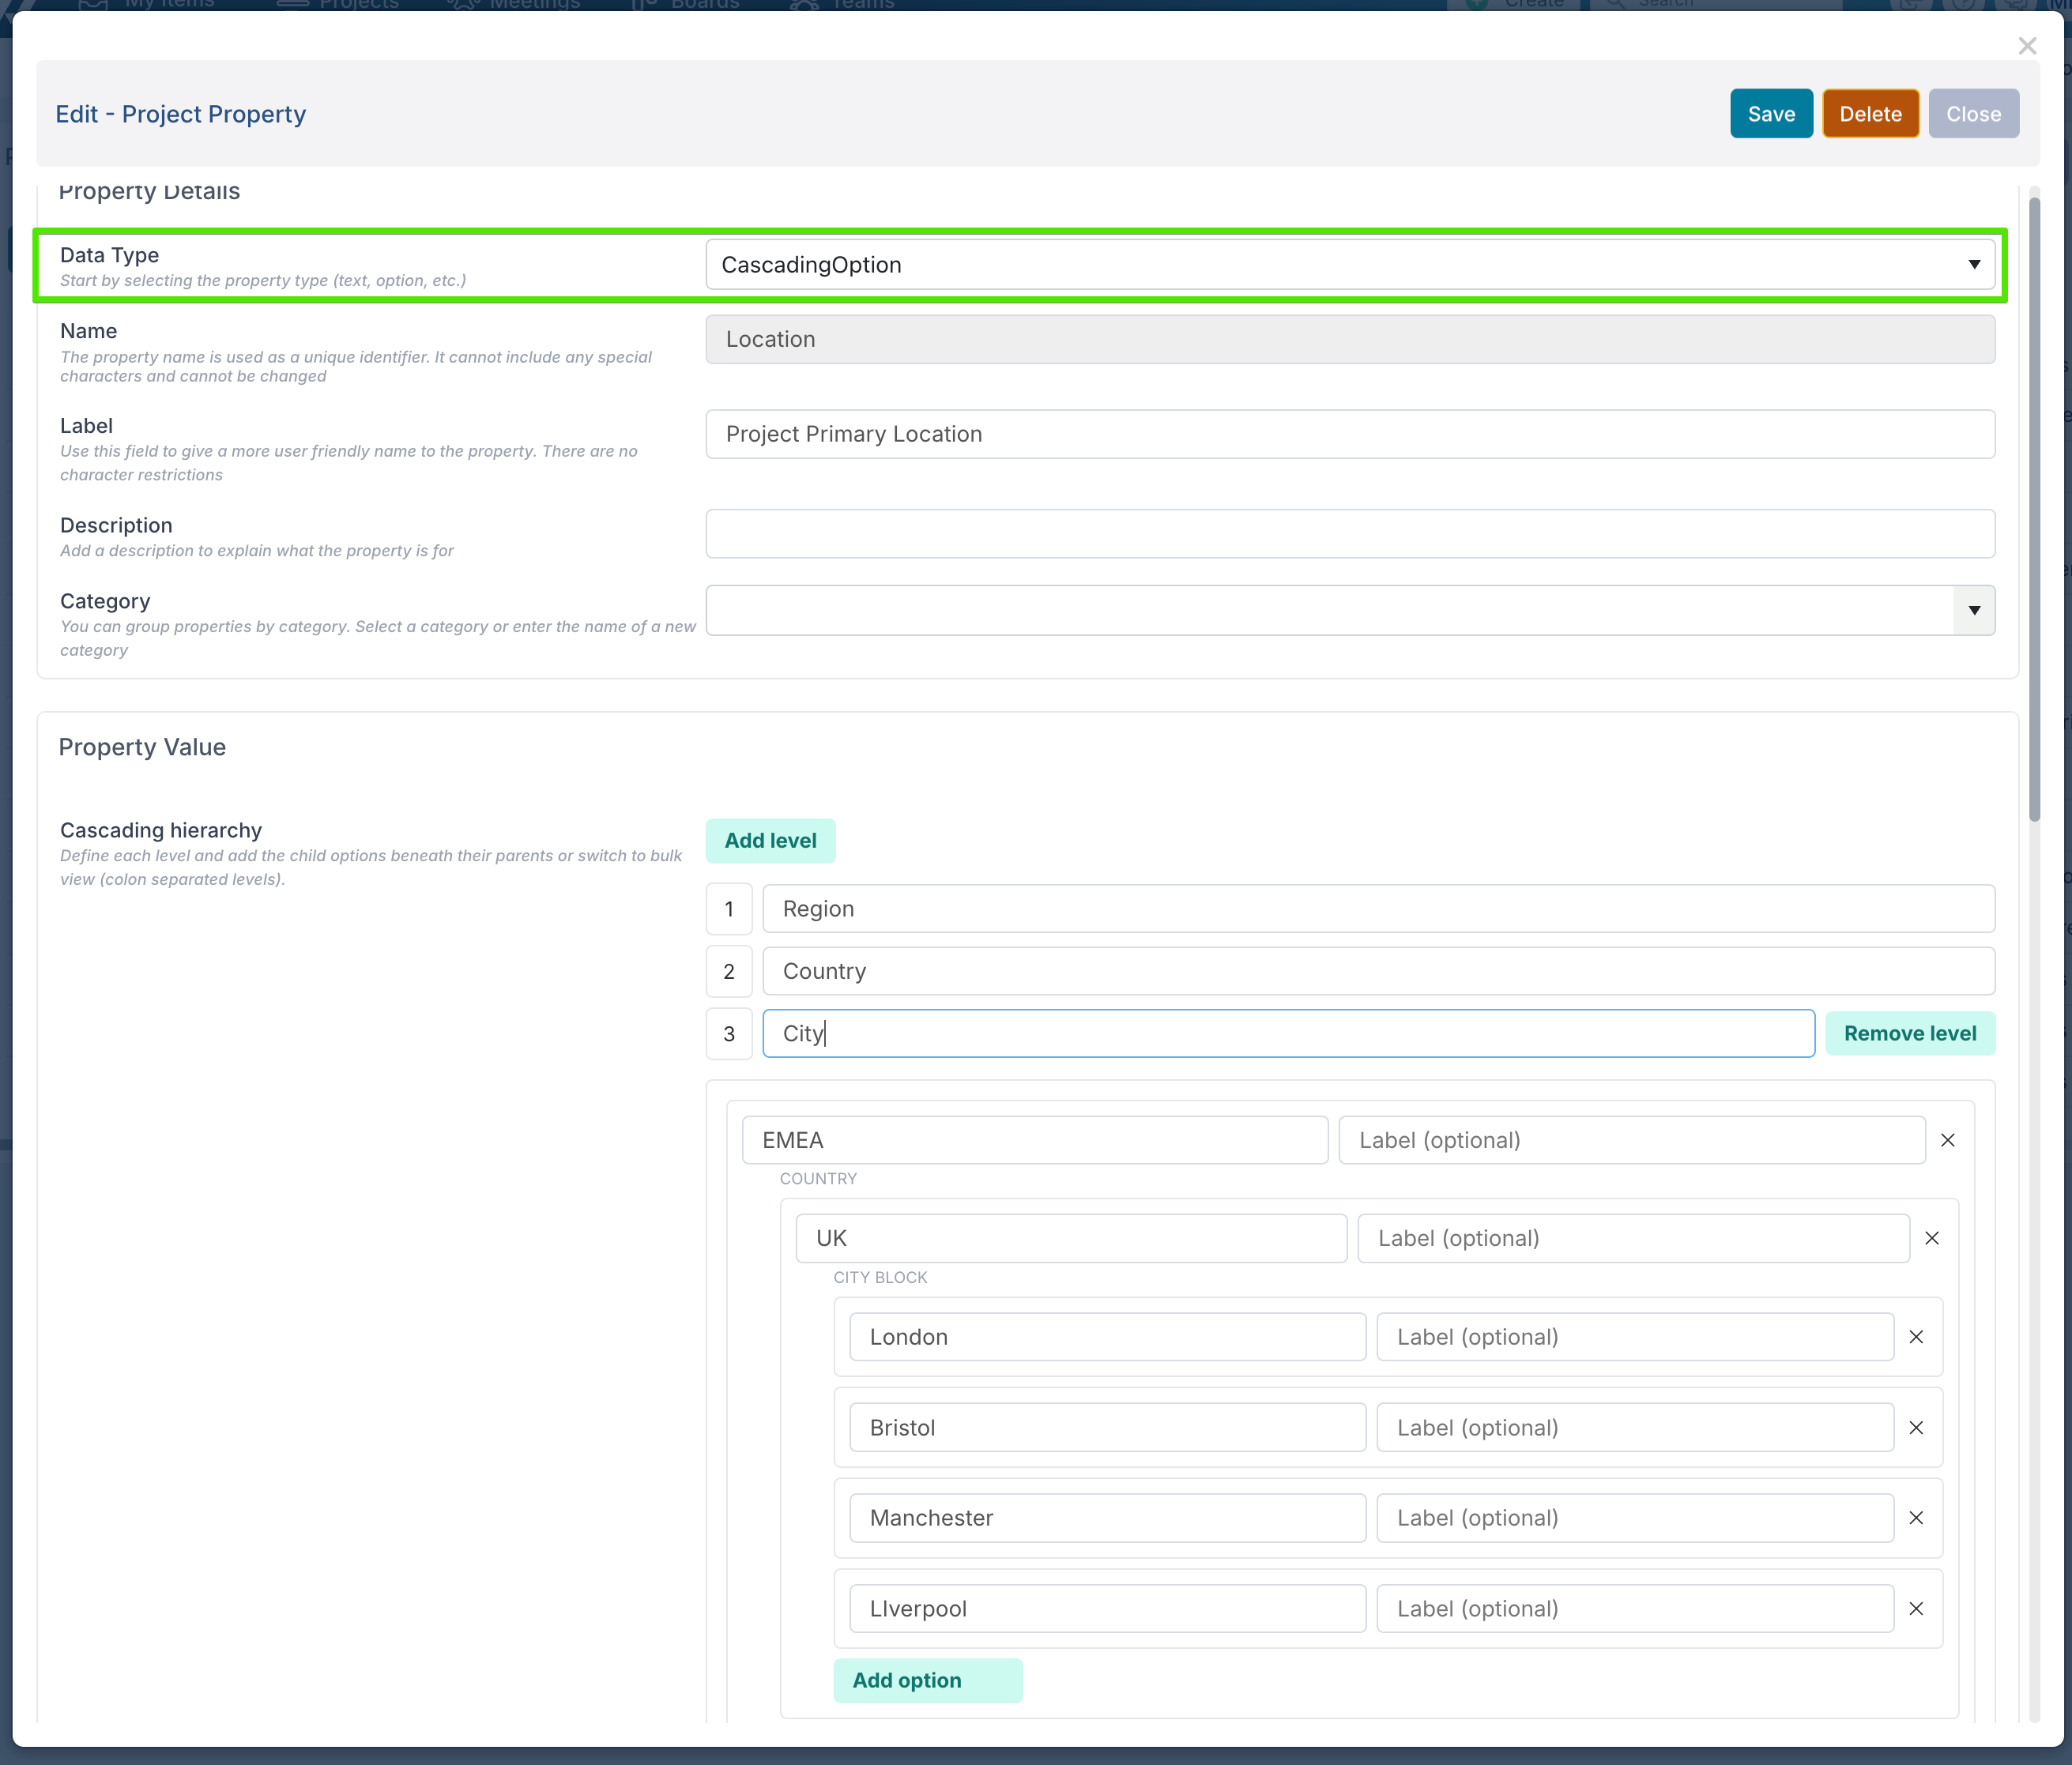
We’ve introduced a new Cascading Option data type for custom properties, allowing you to create properties where selecting one value filters the available options in the next. This makes it easy to capture structured information consistently — for example, selecting a Region automatically filters the list of Countries, and once a Country is chosen, only the relevant Cities are shown.
To create a cascading property, set the Data Type to CascadingOption and define your hierarchy by adding as many levels as you need (e.g. Region → Country → City). For each level, specify the values that belong under each parent level. There’s no limit to the number of levels you can define.
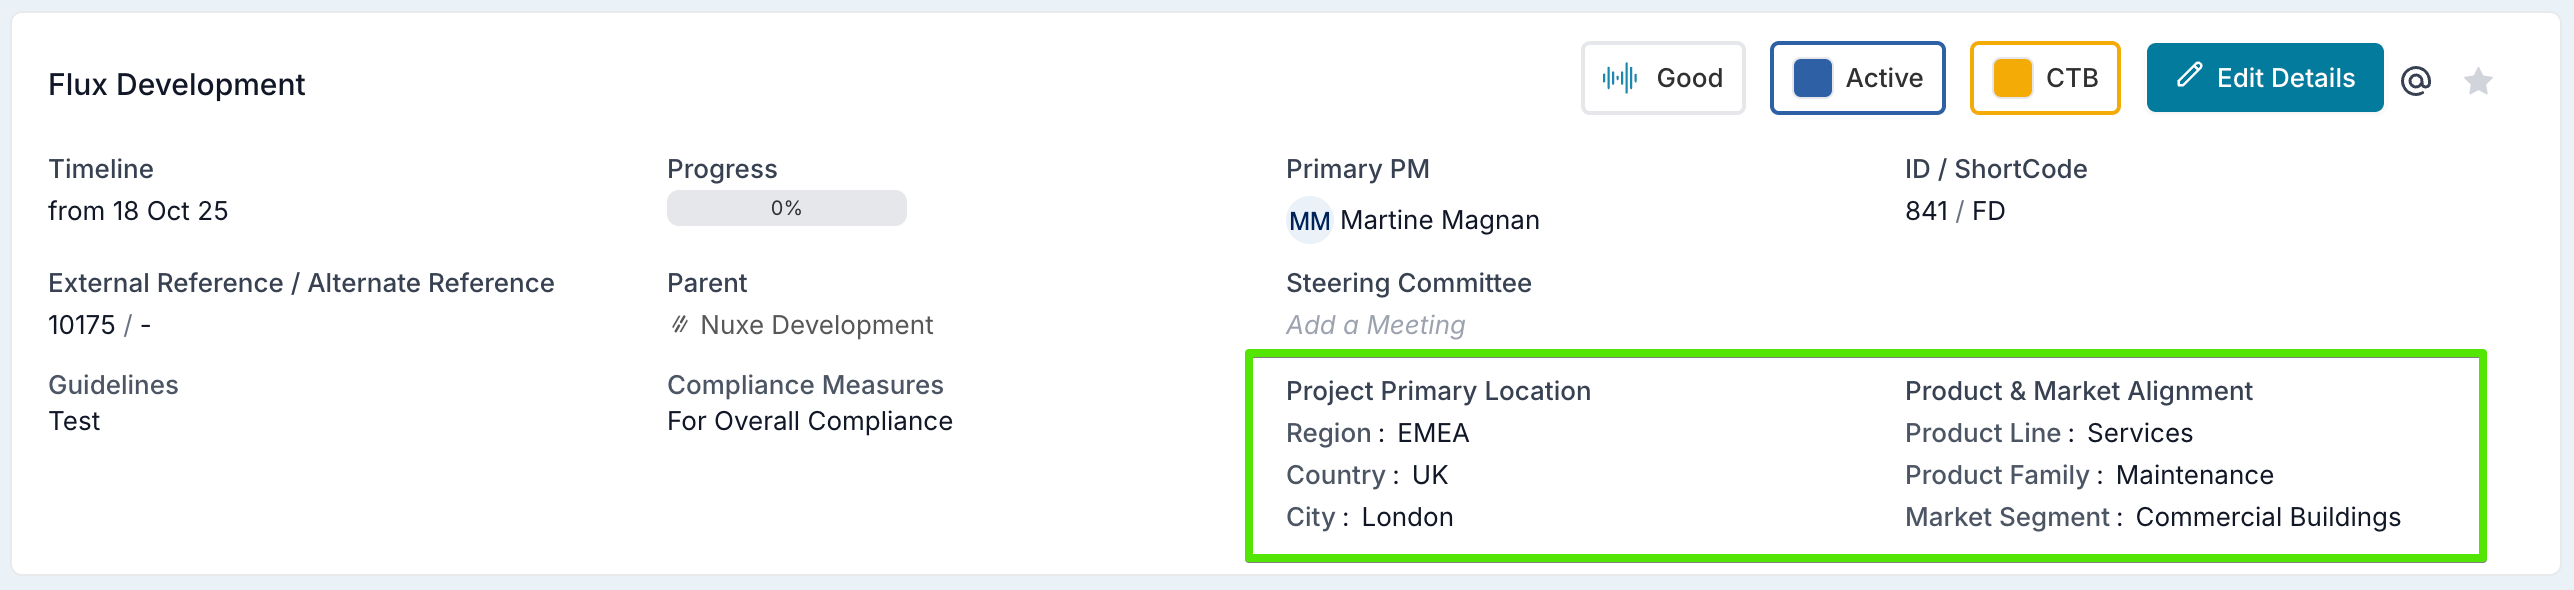
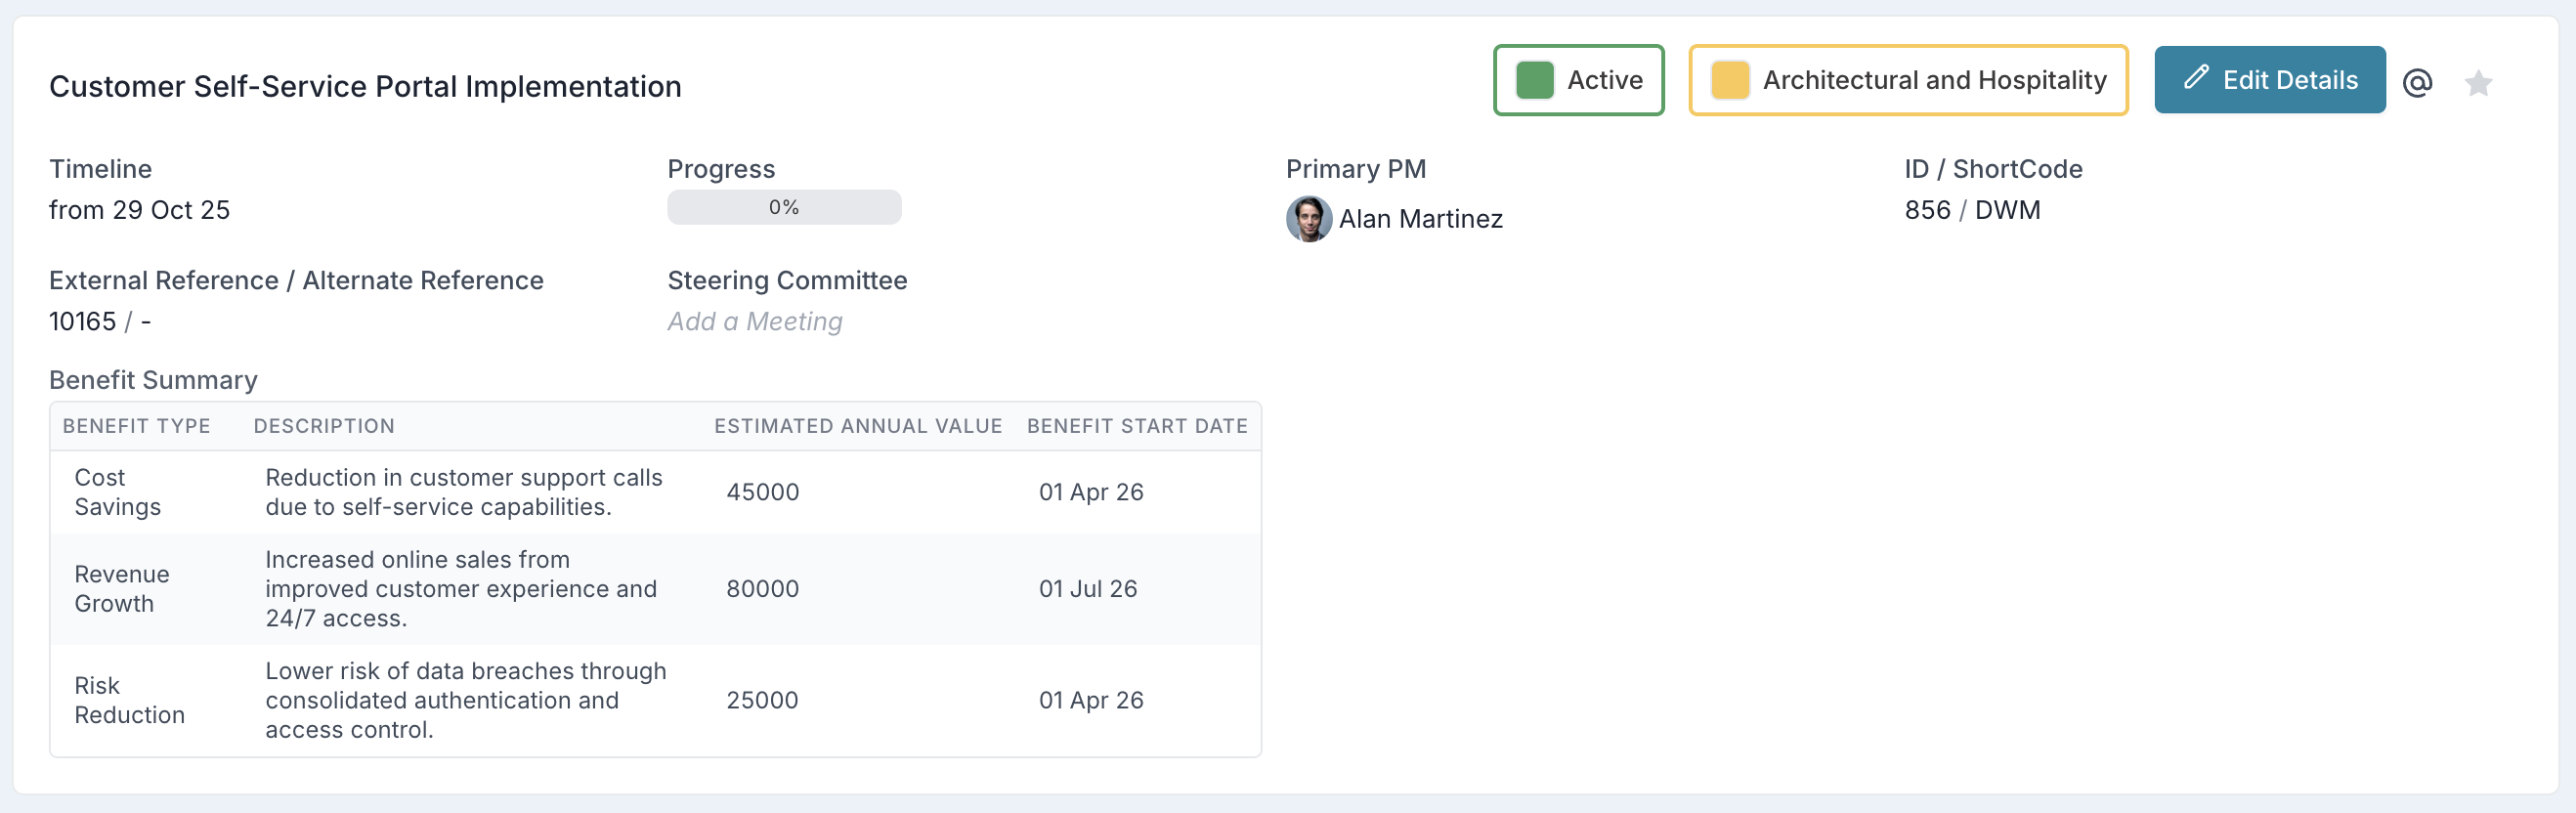
Once configured, the cascading property appears as a single grouped field — for instance, Location: EMEA > Germany > Frankfurt or Product & Market Alignment: Services > Maintenance > Commercial Buildings — helping teams maintain accurate and standardised data entry across boards, impacts, project workspaces. etc.
Please note that when exporting to Excel or using bulk edit, each level in the cascade appears as a separate column (e.g. Region, Country, City), enabling clear reporting, filtering, and analysis of your data across multiple dimensions.
New - Table Custom Property Type
This release also introduces custom properties of type Table, allowing you to capture structured data directly within projects, schedules, and other entities.
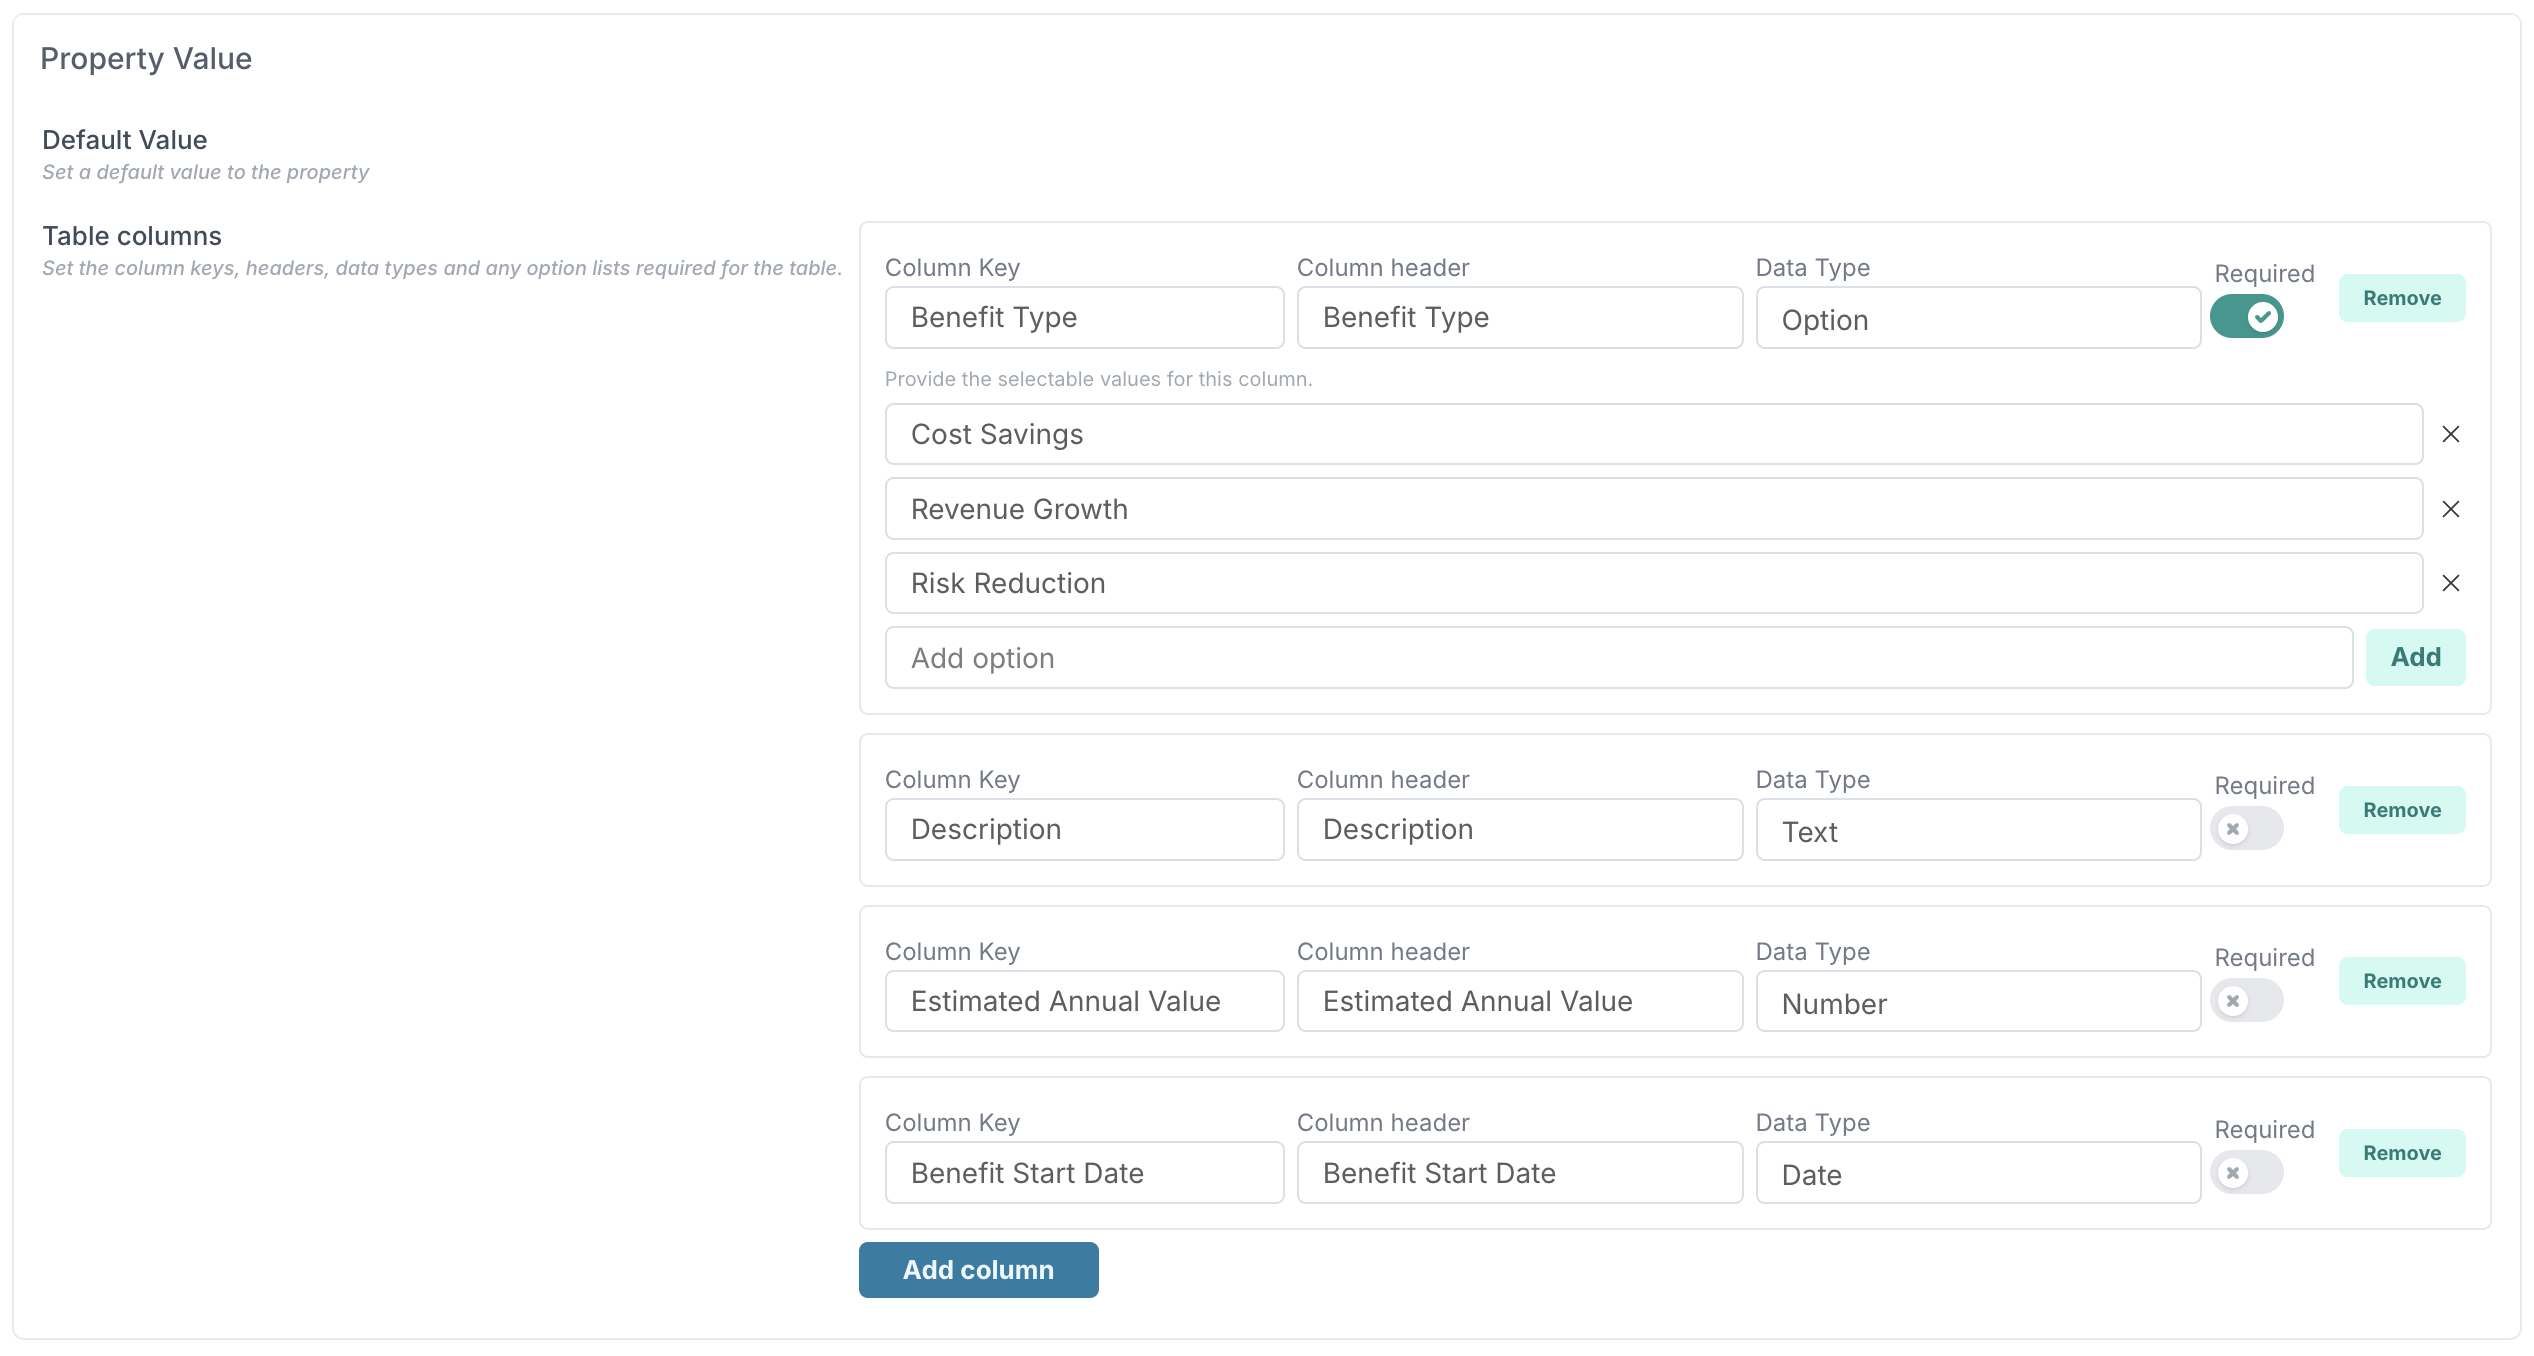
When configuring a table property, you define its columns by specifying a column key, header, data type, and whether the field is required. Supported data types include Text, Number, Date, Option, Yes/No, Hyperlink, and Person.
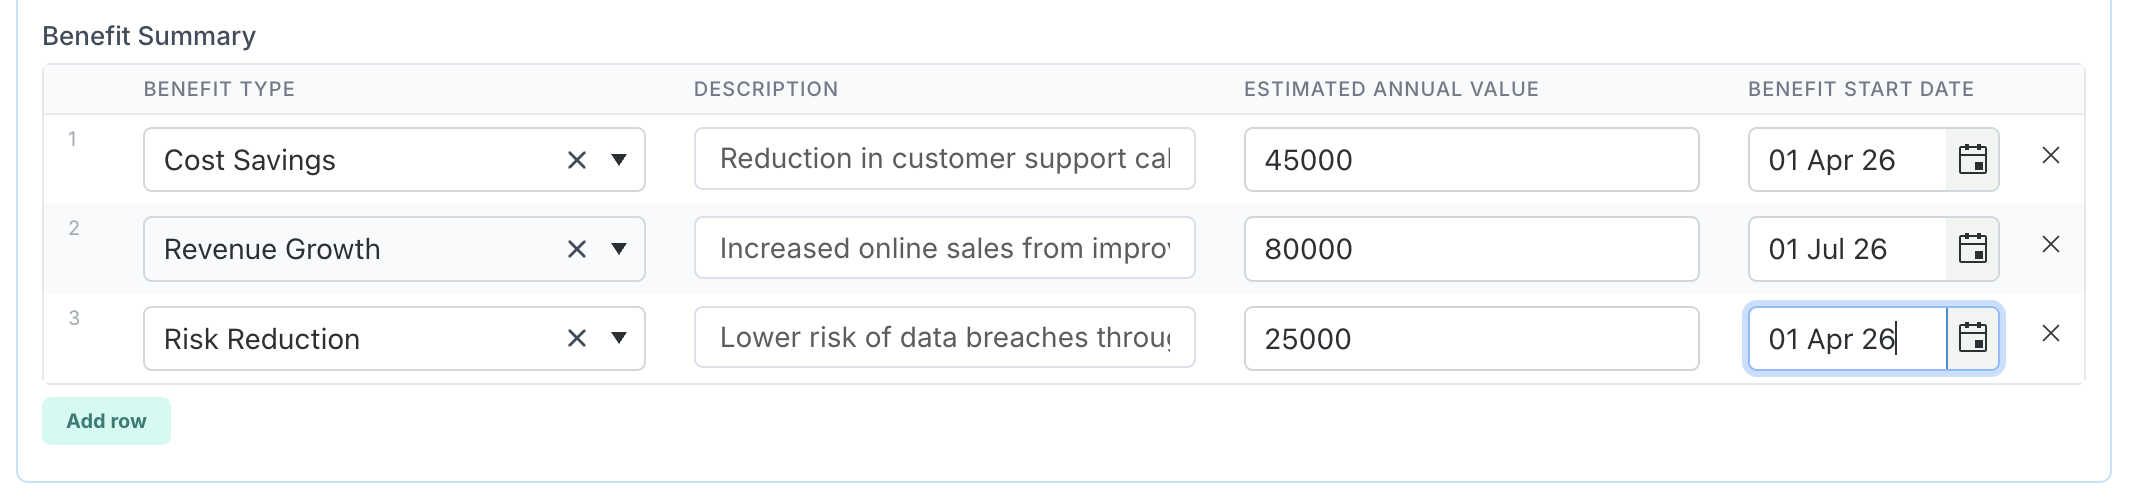
Once configured, users can add as many rows as needed within the table, making it easy to record lists or detailed data sets — such as cost breakdowns, milestone registers, or stakeholder lists — all within a single custom property.
Please note that while table values can be exported using Bulk Edit or Excel export, they cannot currently be updated via Bulk Edit.
New - Configurable Stage Gate Approval Options
We’ve introduced a more flexible way to define who can approve each Stage Gate. Previously, a single named approver could be assigned to a gate, meaning that person was responsible for approving that gate across all projects in the organisation. With this release, you can now select from multiple approval types, making gate approvals context-specific and aligned with your project setup.
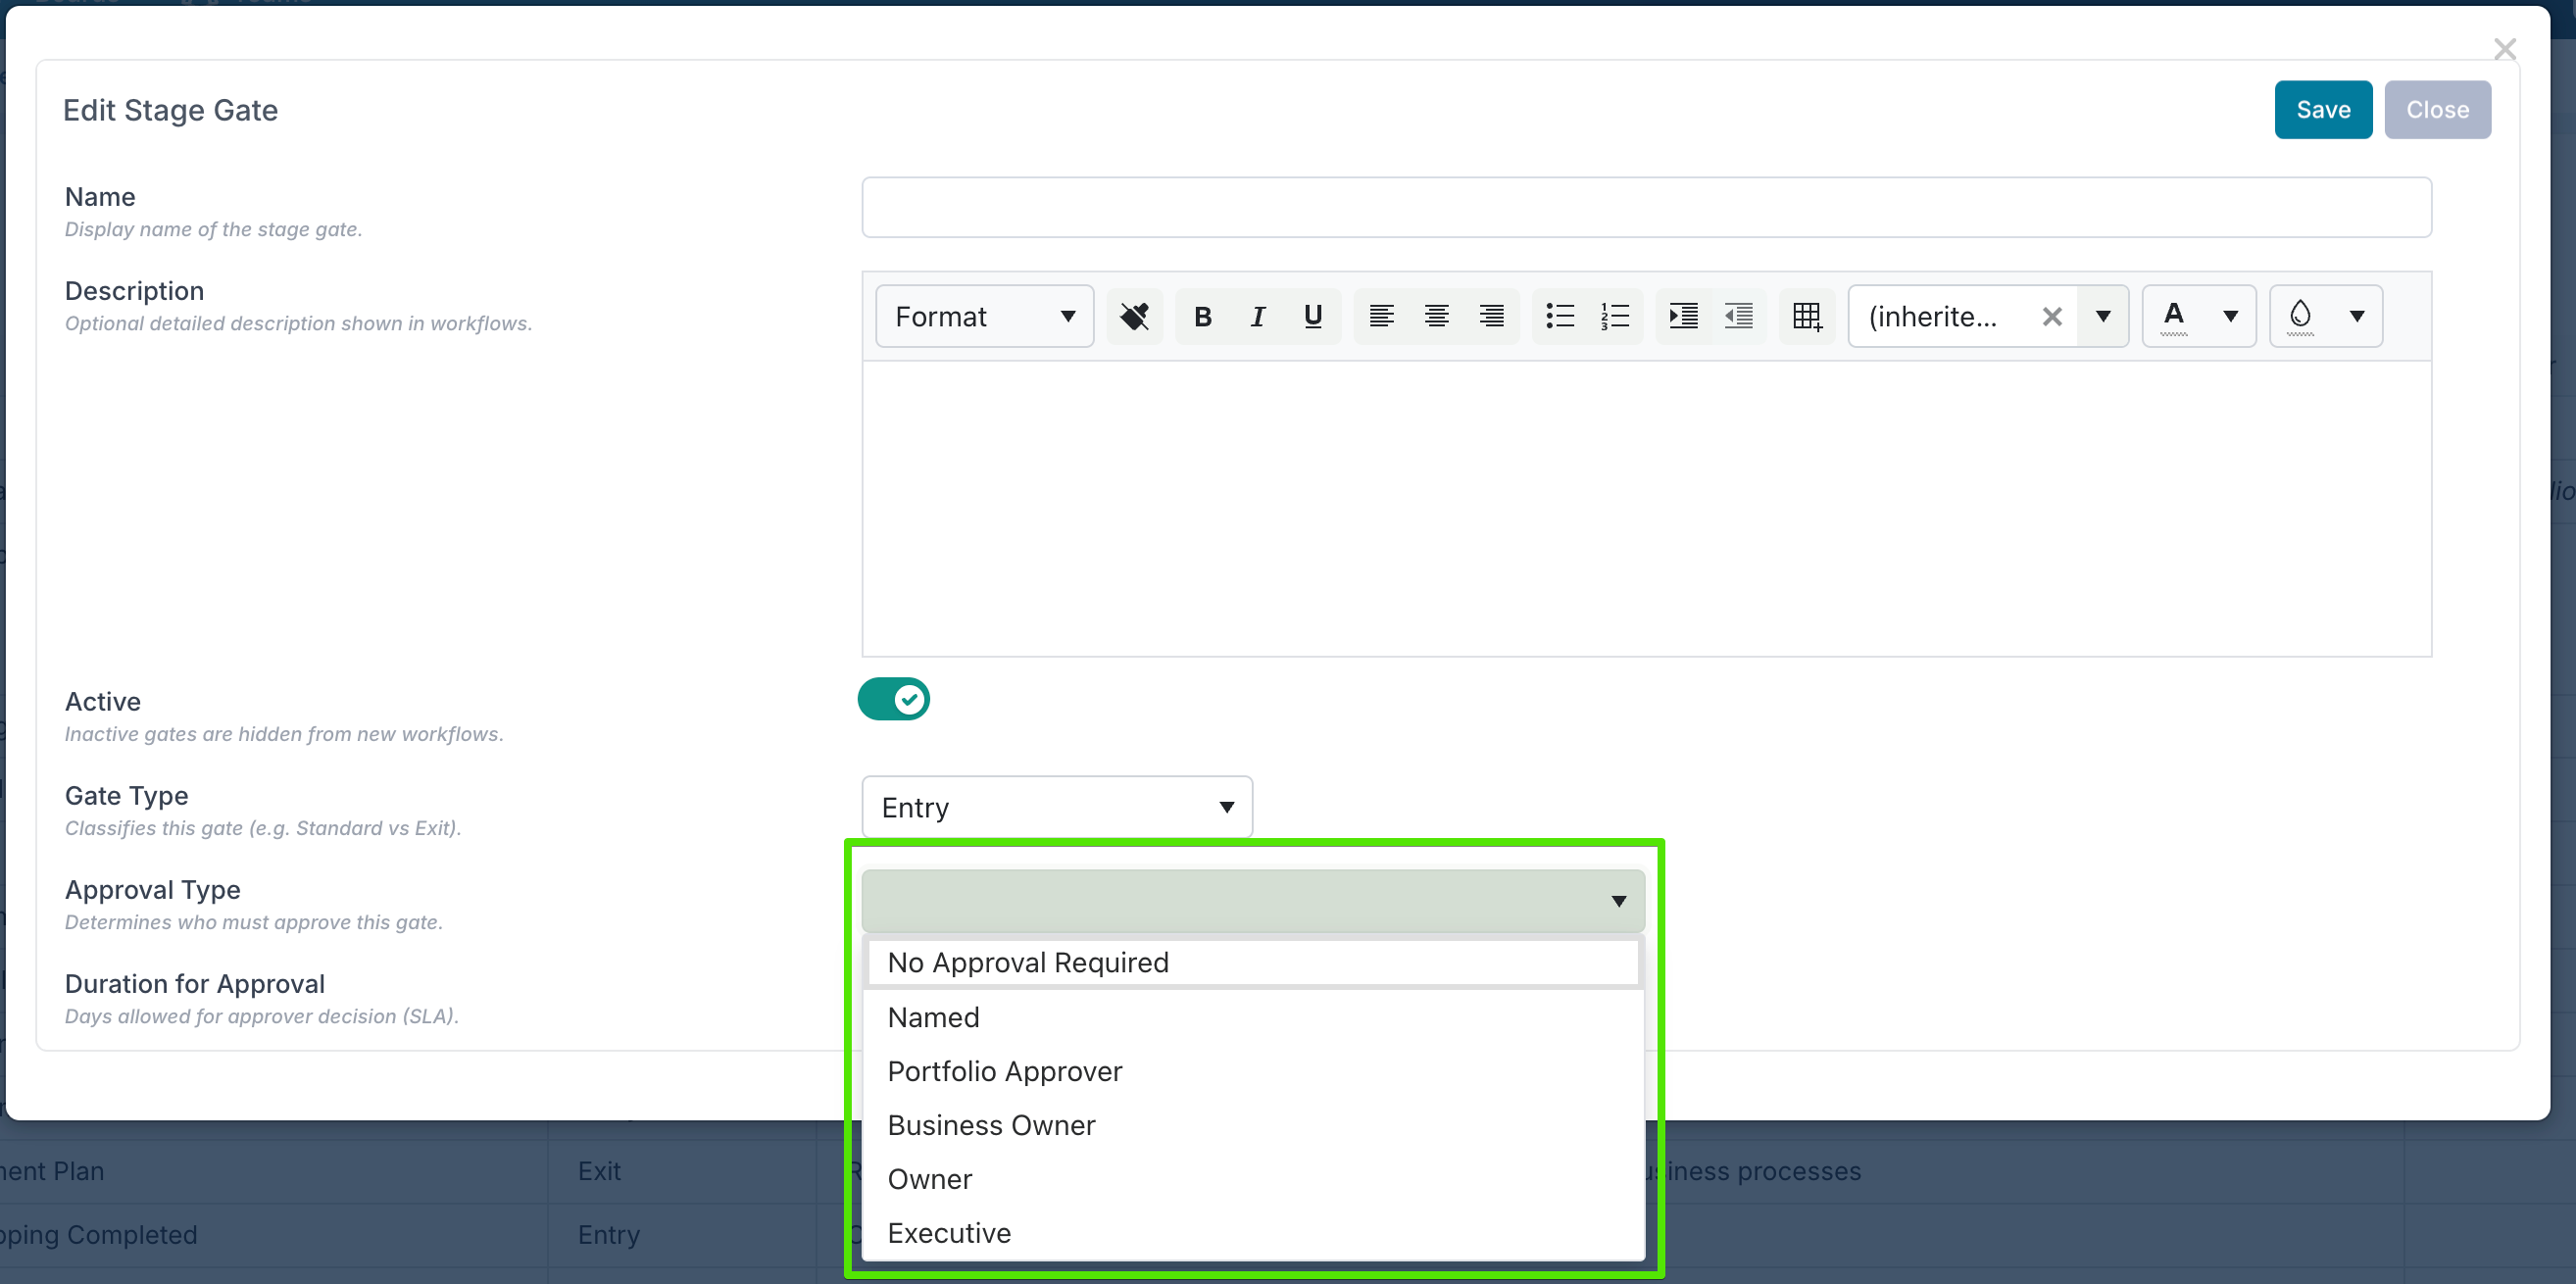
The new Approval Type field allows you to choose from:
No Approval Required – the gate does not need approval.
Named – select a specific individual, work request board, or workhub to handle approvals.
Portfolio Approver – the approval will go to the approver(s) assigned to the project’s portfolio.
Business Owner, Owner or Executive – the approval will go to the person set as the Business Owner, Owner or Executive on the project. Please note that you can rename these fields in the Project Labels and Field Names administration page.
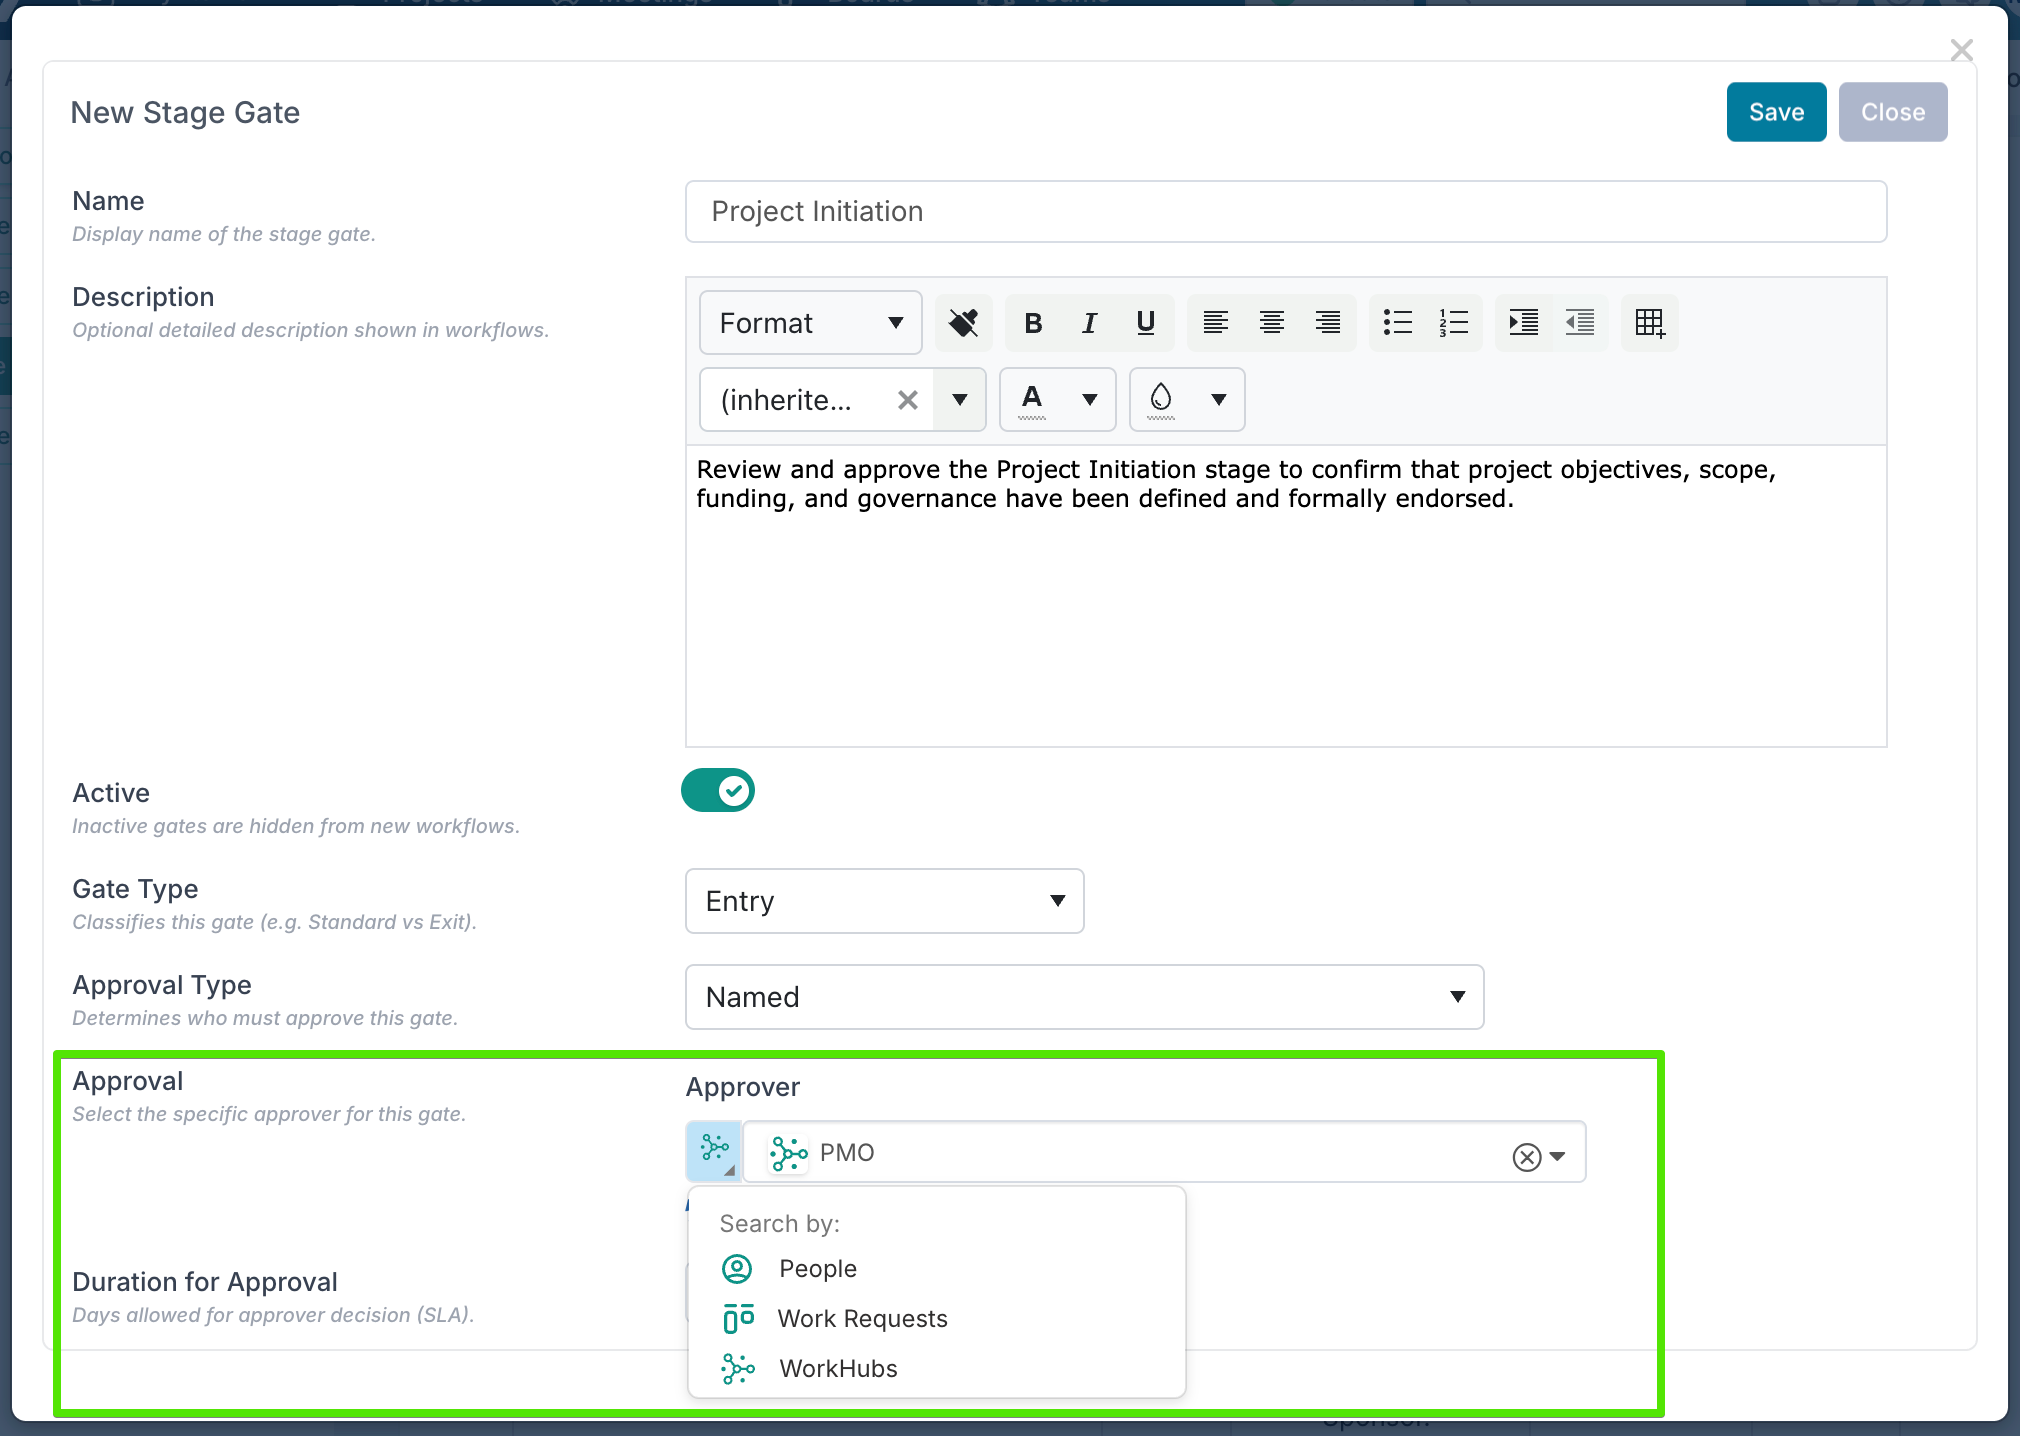
When using the Named option, you can direct approvals to a specific person, a work request board, or a workhub (team workspace). This gives organisations the flexibility to manage approvals through individuals, governance boards, or cross-functional teams.
Using a work request board allows approval tasks to follow a structured workflow — approvals can move through different stages or columns on the board, reflecting your internal review process. This is ideal for organisations that manage approvals collectively or require multiple review steps before sign-off.
Selecting a workhub gives team-based visibility and collaboration. All members of the designated team can see, track, and manage incoming approval requests from a central workspace, ensuring nothing gets missed and enabling shared accountability within governance or PMO teams.
Approvers receive an email notification whenever a gate approval is required, ensuring visibility and timely action. When the approver is set as a work request board or a workhub, the notification is sent to the owner of the board or the owner of the work hub, ensuring that the right governance team or board owner is immediately alerted to manage and progress the approval.
New - Customisable Status Report RAG Values
Until now, the default Green, Amber, and Red status report RAGs could not be removed. You could add new ones - such as On Hold or Completed - but the original three always remained active.
With this release, you can now fully customise the status report RAG setup by creating alternative values for Green, Amber, and Red. For example, you might replace Green with On Track, Amber with At Risk, and Red with Off Track.
Once your new statuses are created, you can set the original Green, Amber, and Red RAGs to inactive so that they no longer appear for selection.
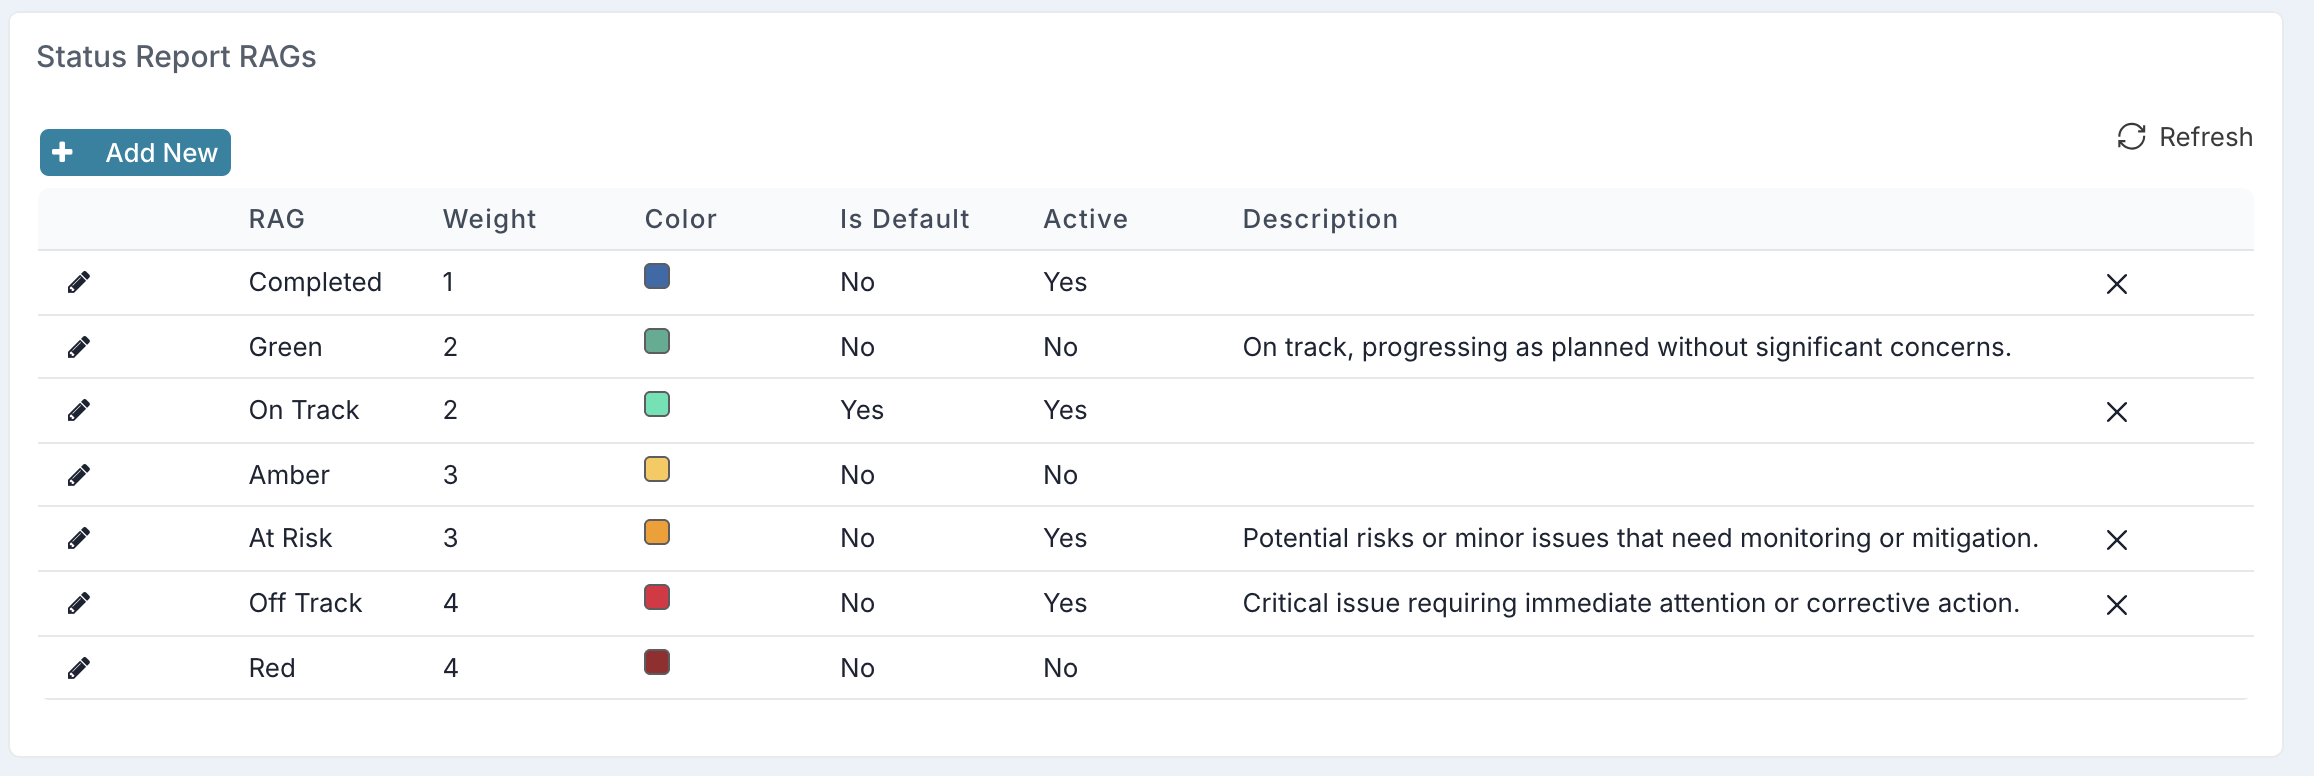
When setting up your new RAGs, remember to choose which one should be the default. The default RAG status becomes your new “green” equivalent and is automatically applied when creating status reports, impacts, or schedule tasks.
Each RAG status also has a weight, which defines when additional information is required. Any RAG with a weight lower than the default does not require a Path to Green strapline, date, or owner. RAGs with a weight higher than the default do, ensuring that more critical statuses capture the necessary commentary and accountability.
New - Copy Custom Properties from Another Board
Setting up a board often involves defining a series of custom properties to capture key project or workflow data. Previously, these properties had to be created manually for each new board — a time-consuming process, especially when replicating established PMO workflows such as project intake, change requests, or stage-gate reviews.

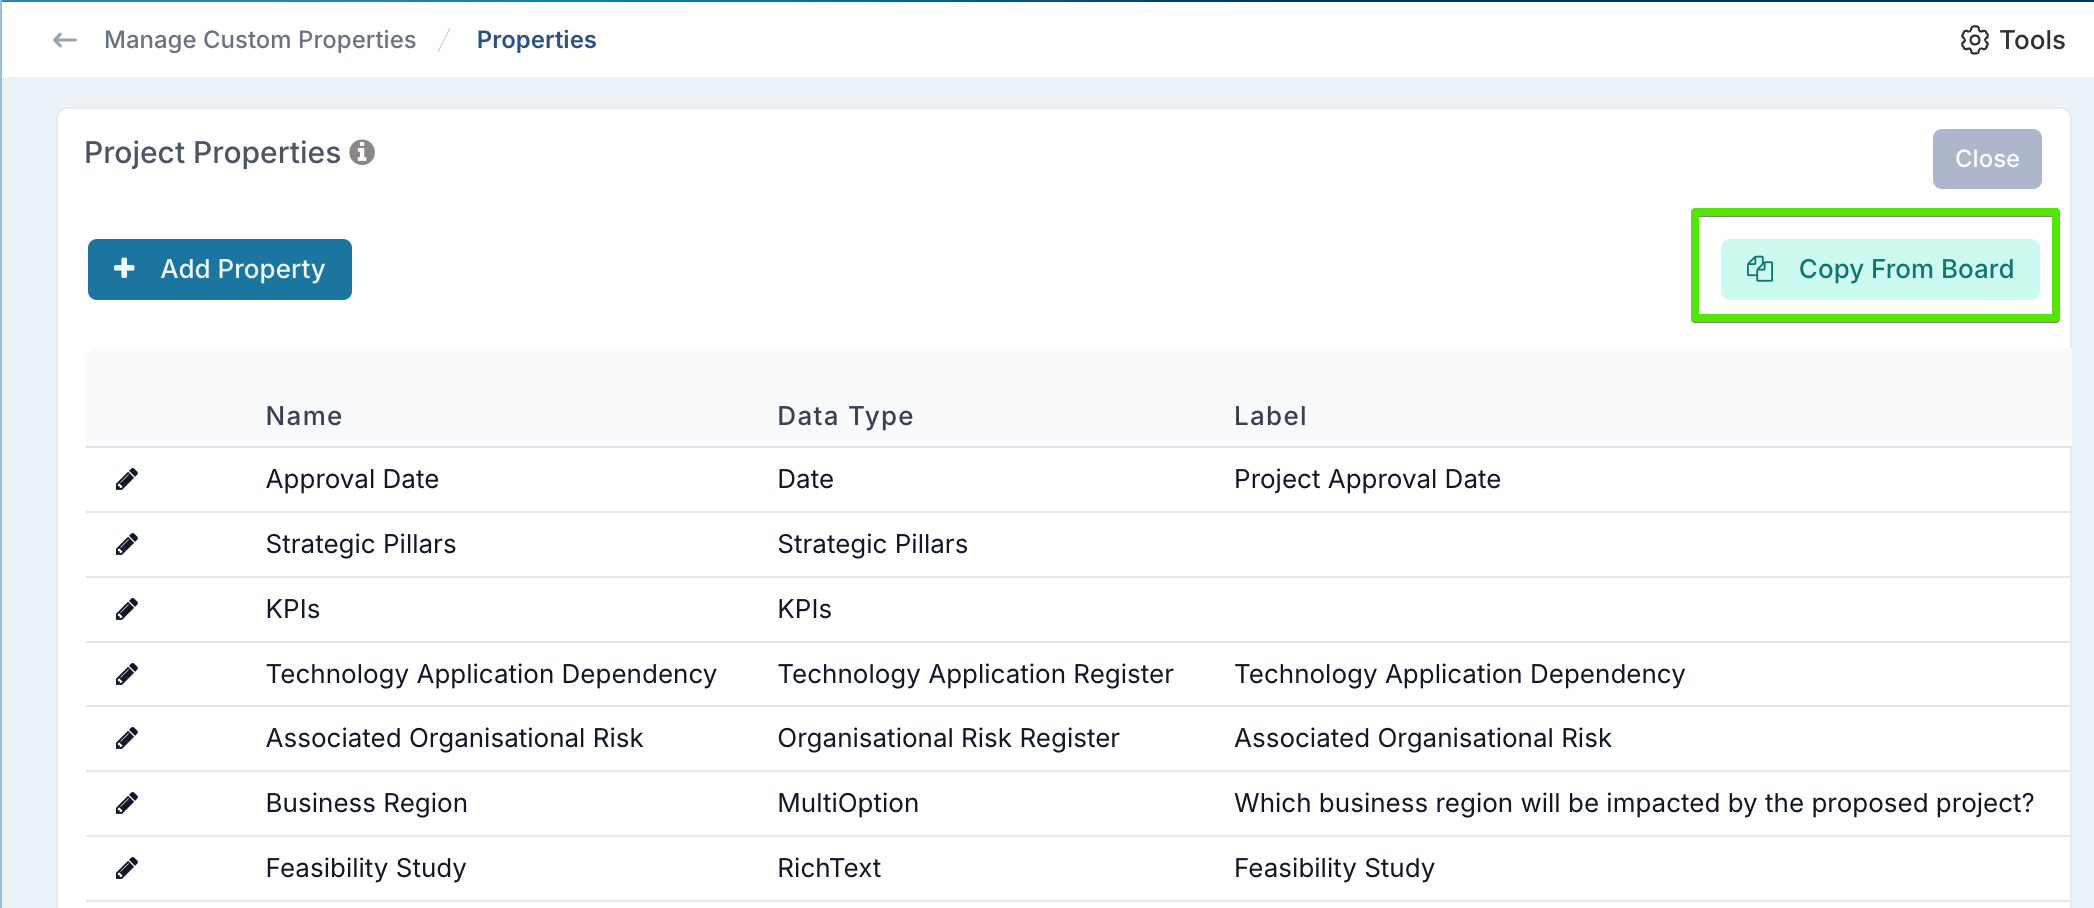
With the new Copy From Another Board feature, you can now reuse the property setup from any board you have access to. Simply search for the board you want to copy from, review its properties, and choose whether to Replace all existing properties or Merge them with the current ones.
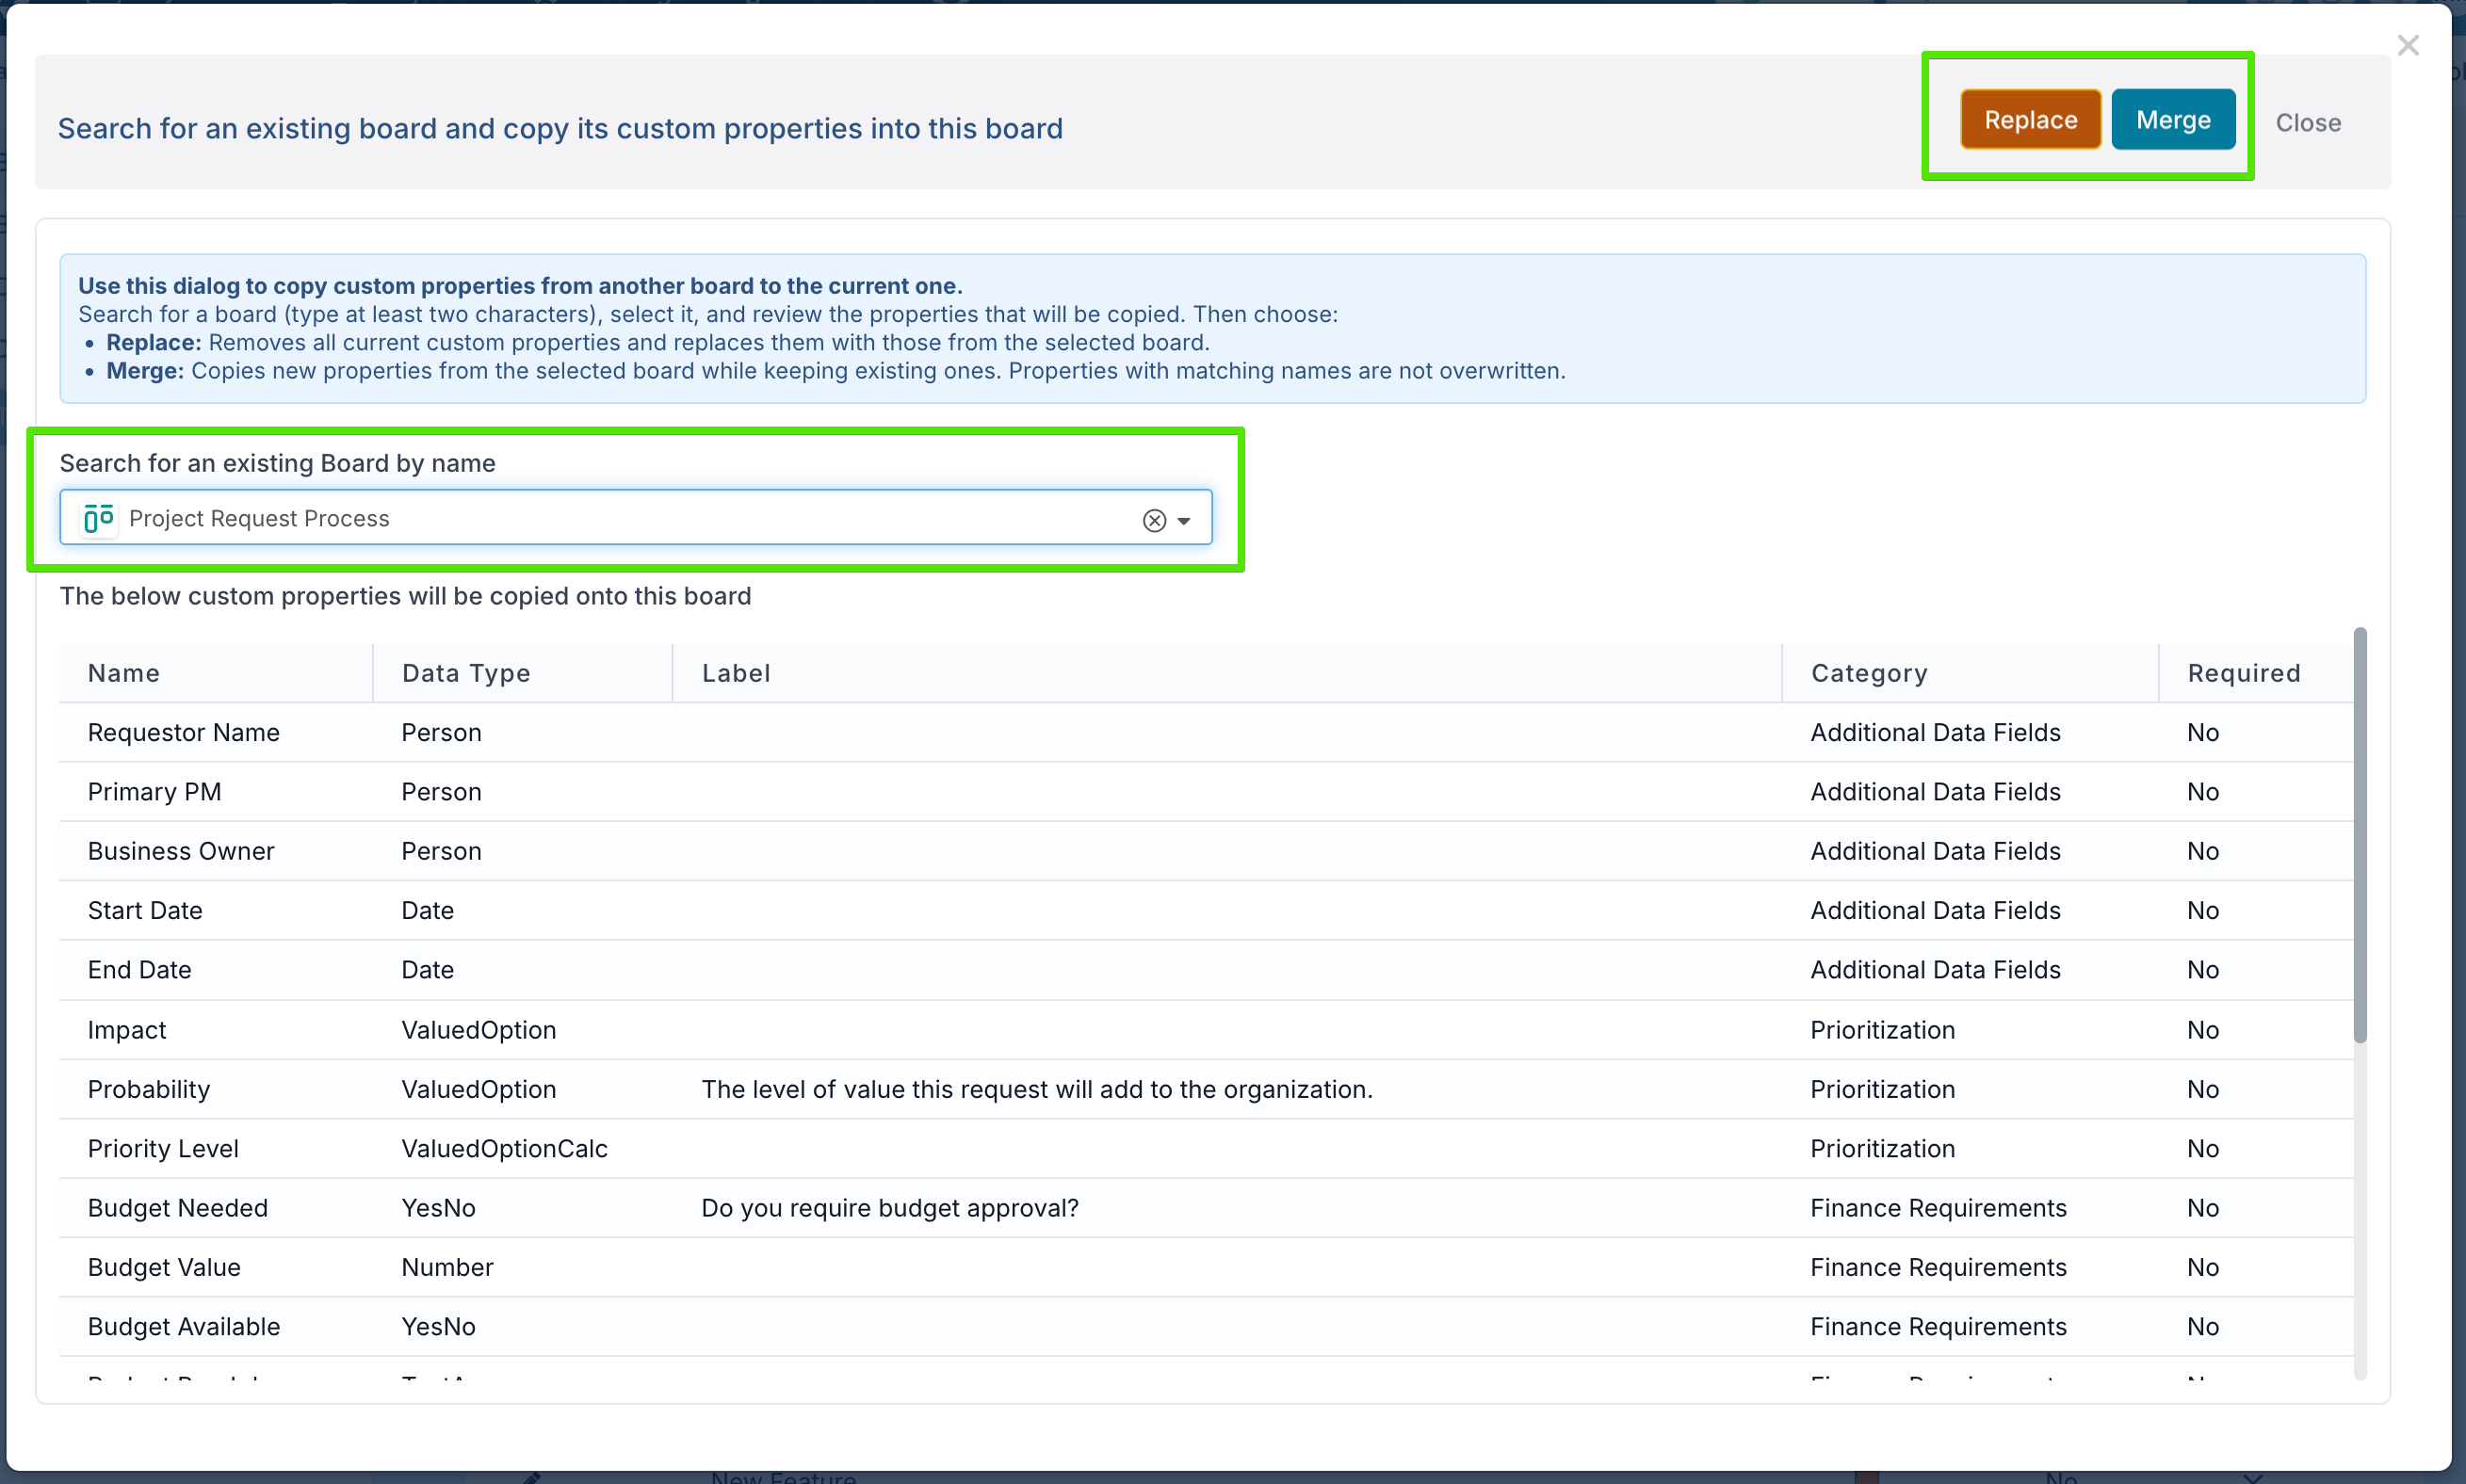
This enhancement makes it far easier to replicate consistent governance frameworks across multiple boards — for example, when standardising project intake forms across portfolios or applying the same approval workflow to different business units — saving time and ensuring process consistency.
In addition, you can also copy board properties to project custom properties, which is particularly useful when using a Project Pipeline board to create projects. This ensures consistent property mapping between boards and projects, so that key data captured at intake flows seamlessly into the created project.
New - Default Project Template and Methodology on Pipeline Boards
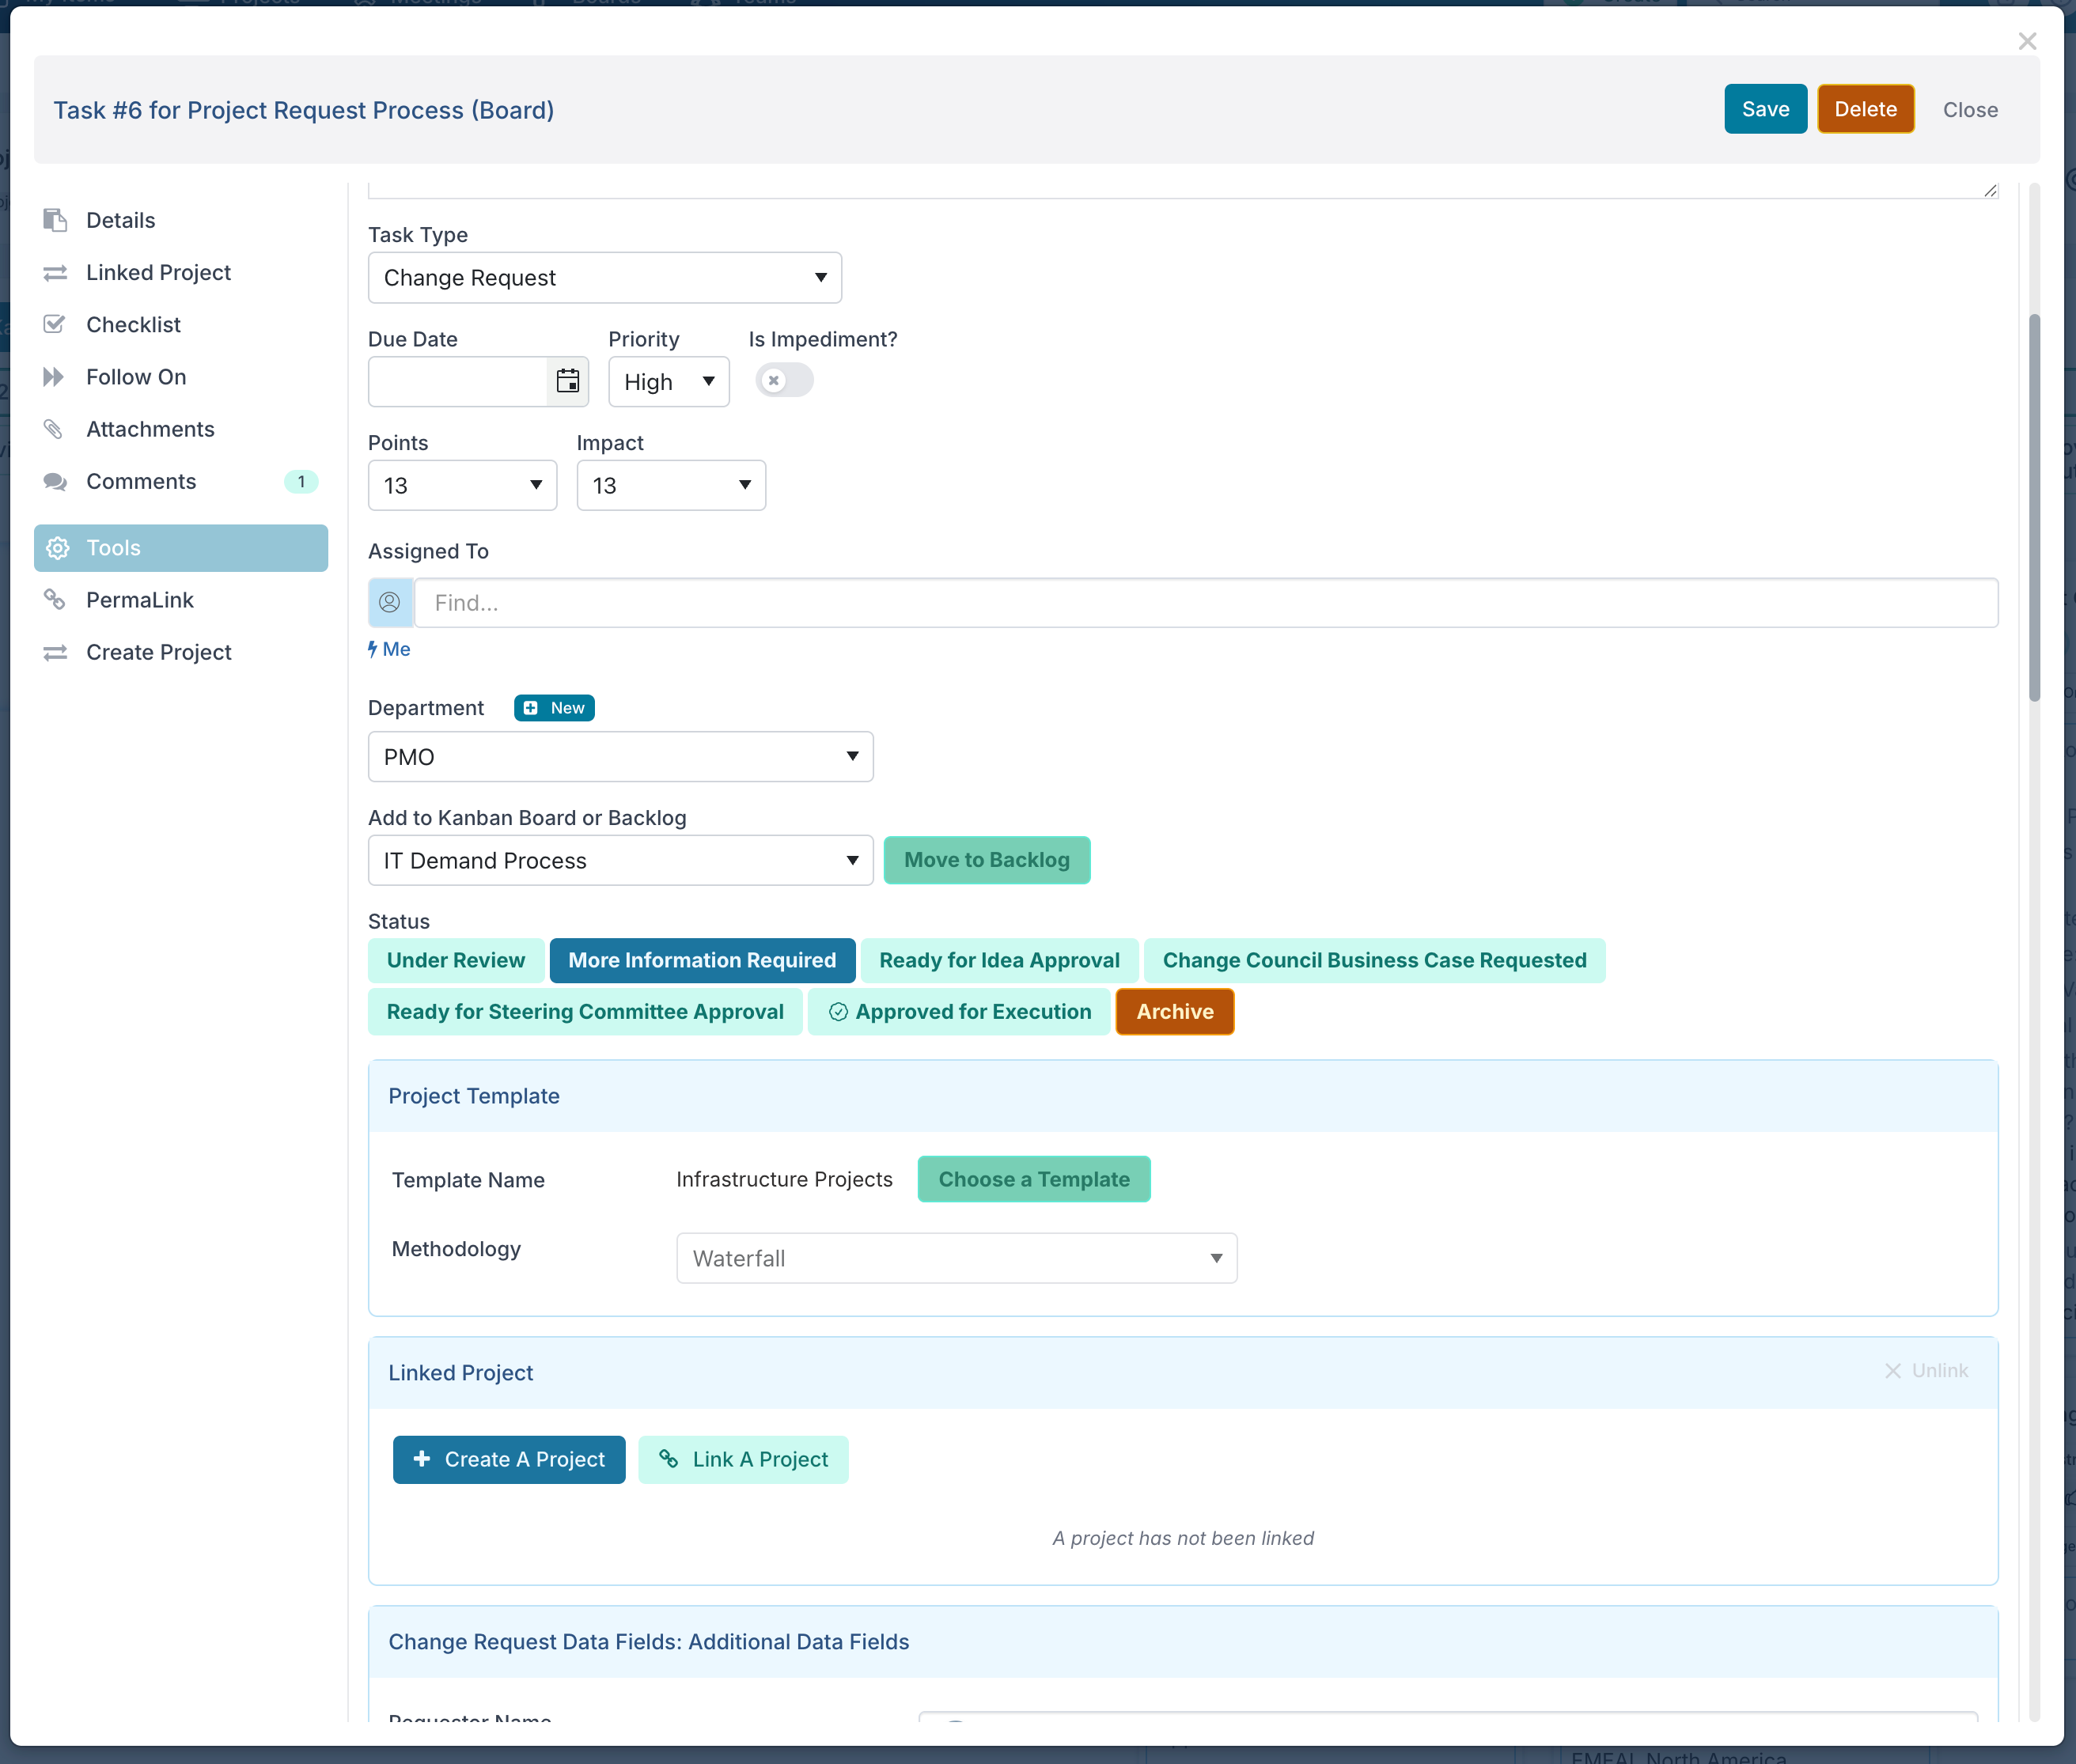
You can now define a default Project Template and default Methodology directly in your Project Pipeline Boards. This means that when new projects are created from the board, they automatically use the selected template and methodology.
The Project Template determines what is included when the project is created — such as the initial schedule, risks, issues, actions, and default resource allocations. The Methodology defines the project’s delivery framework, including its phases, stage gates, and lifecycle.

These defaults ensure that projects created from the pipeline board follow a consistent structure aligned to your organisation’s governance and delivery standards.
However, a single intake process may capture a variety of project types — for example, IT transformation initiatives, smaller operational changes, or maintenance projects — each of which may require a different level of governance or delivery approach. In these cases, you can override the default template or methodology directly in the project card before creation, ensuring each project starts with the most appropriate setup.
If no template or methodology is defined on the board, the project will be created from a blank workspace, allowing teams to build their structure and governance model from scratch.
Enhancements:
Custom Property – Valued Option Calculations: The Valued Option Calc property type now supports two additional functions: Lowest and Highest, allowing you to calculate the minimum or maximum weighted value across a set of Valued Option properties.
Community Request Boards: You can now configure a board so that new requests are sent directly to the board, rather than being added to the backlog. This is especially useful for workflows where the first column represents a triage or review stage, allowing teams to immediately assess and prioritise incoming requests without the extra step of moving them from the backlog.
Copy Board Integrations: You can now copy Jira or DevOps integration settings from one board to another. When setting up a new integration, simply choose to copy the configuration from an existing board, making it faster and easier to replicate standard integration setups across multiple boards.
Stage Gates: The Apply to All Projects option will now only update stage gates for projects with an end date in the future. This ensures that changes are not applied to closed or completed projects.
Custom Properties: Property names can no longer contain spaces or special characters. Names must now consist of alphanumeric characters only.
28th October Patch Release
Fixes:
Timesheets: Project Viewers can now access timesheets in read-only mode.
Project Dashboards: Fixed an issue where spaces in filter parameters were encoded as “+” when setting a default dashboard.
Timesheet Compliance: Resolved an issue with the week toggle in the compliance component on the Timesheet Administration page.
PDF: Fixed an issue where dependency lines were not rendering correctly in schedule PDF exports.
24th October Patch Release
Fixes:
Resource Dashboard: In the Delivery Team dashboard concise view, inactive resources are now displayed along with their resource allocations.
Jira Integration: Fixed an issue where story points were not captured correctly when a custom field ID was used.
16th October Patch Release
Fixed:
Custom Properties: Resolved an issue where updating a custom property failed when its category name contained special characters.
Resource Dashboard & Delivery Teamspace: Improved handling of allocations for resources assigned across multiple teams or with no resource plan defined for the full fiscal year.
Gantt Schedule: Fixed an issue where the percentage slider could change the completion percentage on tasks set to auto-calculate progress.
Process Boards: Fixed issues related to creating and managing follow-on child tasks from boards to ensure titles and backlog changes behave correctly.
15th October Patch Release
Enhancement:
Governance Assessment: A new financial assessment has been added to identify projects overspending beyond a defined threshold.
13th October Release
Fixed:
Resource Dashboard: Fixed an issue where saved dashboards did not reapply filters when accessed again.
Watchlist PDF Generation: Fixed an issue where generating a PDF from watchlists failed when fields contained special characters.
Project Dashboards: Fixed an issue with handling query parameters on project dashboards.
9th October Release (v. 16.2.32153)
New: Historical Baselines in Scheduling
Until now, you could baseline your schedule or individual tasks and only see the most recent baseline dates. With this release, you now get the full history of baselines across projects and portfolios.
Baseline history shows exactly how your schedule has shifted over time — whether tasks slipped, were brought forward, or stayed on track. You can step through or play back baseline changes to see project drift unfold. Combined with status reports through time, this gives PMs and PMOs a transparent record of delivery performance: not just today’s position, but the full path the project has taken to get there.
This feature turns your schedules into more than static plans — they become tools for analysing delivery performance over time.
Track project drift – See how far tasks or milestones have shifted compared to their original plan.
Spot risks and recoveries – Identify projects that have slipped into red, those that recovered, and those that consistently push milestones.
Strengthen governance – Give steering groups and executives a clear, auditable record of how both schedules and project status have changed over time.
Portfolio visibility – Review baselines across multiple projects in the dashboard to spot patterns and systemic risks.
Status report through time
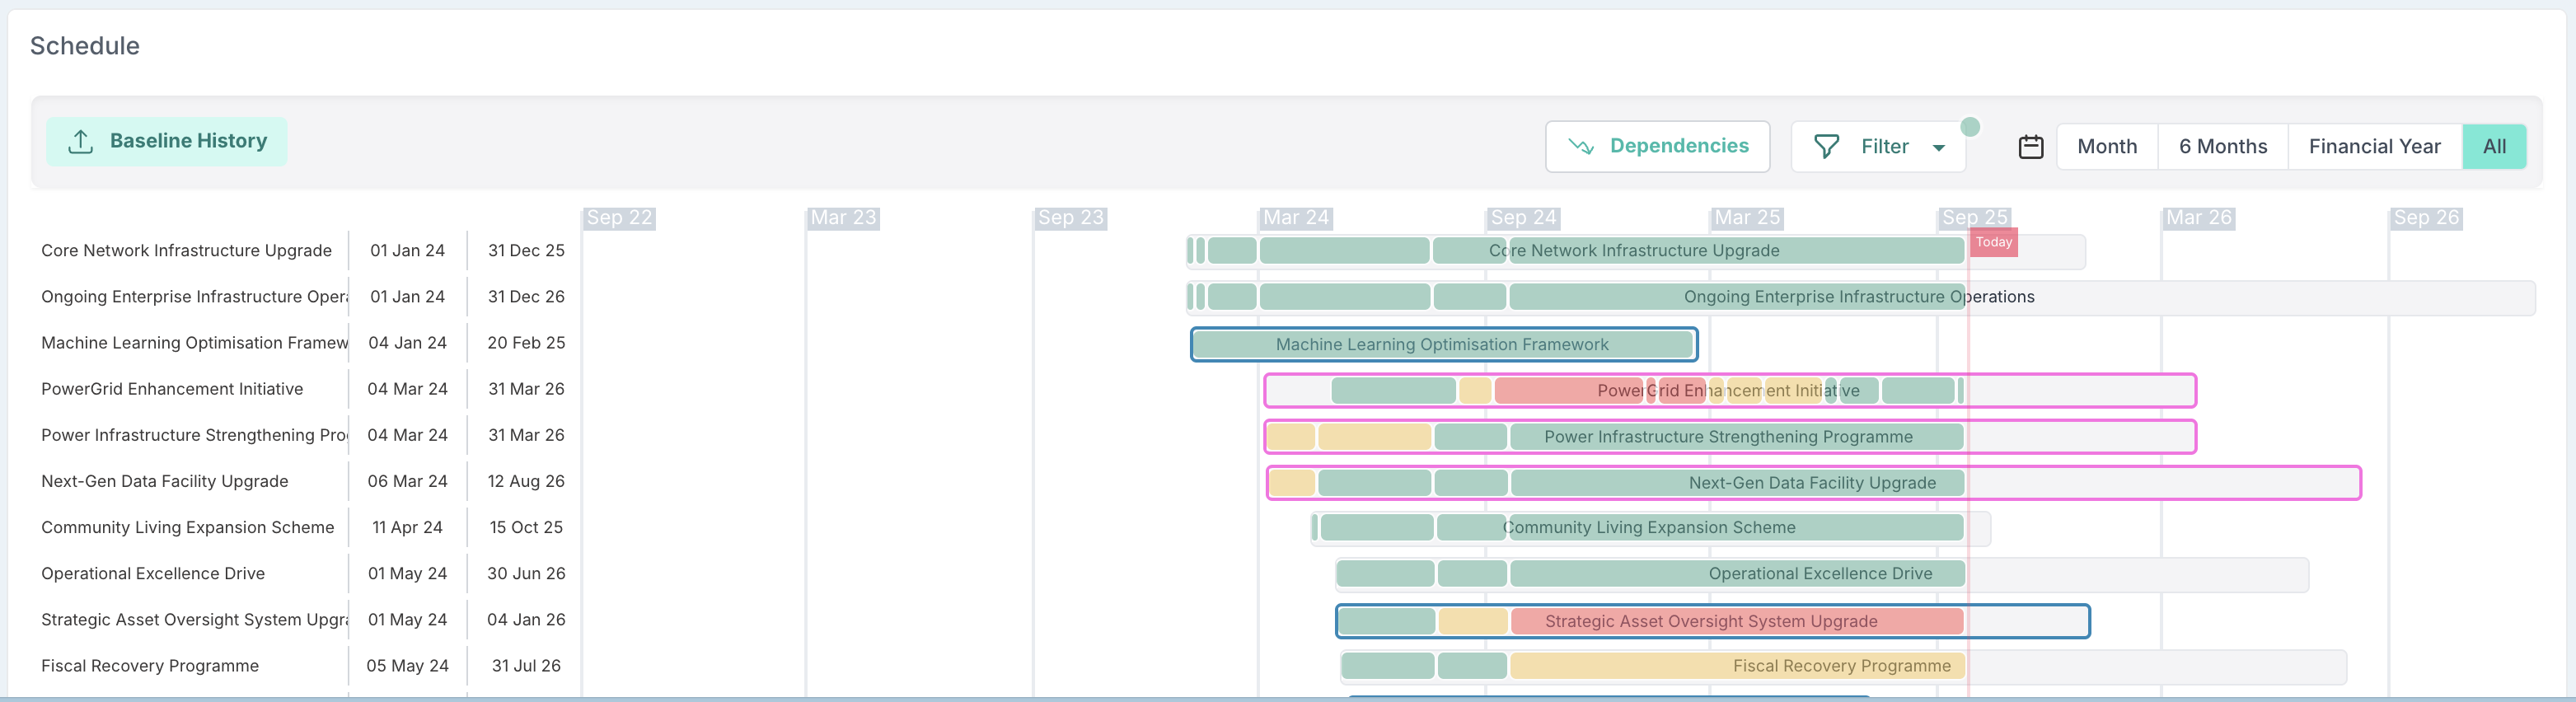
At the top of every project schedule, you’ll now see a timeline showing how the project status has evolved during the project lifetime. Each coloured segment represents when a new status report was posted and whether the project status was green, amber or red.
This new view shows how the project has performed across its lifetime. The coloured status history is displayed directly above the tasks, so you can see shifts in project health alongside the schedule itself.
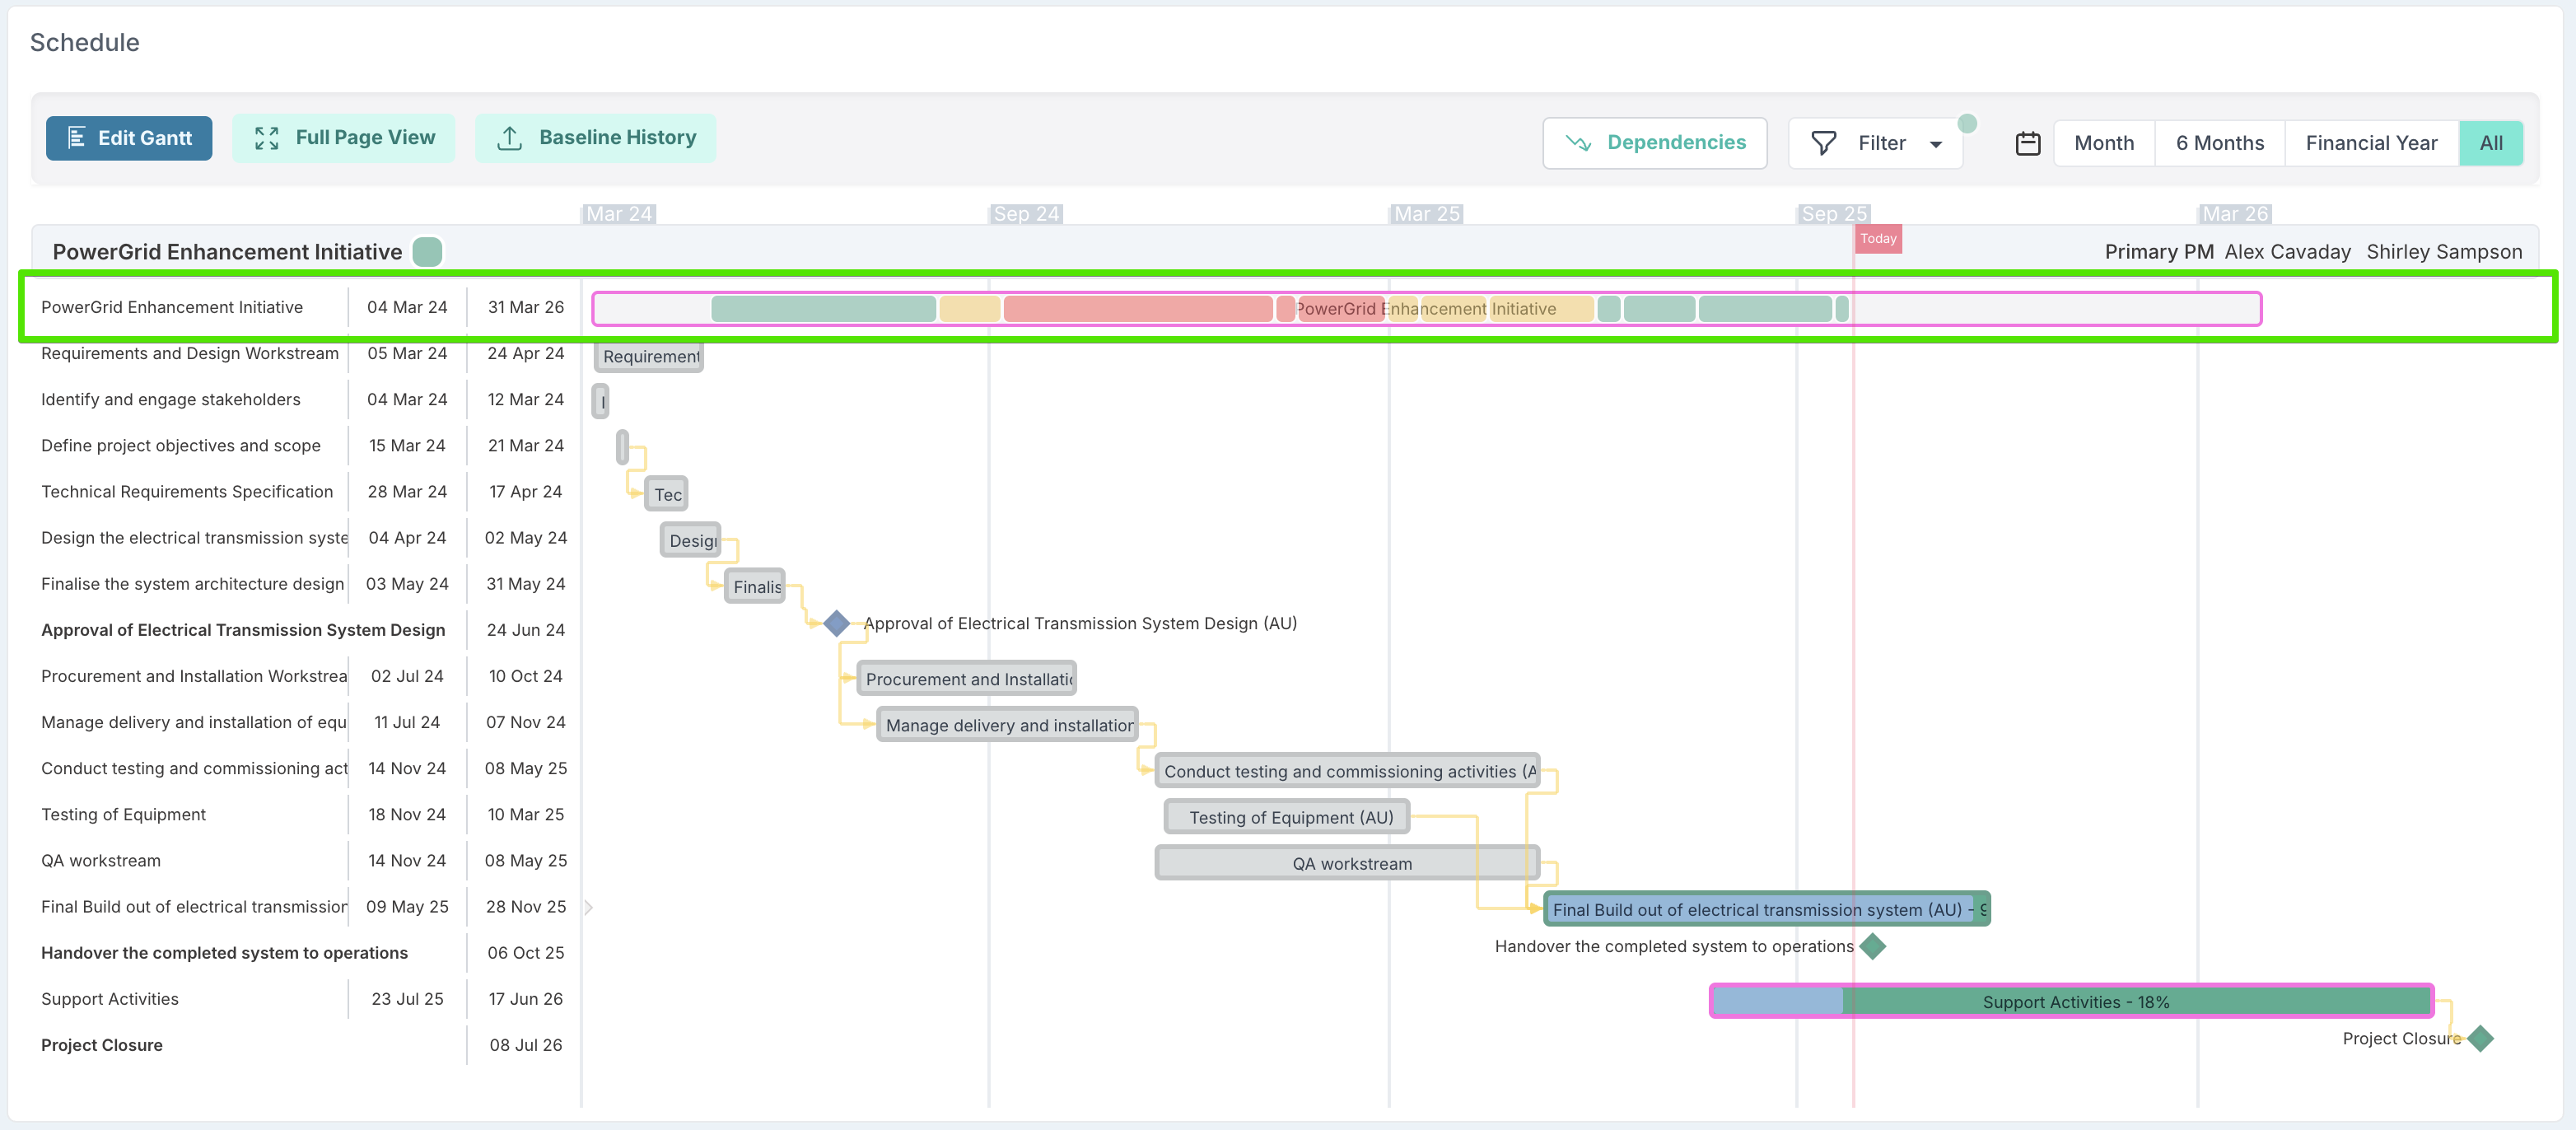
On project dashboards, you can quickly spot which projects were at risk and have since recovered, and which have slipped further into red. This makes it much easier to understand not only the current state of delivery but also the path the project has taken to get there.
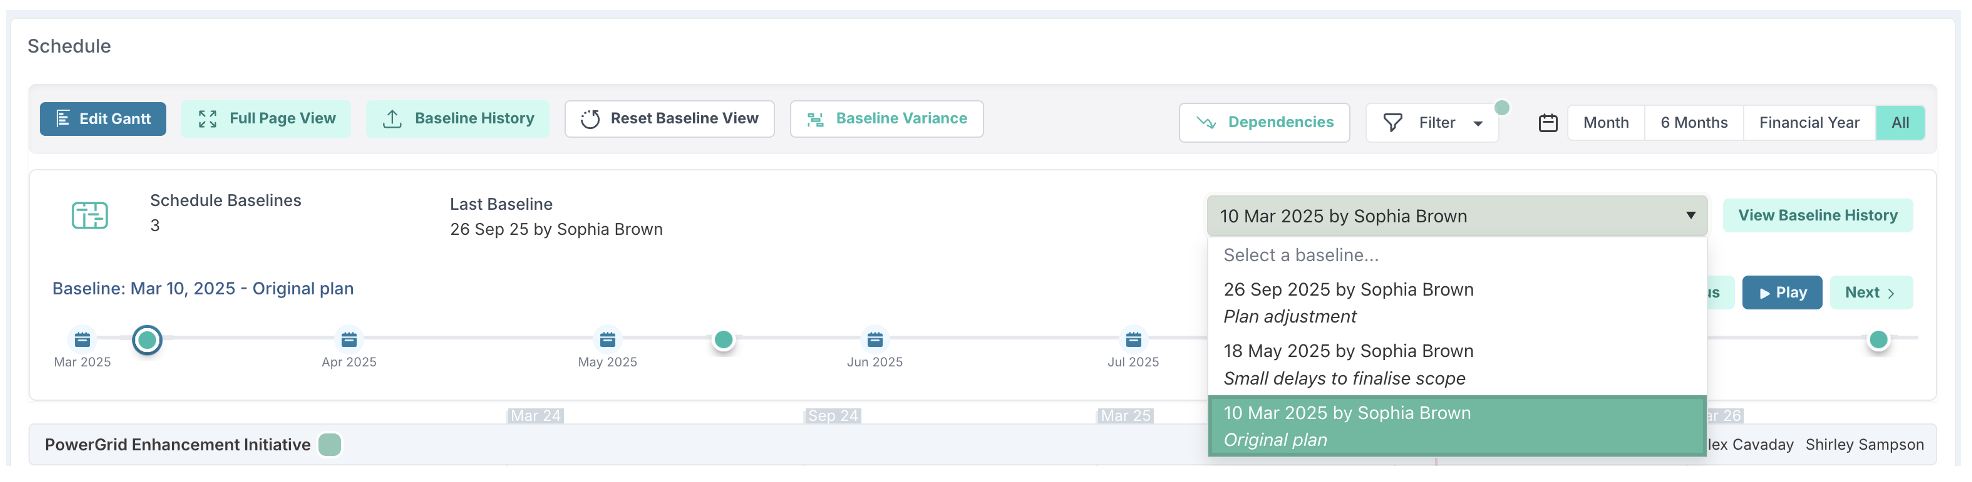
Viewing baseline history
Click Baseline History to see all the baselines that have been created for your schedule. You can:
Pick a specific month from the timeline.
Click on one of the dots that represent baseline dates.
Select a baseline directly from the dropdown list. This list represents the baselines
This flexibility makes it easy to jump into the point in time you want to review.
When a baseline is selected, the schedule shows how each task has moved. Coloured lines appear beneath the task bars to indicate variance:
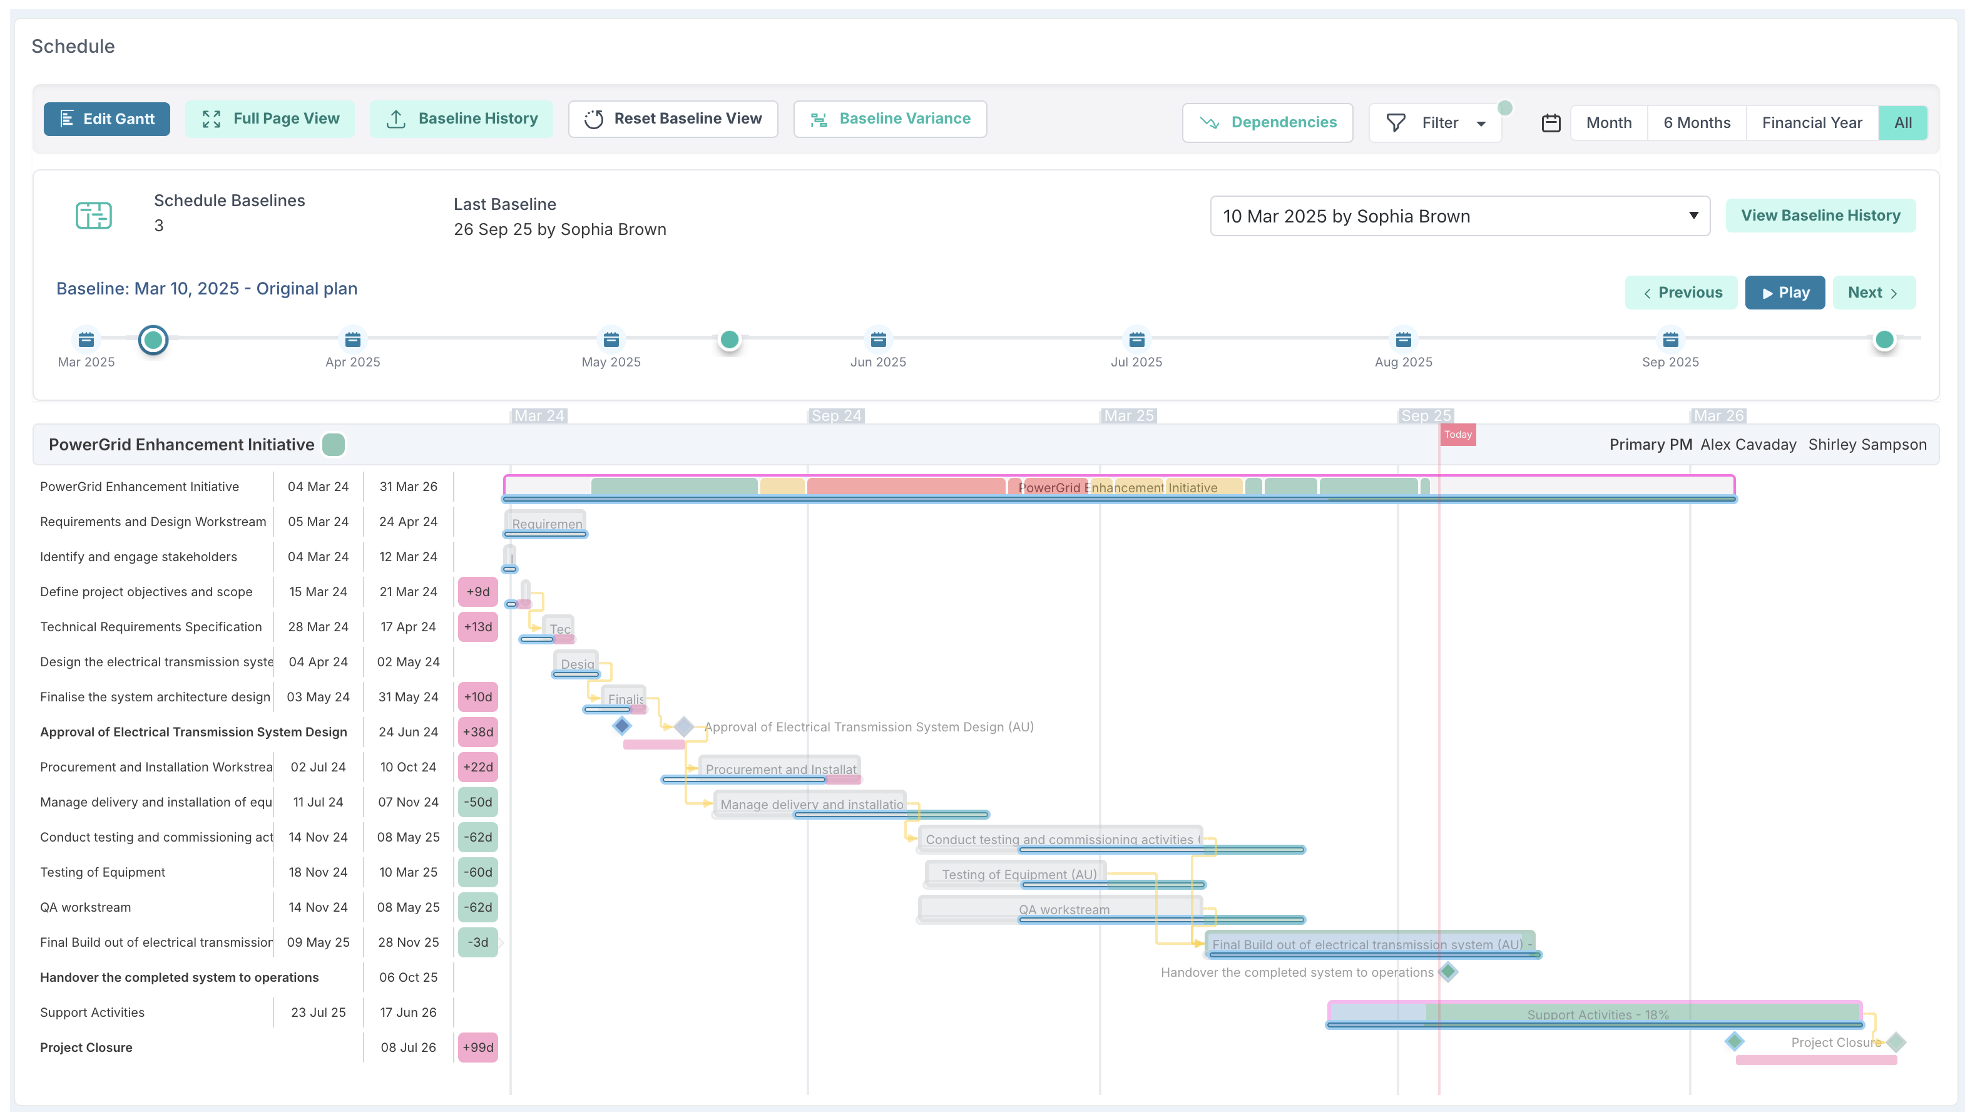
Variance column – numerical shift (e.g. +22d = task delayed by 22 days, –5d = task started 5 days earlier).
Blue line under the task – where the task was originally planned.
Pink line under the task – how much later it has moved.
Green line under the task – how much earlier it has moved.
This lets you see, at a glance, whether tasks are slipping or being delivered ahead of plan.
Baseline playback
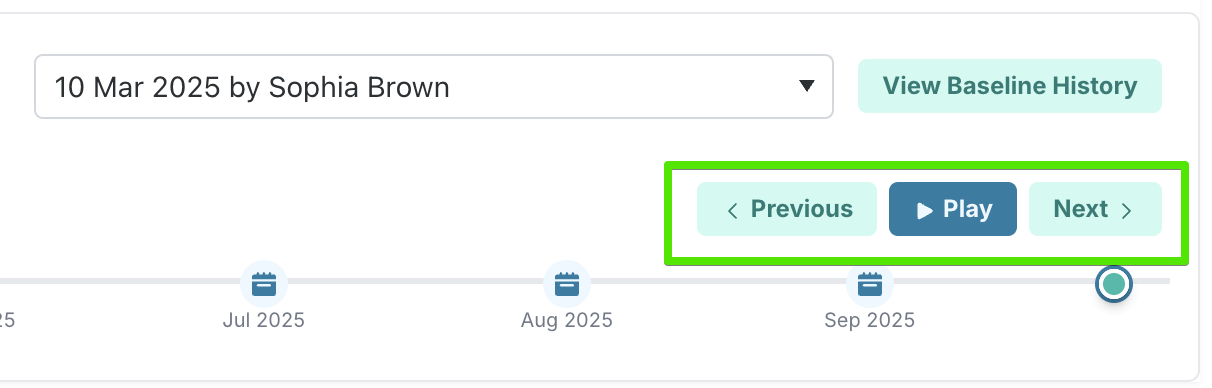
Use Previous/Next to step through baselines, or click Play to animate them in sequence. As playback runs, tasks move live on the schedule, so you can watch how the plan has shifted baseline by baseline.
Baseline history at task level
When you open a schedule task, you can now view the baseline history directly within the task record.
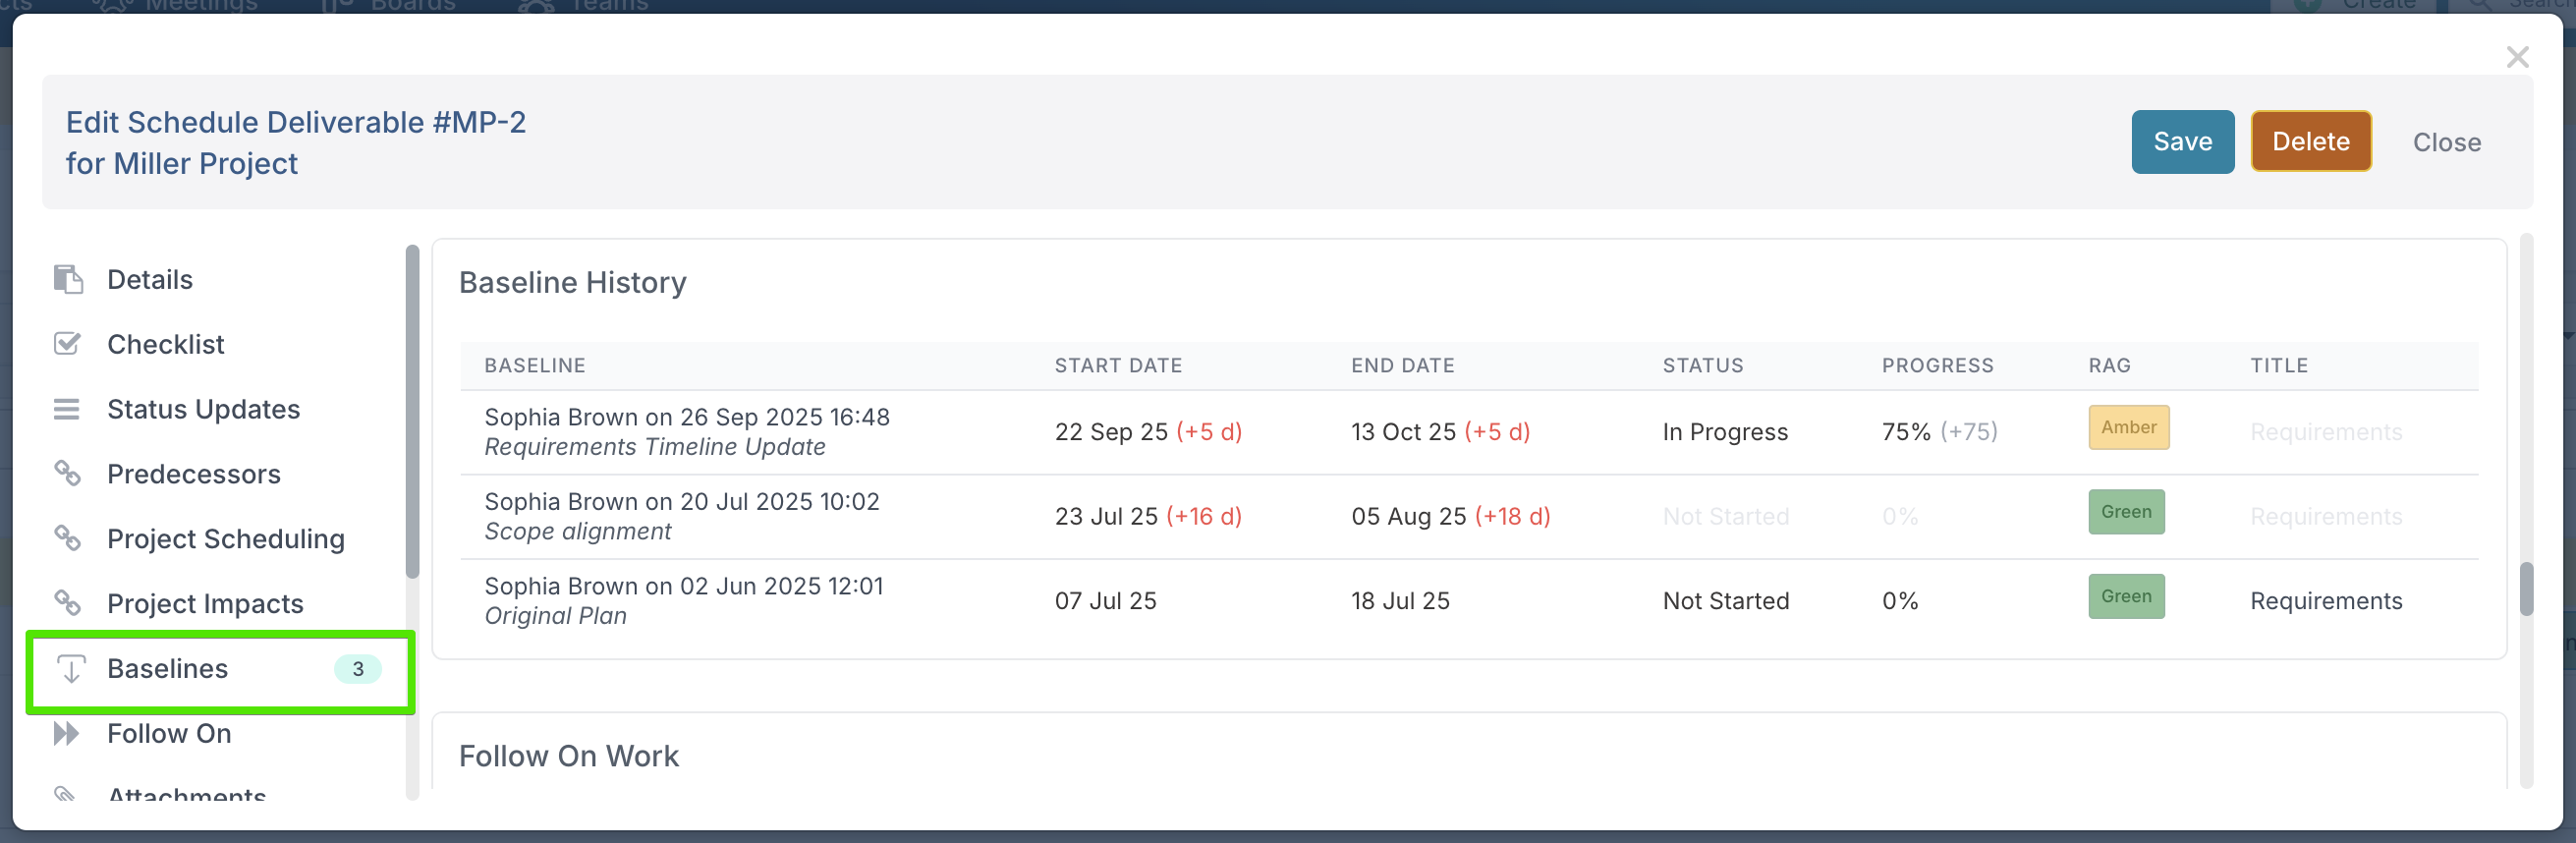
Each baseline entry shows:
The baseline date and description.
How the start and end dates have shifted compared to the baseline (e.g. +5d, +18d).
The status of the task at the time (e.g. Not Started, In Progress).
The progress percentage recorded against the task.
The RAG status (Green, Amber, Red).
The task title at the time of the baseline.
This means a baseline is not only about tracking how dates have changed — it also provides full context of where the task was in terms of status, progress, RAG status, and even title at that moment in time.
To make changes easy to spot, any field that has not changed between baselines appears greyed out. In the example above, the Requirements title is greyed out in two of the baselines because it stayed the same, while the start/end dates and progress fields are highlighted in colour where changes occurred.
By capturing this additional context, baselines become a complete audit trail: you can review not only when tasks shifted but also how they were performing and what information changed when the baseline was taken.
Important note on historical data
Baseline history tracking starts from this release. You will see your most recent baseline carried forward, but earlier baselines created before this update will not appear in the history. All new baselines taken from now on will be recorded and displayed in full.
Schedule Bulk Edit
When you download the Schedule Bulk Edit file, any existing baseline dates will be included if they exist for the tasks.
If you are a Project Administrator, you can use Bulk Edit to update or correct baseline dates. However, you cannot use Bulk Edit to add new baseline dates where none exist.
Here’s how it works:
If baseline dates already exist for a task, Bulk Edit allows you to update the most recent baseline date.
If no baseline existed for a given task, the upload will not create a new baseline.
This ensures that baseline creation remains controlled within the application itself, while allowing project administrators to correct baseline information safely via Bulk Edit.
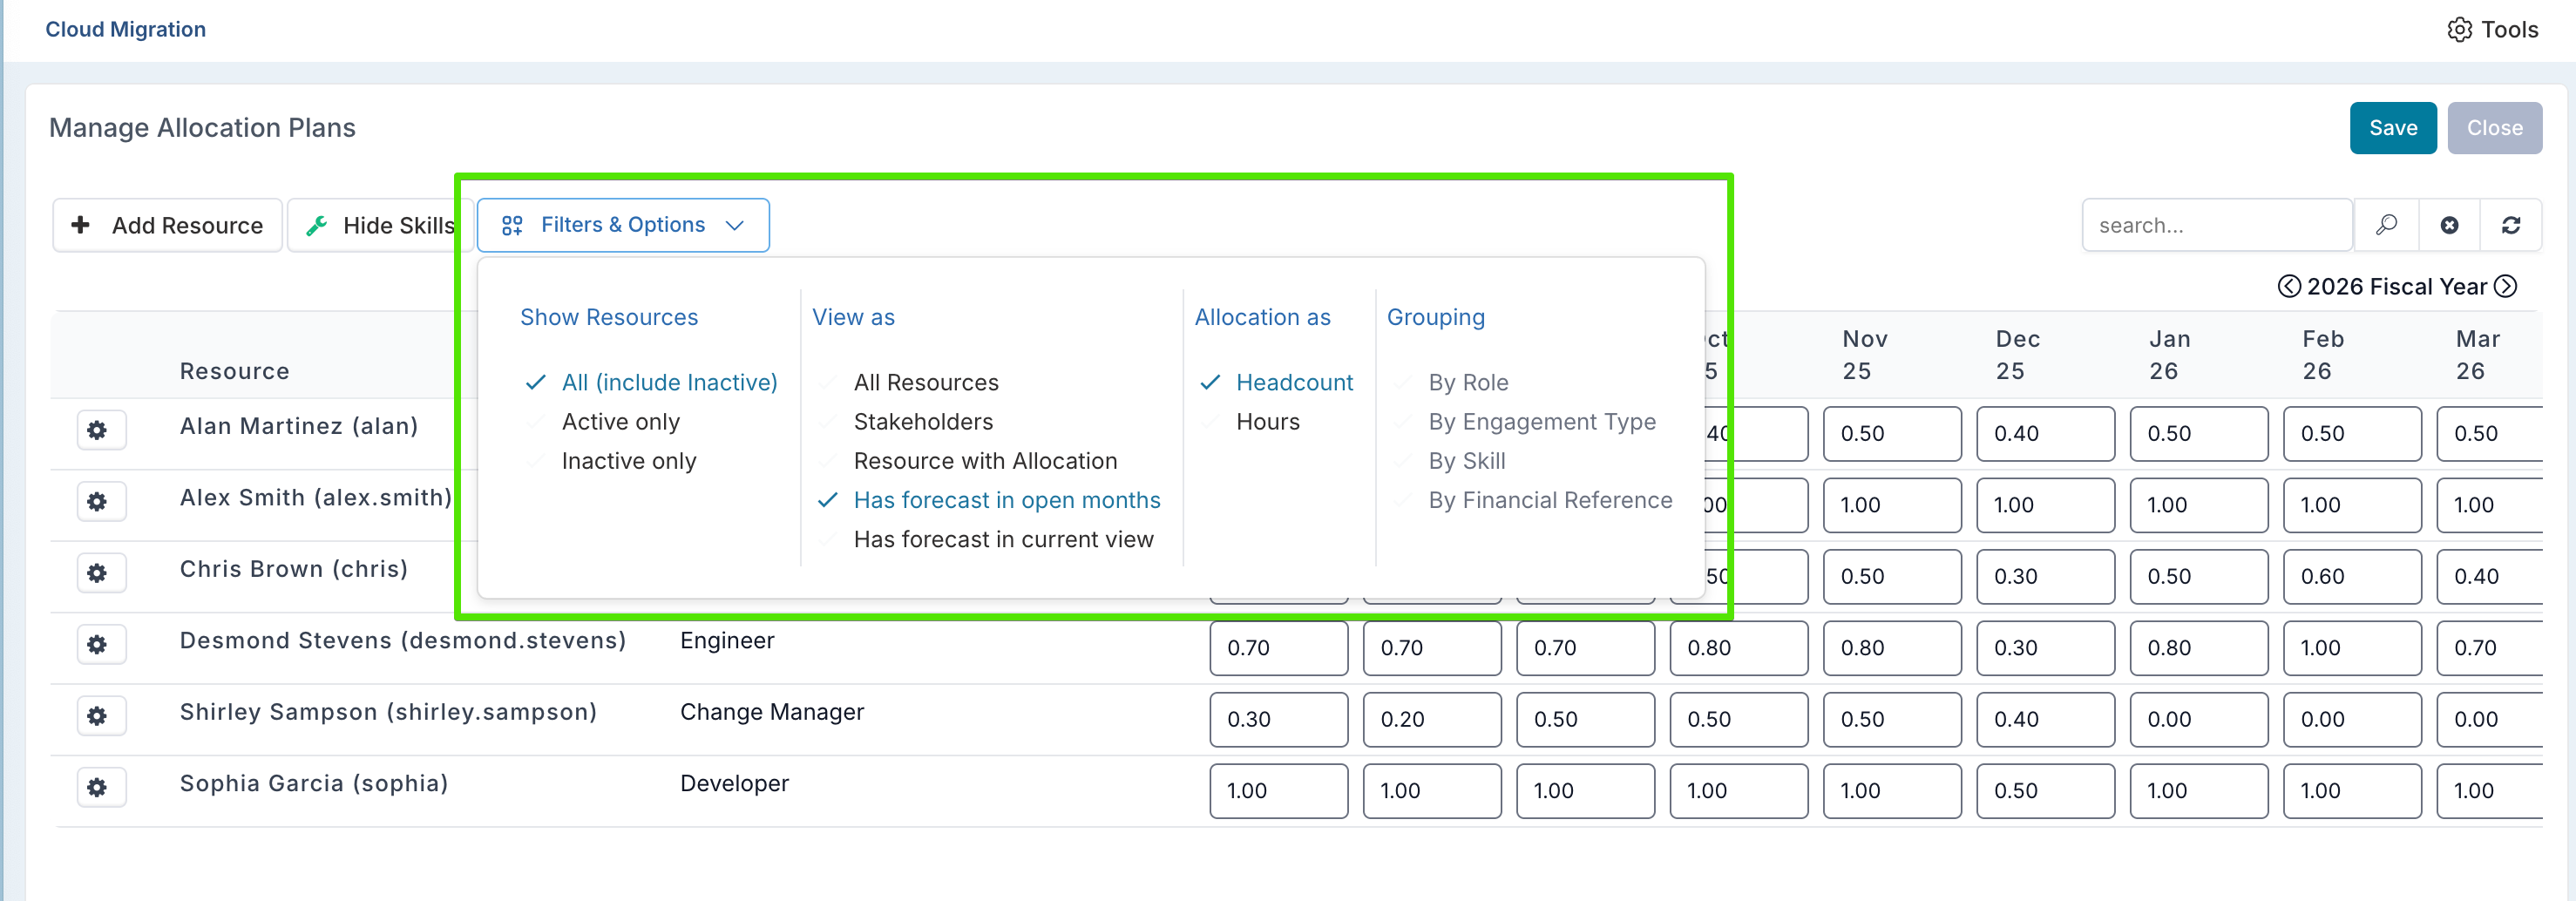
New: Improved Filtering in Resource Allocations and Community Views
We’ve introduced new filtering options in both the Project Workspace and the Community Allocation pages to make it easier to focus on active resources. You can now choose to:
Show all resources
Exclude inactive resources
Show inactive resources only
This enhancement is especially useful for long-running projects where some resources may have left the organisation. Excluding inactive resources keeps the view clear and focused on the team currently contributing to the project.
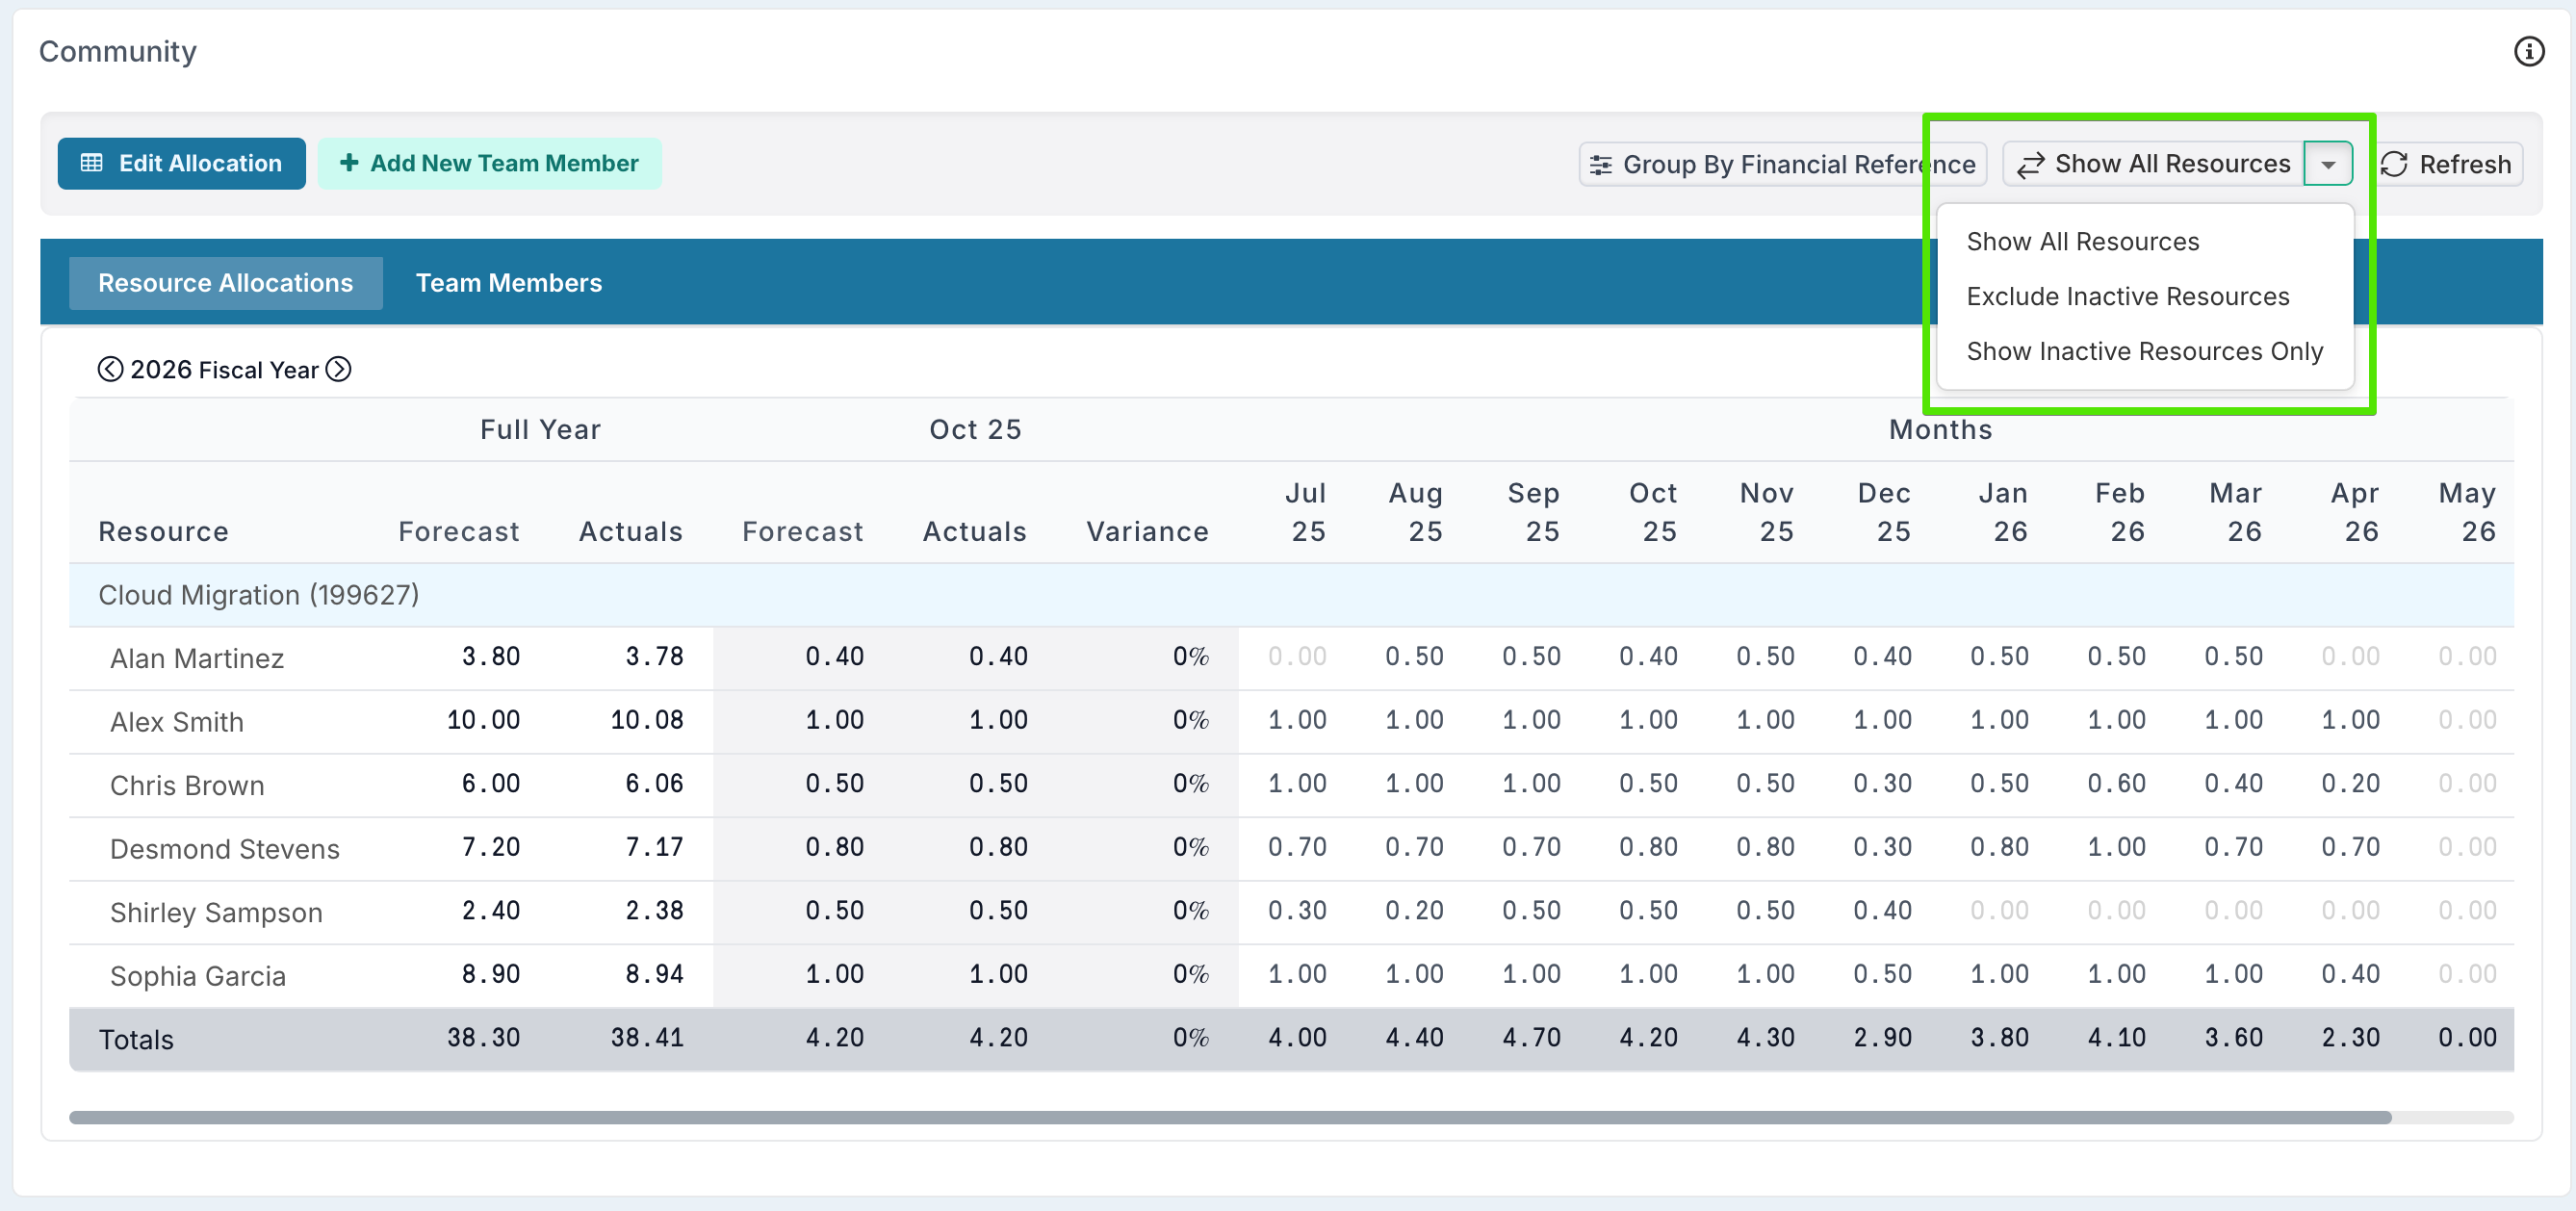
On the Community Allocation page, we’ve also redesigned the layout so that all grouping and filtering options are now conveniently available under the unified Filters & Options menu, giving you a cleaner and more intuitive experience when analysing allocations and capacity.
Enhancements & Fixes
Enable Project Managers to Baseline Schedules: By default, Project Managers can baseline their project schedules. If you want to restrict this capability, Project Administrators can turn off the Enable Project Managers Baseline feature from the Setup Project Features page. When this setting is disabled, only Project Administrators will be able to baseline schedules.

Project Scheduling: Improved the rendering of dependencies for large and complex schedules, resulting in better performance.
Resource Allocation Edit View & Bulk Edit: Prevented forecasts from being added to protected roles if the resource is not assigned to those roles. When project managers or stakeholders are removed from the project definition, their upcoming allocations are now automatically removed, and new allocations cannot be added to their previous roles unless they are reassigned.
Timesheet Instructions: Fixed an issue where an apostrophe character in the timesheet instructions prevented the timesheet page from rendering correctly.
User Creation: Fixed an issue where users could not be created if they had previously signed up but not completed registration. Administrators were receiving an error that the account already existed.
Meeting Documents: Fixed an issue where documents created via the meeting dialog were not visible.