This guide provides instructions for copying data between Fluid sites.
The sections in the article are numbered as a guide, as some data will have dependencies on others. You can go back at any time and amend the data, but this method maintains any existing data links, without the need to do this.
For example, the 'Project Details' file will likely contain assigned PMs, so it makes sense to upload your 'Resource Plan', which contains the assignee details, before your 'Project Details' file, if you haven't already or you will need to go back and reassign the PMs later once their profile has been created in the site.
Therefore, if you're copying multiple sets of data, it's recommended to follow the order listed, skipping sections you don't require.
Data Administration
Security Roles: You must be a Data Administrator or Application Administrator.
1. Catalogs
Note: If you are copying Catalogs from one site to another, we recommend to create the Catalogs before the custom properties as the Catalogs are listed as a 'Data Type' when creating a Custom Property that utilises a Catalog in Fluid.
Step | Instructions |
Download from Sandbox | Location: Administration Console > Catalogs Instructions: Click 'Tools' icon. Select 'Bulk Edit' from menu. Keep 'Include existing data' ticked. In the dialogue, you will need to select the Catalog for which you would like to download the Catalog entries for. 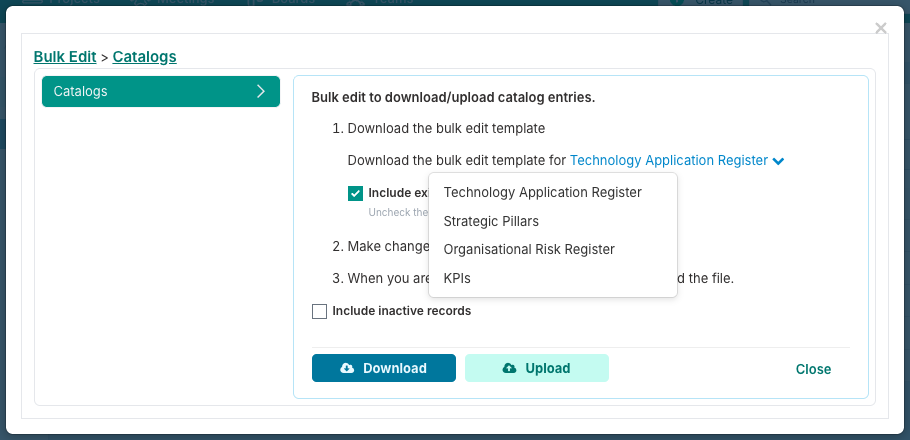
You will need to download each of these from Sandbox and upload to Production to migrate them. Click 'Download'.
|
Prepare the File | Delete the 'Catalog ID' column - this is system-generated. Review and update any other data as needed. For more information please see: Setting up Catalogs - at the bottom of the page is a table describing the columns in the file.
|
Upload to Production | Instructions:
First you will need to re-create the Catalogs. Click the 'Add Item' button to create a Catalog. Add the name of the first Catalog that you are recreating and update any of the other details to match Sandbox settings. Repeat for each Catalog that you need to migrate.
Then you will need to upload the Catalog Values using Bulk Edit.
Click 'Tools' icon. Select 'Bulk Edit' from menu. Click 'Upload'. Select and upload the file you downloaded from Sandbox. Repeat for each of the Catalog Values bulk edit file you downloaded from Sandbox.
|
2. Custom Properties
Prerequisites: If you are copying Catalogs from one site to another, we recommend to create the Catalogs before the custom properties as the Catalogs are listed as a 'Data Type' when creating a Custom Property that utilises a Catalog in Fluid.
It's important to set up your custom properties before migrating any other bulk edit files as many of these will utilise custom properties, including the Project Details.
Step | Instructions |
Locate in Sandbox | Location: Administration Console > Custom Properties
|
Replicate in Production | You will need to manually recreate the custom properties you want to use into your production site with the exception of Project Properties.
For the Project properties (Admin Console > Custom Properties > Project), you can: From Sandbox, click Copy From Board From the menu, select Export to File; this will download a JSON file (not a bulk edit spreadsheet). Then go to your Production site and file the same page (Admin Console > Custom Properties > Project) Click Copy From Board From the menu click Import from File Find the json file that you downloaded from Sandbox and upload that to Production You will need to select whether you want to 'Replace', Merge & Skip' or 'Merge & Overwrite - please read the descriptions in the dialogue and select the correct one. If you have no Project custom properties in Sandbox you can choose any - but be sure to check or you could overwrite existing data.
Note: this feature is designed for porting properties from boards to projects for use with pipeline boards, but works for project property migration too.
For the other custom property types, you can follow the steps in this article: Setting Up Custom Properties.
|
3. Custom Properties Shared List
It is recommended to set up your custom properties shared lists before migrating any of your bulk edit files as many of these will utilise shared lists.
Step | Instructions |
Locate in Sandbox | Location: Administration Console > Custom Properties Shared List
|
Replicate in Production | You will need to manually recreate the custom properties you want to use into your production site. You can follow the steps in this article: Setting Up Custom Property Shared Lists.
|
4. Global Themes
Step | Instructions |
Download from Sandbox | Location: Administration Console > Global Themes
Instructions: Click 'Tools' menu.
Select 'Bulk Edit'.
Click 'Download'.
The 'Global Themes' bulk edit file will download.
|
Prepare the File | Review the list of themes.
Remove any themes you don't want in Production by deleting the row from the file.
No other data needs to be removed.
|
Upload to Production | Instructions: Click 'Tools' menu.
Select 'Bulk Edit'.
Click 'Upload'.
Choose the same file you amended and saved.
|
5. Metadata Management
It's advised to migrate your metadata before migrating resources, projects and project data, as the metadata is used in these areas.
Step | Instructions |
Download from Sandbox | Location: Administration Console > Metadata Management
Instructions: Click 'Tools' menu.
Select 'Export Metadata'.
Click 'Download'.
|
Prepare the File | Remove any metadata you do not want to apply to Production by removing the row from the file.
Amend any metadata you would like to change before uploading to production.
There is nothing specific that you need to remove; there are no unique IDs in the metadata file.
|
Upload to Production | Instructions: Click 'Tools' menu.
Select 'Bulk Edit'.
Click 'Upload Metadata'.
Choose the same file you amended and saved.
|
Financials & Timesheets
Security Roles: You must be a Financial Administrator or Application Administrator.
6. Currency Management
Currency is used in the rate cards so it's advisable to upload currencies before rate cards.
Step | Instructions |
Download from Sandbox | Location: Financial Administration > Currency Management Instructions: Click 'Tools' menu.
Select 'Bulk Edit' from the menu.
The Currency Management file will download automatically.
|
Prepare the File | Remove all GUID entries from (column J) in the file you downloaded from Sandbox. Removing the GUID will allow Fluid to create a new currency record when the bulk edit file is uploaded.
Note: when you want to amend a currency that is already in the system, the GUID identifies the record and makes sure the details are changed. If you re-upload the file with no GUIDs after the records have been created, you will create duplicate currency records.
|
Upload to Production | Instructions: Click 'Tools' menu.
Select 'Bulk Edit' from the menu.
Click 'Upload'.
Upload the currency file that you downloaded and amended from Sandbox.
|
7. Expense Types
Expense Categories and Expense Types are also used in the rate cards (those of Class 'Resource'), therefore it's advised to migrate the expense categories and types before migrating the rate cards.
Step | Instructions |
Download from Sandbox | Location: Financial Administration > Expense Types
Instructions: Click 'Tools' menu.
Select 'Export Expense Types' from the menu.
The file will download automatically.
|
Prepare the File | You can remove the IDs, but if you don't it won't cause an error and Fluid will system generate them anyway.
Add, remove and amend any types that you don't want to migrate. Just be mindful that any Expense Categories and Types that are being for resources and costs will no longer be associated when you upload those.
|
Upload to Production | Instructions: Click 'Tools' menu.
Select 'Upload Expense Types' from the menu. Click 'Upload'.
Select the file you downloaded from Sandbox.
|
8. Rate Cards
Prerequisites: Currency Management and Expense Types are used by the Rate Cards.
Step | Instructions |
Download from Sandbox | Location: Administration Console > Rate Card Management
Instructions: Click 'Tools' menu.
Select 'Export Rate Card' from the menu.
The file will download automatically.
|
Prepare the File | Remove the data from the Id column.
Remove the data from the GUID column. Please ensure that you that you have a DEFAULT rate card as it is mandatory to have a default rate card in the site. The default rate card is used as the rate card where no rate card is assigned.
If you upload the file and there is no default rate card, you will need to create a new rate card and call it 'DEFAULT' and add any other details. Note: when you want to amend a rate card that is already in the system, the GUID identifies the record and makes sure the details are changed.
|
Upload to Production | Instructions: Click 'Tools' menu.
Select 'Upload Rate Card' from the menu.
Click 'Upload' from the dialogue.
Upload the rate file you downloaded.
Click the 'Apply to All Projects' button to apply the changes to all project financials forecast in open months.
|
User Management
Security Roles: You must be a User Administrator or Application Administrator.
9. Resource Labels and Field Names
10. Division, Department and Team
Step | Instructions |
Download from Sandbox | Location: Administration Console > Division, Department and Team 
Instructions: Click Tools > Bulk Edit.
Leave 'Include existing data' ticked and click 'Download'.
Open the downloaded file.
|
Prepare the File | Unless there's anything that you would like to remove, add or change, you can download this file from Sandbox and re-upload straight to Production to create them. If any division, department or team names already exist in production when you try to upload, those rows will be skipped when you upload the file.
Fluid will generate any Division IDs, Department IDs and Team IDs - even if you don't amend these in the download from Sandbox, when uploaded to Production they will be reassigned.
The TeamRef should remain the same for all entries as these are used in the Resource Plan when creating your users, resources and placeholders. If you have an invalid Team Ref, Fluid will generate one.
To see the full list of bulk edit rules, see: Uploading division, department and team data via Bulk Edit
|
Upload to Production | Instructions: Click 'Tools' menu.
Select 'Bulk Edit'.
Click 'Upload'.
Choose the file you downloaded from Sandbox.
Wait for the upload to complete.
|
11. Manage Resource Plans
This includes Resources / User Profiles & Placeholders.
Prerequisites: Division, Department and Teams, Resource Labels and Field Names (if labels and field names have been changed)
Step | Instructions |
Download from Sandbox | Location: User Management Financial administrators with a 'User Administration' role can find this functionality on the 'Financial Administration' page too. Instructions: Click 'Tools' menu.
Select 'Manage Resource Plans' from the menu.
When the Resource Plans dialogue appears, keep 'Download All Resources' ticked (this will download all user profiles including those who are licensed or collaborators who can log in, all unlicensed resources used for allocations and placeholders.
Choose whether you want to download and migrate inactive resources or not by ticking the relevant tick box.
Click 'Download'.
|
Prepare the File | Remove the data in the columns: ResourceId.
Update any security roles that may be different from Sandbox to Production (sometimes during onboarding champion teams give higher levels of access to their team members whilst exploring the product, but may not want to provide this level in production).
Ensure any custom property columns (beginning with an underscore '_') have been created in production or if you are not replicating in production, be sure the remove the column from the file). For more guidance on the Resource Plan Bulk Upload, see: Resource Plan Bulk Upload
|
Upload to Production | Instructions: When the Resource Plans dialogue appears, click 'Upload'.
Select the file that you downloaded from Sandbox and amended and upload the file.
|
Project Settings
Security Roles: You must be a Project Administrator or Application Administrator.
12. Project Labels & Field Names
Instructions: Locate in Sandbox and Production and update any field names you have customised and wish to mirror in Production.
Note that in this section, you not only update the project labels, but the controls for your Status Report settings, Project Impacts settings and global Default Dashboard page (Default Watchlist Page) are also set here so please check these.
You can read more here: Project Labels & Field Names.
13. Setup Project Features

14. Project Templates
Step | Instructions |
Download from Sandbox | Location: Administration Console > (Project Settings) Project Templates Instructions: You will need to do this for each project template that you want to migrate from Sandbox to production. Click on the name of the template or the pencil 'Edit' icon to open the template details dialogue.
Download the template files.
|
Prepare the File | |
Upload to Production | Instructions: You will need to do this for each project template that you want to migrate from Sandbox to production. Click the 'Create' button.
Add the template details in the dialogue, matching them from the template you are copying over from Sandbox.
Click 'Save'.
The dialogue will close.
Find the new template in the list and click the name of the pencil 'Edit' icon.
Upload the template files you downloaded from Sandbox into the relevant areas.
Click 'Save'.
|
15. Impact, Probability and Risk Rating

16. Methodologies, Phases and Stage Gates
Projects will use these so it's recommended to migrate the methodologies, phases and stage gates before uploading projects if you want the project to maintain the links with these.
Step | Instructions |
Download from Sandbox | Location: Administration Console > (Project Settings) Methodologies, Phases and Stage Gates Note: if Stage Gates are not turned on, the link will be shown as 'Methodologies, Phases, and Tasks'. Instructions: Click 'Tools' menu.
Select 'Bulk Edit'.
Click 'Download'.
|
Prepare the File | |
Upload to Production | Instructions: Click 'Tools' menu.
Select 'Bulk Edit'.
Click 'Upload'.
Choose the file that you downloaded from production and upload.
You will need to manually create the Phase Gates and Stage Gates in production as the bulk edit file currently only supports Methodologies, Phases and Phase Tasks.
Click 'Apply to All Projects' button to apply the new gates to existing projects.
|
17. Project Types
Projects will use these so it's recommended to migrate the Project Types before uploading projects if you want the project to maintain the links with these.
Step | Instructions |
Download from Sandbox | Location: Administration Console > (Project Settings) Project Types 
Instructions: Click 'Tools' menu.
Select 'Export MetaData'.
The file will download automatically.
|
Prepare the File | |
Upload to Production | Instructions: Click 'Tools' menu.
Select 'Upload MetaData'.
Click 'Upload'.
Choose the file that you downloaded from production and upload.
|
18. Portfolios and SubPortfolios
Projects will use these so it's recommended to migrate the portfolios and subportfolios before uploading projects if you want the project to maintain the links with these.
Prerequisites: If you have portfolio or subportfolio administrators, approvers, viewers assigned, then it makes sense to have imported your resource plans (which includes your resource profiles).
If you have not, you can come back and re-assign the administrators, approvers and viewers later when you have created the users in the system.
Step | Instructions |
Download from Sandbox | Location: Administration Console > (Project Settings) Portfolio and SubPortfolios Instructions: Click 'Tools' menu.
Select 'Export Portfolio & SubPortfolio'.
The file will download automatically.
|
Prepare the File | |
Upload to Production | Instructions: Click 'Tools' menu.
Select 'Upload Portfolio & SubPortfolio'.
Click 'Upload'.
Choose the file that you downloaded from production and upload.
|
19. Tier and Business Drivers
Projects will use these so it's recommended to migrate the Tier and Business Drivers before uploading projects if you want the project to maintain the links with these.
Step | Instructions |
Download from Sandbox | Location: Administration Console > (Project Settings) Tier and Business Drivers Instructions: Click 'Tools' menu.
Select 'Export Tier and Business Driver'.
The file will download automatically.
|
Prepare the File | |
Upload to Production | Instructions: Click 'Tools' menu.
Select 'Upload Tier and Business Driver'. Click 'Upload'.
Choose the file that you downloaded from production and upload.
|
Projects
Security Roles: Only users with Financial Administrator and Data Administrator roles on their account can download and upload project details. Users with only Financial Administrator role only can download the project details file but cannot upload it.
20. Project Details
Prerequisites: Resource Plans, Catalogs, Custom Properties (Project), Custom Property Shared Lists, Metadata, Global Themes, Project Labels & Field Names, Setup Project Features, Methodologies, Phases and Stage Gates, Project Types, Portfolio and SubPortfolios, Tier and Business Drivers.
Step | Instructions |
Download from Sandbox | Location: Data Administration > Project Details (Download)
Instructions:
Click the 'Download' button for the 'Project Details'; the file will download automatically.
Or
Location: Projects (Top Navigation) > Tools > Bulk Edit Instructions: You can filter the dashboards watchlist to include only the project that you want to download the data for.
For example, if you want to only migrate 'Active' projects, apply the 'Active' Status filter before downloading the 'Project Details' bulk edit file.
'Tools' > 'Bulk Edit'.
Select Project Details on the left of the Bulk Edit dialog.
If you want to download existing data from the projects into the file set the flag to Yes. To extract a blank upload file, set it to No.
Click on Download.
|
Prepare the File | Remove any rows of project that you do not want to migrate from the bulk edit file.
Remove all data from columns that contain project IDs and reference numbers: ProjectID, ProjectGuid, Immediate Parent Id, Top Parent Project Id, Program Id.
Ensure that your custom property fields (those that begin with and underscore '_', are available in production). You can leave the Immediate Parent, Immediate Parent Ref, Top Parent Project, Top Parent Project Ref, Program, Program Ref, ReportingProgram and Reporting Program Ref data in the file to relink your projects to create you project hierarchies. You can leave the ProjectRef date in the file. The Schedule Tasks reference these to link them to the project. For more guidance, see: Project Details: Bulk Edit and Project Details Upload
|
Upload to Production | Location: Data Administration > Project Details (Upload)
Instructions: Click the 'Upload' button for the 'Project Details'.
Select 'Upload Data' a search for the file you downloaded and amended from Sandbox.
OR
Location: Projects (Top Navigation) > Tools > Bulk Edit
Instructions: 'Tools' > 'Bulk Edit'.
Select 'Project Details' on the left of the Bulk Edit dialog.
If you want to download existing data from the project/s into the file set the flag to Yes. To extract a blank upload file, set it to No.
Click on Upload.
Select the file you download and amended from Sandbox.
|
21. Schedules
Prerequisites: Metadata, projects (Project Details) and Resource Plans to link any task assignees.
File: Schedule Tasks
Step | Instructions |
Download from Sandbox | Location: Projects (Top Navigation) > Tools > Bulk Edit Instructions: You can filter the dashboards watchlist to include only the project's tasks that you want to download the data for.
For example, if you want to only migrate 'Active' projects, apply the 'Active' Status filter before downloading the 'Schedule Tasks' bulk edit file to get a list of tasks for active projects only.
'Tools' > 'Bulk Edit'.
Select 'Schedule Tasks' on the left of the Bulk Edit dialog.
Tick 'Include existing data' to download existing data. Tick 'Include sub projects' to include sub projects.
Click on Download.
|
Prepare the File | Remove any data in the ProjectId, Id, and Guid columns.
Important: Remember, when you upload a schedule task row in a bulk edit file that has no GUID, Fluid will create a new task with those details. If you have already added any of the schedule tasks in Fluid, you will need to remove them from the file so that you do not create duplicate tasks in projects. For more information, see: Project Schedule Bulk Edit
|
Upload to Production | Instructions: 'Tools' > 'Bulk Edit'.
Select 'Schedule Tasks' on the left of the Bulk Edit dialog.
Click on Upload.
Select the file that you downloaded and amended from Sandbox.
|
23. Project Impacts
Prerequisites: Project Labels & Field Names (Project Impacts) , project s(Project Details) and Resource Plans for maintaining impact assignees.
Step | Instructions |
Download from Sandbox | Location: Projects (Top Navigation) > Tools > Bulk Edit Instructions: You can filter the dashboards watchlist to include only the project's impacts that you want to download the data for.
For example, if you want to only migrate 'Active' projects, apply the 'Active' Status filter before downloading the 'Impacts' bulk edit file to get a list of impacts for active projects only.
'Tools' > 'Bulk Edit'.
Select 'Project Impacts' on the left of the Bulk Edit dialog.
Tick 'Include existing data' to download existing data.
Click on Download.
|
Prepare the File | |
Upload to Production | Instructions: 'Tools' > 'Bulk Edit'.
Select 'Project Impacts' on the left of the Bulk Edit dialog.
Click on Upload.
Select the file that you downloaded and amended from Sandbox.
|
24. Status Reports
Prerequisites: Custom Properties, Metadata (RAGs and Component RAGs), projects (Project Details), Resource Plans as the project statuses use assignees to establish owners and Impacts, to maintain any linked impacts.
These instructions step you through how to import the latest project status report for each of the projects. There are instructions for uploading historic status reports on a project by project basis below the first table.
Step | Instructions |
Download from Sandbox | Location: Project Dashboards (Click the 'Projects' button in the top navigation bar.
Instructions: Before you download the bulk edit file, you can add filters to the dashboard to select just the projects that you wish to migrate.
For example, if you only wish to migrate active projects, you can apply the 'Active' Status filter and download details for those projects only.
Click Tools > Bulk Edit.
Select 'Project Status' from the left hand list.
Leave 'Include Existing Data' ticked.
Click 'Download'.
|
Prepare the File | Remove all data from the ProjectId columns. Remove all data from other columns that use an ID, such as: Resource Issue/Risk Id, Scope Issue/Risk Id and the Timeline Issue/Risk Id columns they will have different IDs in Production.
Remove any lines for projects you do not wish to upload the status for in Production. For more information, see: Project Status: Bulk Edit
|
Upload to Production | Instructions: Click Tools > Bulk Edit.
Select 'Project Status' from the left hand list. Click 'Upload'.
Upload the file you downloaded from Sandbox and updated.
|
To add the historic project status reports to an individual project:
Step | Instructions |
Download from Sandbox | Location: Project Workspace Instructions: Click Tools > Bulk Edit.
Select 'Project Status' from the left hand list.
Leave 'Include Existing Data' ticked.
Click 'Download'.
|
Prepare the File | You do not need to update the file, but do check that you have added any custom properties used by the status report into Production, or if you are not migrating those, remove any custom property columns from the bulk edit file that do not exist in Production. For more information, see: Project Status: Bulk Edit
|
Upload to Production | Instructions: Find the corresponding project in Production that you wish to apply the status reports to.
Click Tools > Bulk Edit.
Select 'Project Status'.
Click 'Upload'.
Upload the file you downloaded from Sandbox'.
|
Resource Forecasts
25. Resource Forecasts
Prerequisites: Metadata Management, Rate Cards, Resource Labels & Field Names, Resource Plans, Project Details.
File: Resource Forecasts
Step | Instructions |
Download from Sandbox | Location: Project Dashboards (Click the 'Projects' button in the top navigation bar.
Instructions: Before you download the bulk edit file, you can add filters to the dashboard to select just the projects that you wish to migrate.
For example, if you only wish to migrate active projects, you can apply the 'Active' Status filter and download details for those projects only.
Click Tools > Bulk Edit.
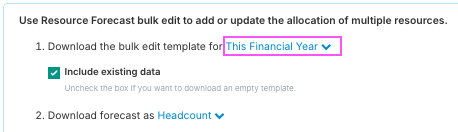
Select 'Resource Forecast' from the left hand list.
Keep 'Include existing data' ticked.
Choose the date range that you are downloading.
Click 'Download'.
|
Prepare the File | |
Upload to Production | Instructions: Click Tools > Bulk Edit.
Select 'Resource Forecast' from the left hand list.
Click 'Upload'.
Select and upload the file you downloaded and amended from Sandbox.
|
Project Financials
Security Roles: You must be a Financial Administrator or Application Administrator.
26. Baseline Forecasts
Prerequisites: MetaData Management, Project Details, Currencies, Expense Categories and Types, Resource Plans.
File: Baseline Forecast
Step | Instructions |
Download from Sandbox | Location: Project Dashboards (Click the 'Projects' button in the top navigation bar.
Instructions: Before you download the bulk edit file, you can add filters to the dashboard to select just the projects that you wish to migrate.
For example, if you only wish to migrate active projects, you can apply the 'Active' Status filter and download details for those projects only.
Click Tools > Bulk Edit.
Select 'Baseline Forecast' from the left hand list.
Choose the date range that you are downloading. 
Choose 'Download Baseline Forecast' or 'Download Full Year Forecast' depending on which you need.
Click 'Download'.
|
Prepare the File | |
Upload to Production | Instructions: Click Tools > Bulk Edit.
Select 'Baseline Forecast' from the left hand list.
Click 'Upload'.
Select and upload the file you downloaded and amended from Sandbox.
|
27. Project Benefits
Prerequisites: MetaData Management, Project Details, Currencies, Expense Categories and Types, Resource Plans.
Files: Project Benefits (Fluid Benefits-qualitative, Fluid Benefits-quantitative, Fluid Benefits-quantitativeNonResourcing)
Step | Instructions |
Download from Sandbox | Location: Project Dashboards (Click the 'Projects' button in the top navigation bar. Instructions: Before you download the bulk edit file, you can add filters to the dashboard to select just the projects that you wish to migrate.
For example, if you only wish to migrate active projects, you can apply the 'Active' Status filter and download details for those projects only.
Click Tools > Bulk Edit.
Select 'Project Benefits' from the left hand list.
You have three option in the form of check boxes: Download Qualitative Benefits, Download Quantitative Resourcing benefits and Download Quantitative Non Resourcing Benefits. If you are migrating all of these, click each option and download the file in turn.
Choose whether you want to 'Include closed benefits'.
Click 'Download'.
|
Prepare the File | Remove the data from the ProjectId column.
Remove the data from the GUID column.
Important: Remember, when you upload a row in a bulk edit file that has no GUID, Fluid will create a new project benefit with those details. If you have already added any of the project benefits in Fluid, remove them from the file so that you do not create duplicate the project benefits.
For more information, see: Project Benefits: Bulk Edit
|
Upload to Production | Instructions: Click Tools > Bulk Edit.
Select 'Project Benefits' from the left hand list.
Click 'Upload'.
Select and upload the file you downloaded and amended from Sandbox. Do this for each of the files you downloaded.
|
Project Dashboards and Reporting Templates
Troubleshooting
Bulk File: Skipped Rows or Didn't Upload the Data
When your file uploads, the dialogue will list any issues encountered. It will display the row number from the spreadsheet, and the reason why it skipped the row. You can use this to diagnose any issues with your data.
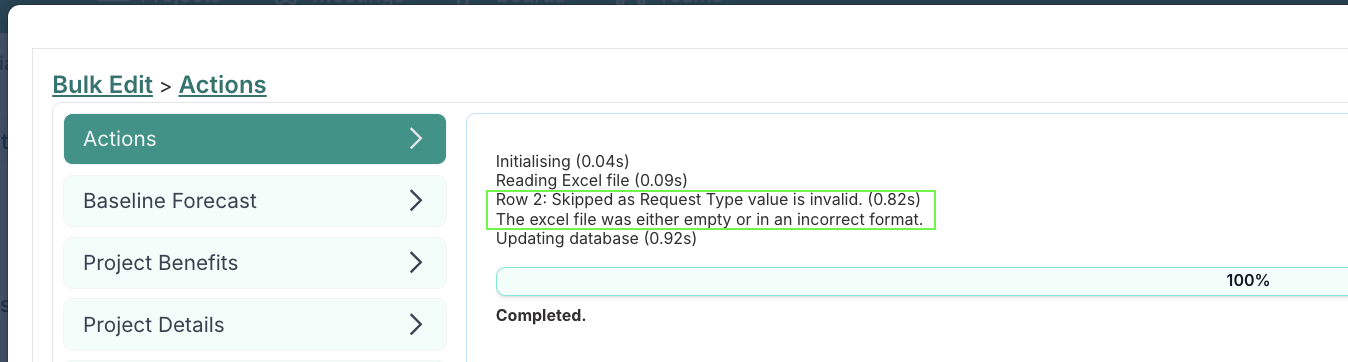
To rectify any issues with the data for any skipped rows, in most cases, you can reopen the file you uploaded, make the necessary updates, save and re-upload the file.
Important Note: If the file rows use GUIDs, please remember not to re-upload the file with the lines that did successfully upload, or you may create duplicates of those items. The 'Schedule Tasks' file is an example of this.
In cases where some rows have not uploaded, and the rows use GUIDs, you should remove any lines that you have confirmed did upload from the file in order to not create those items again.