
How to setup SCIM with Okta
SCIM is a protocol that standardizes how identity information is exchanged between one entity and another. It's an open standard and is widely used to simplify the process of granting people or groups access to cloud-based applications.
In an enterprise work scenario, using SCIM reduces the effort it takes to create, modify, and synchronize employee accounts and govern the resources employees have access to.
How SCIM works
In addition to providing a predefined schema for common identity attributes like group name, username, first name, last name, and email, SCIM provides a standardized definition of client and service provider roles. A client is usually an identity provider or IAM system, such as Okta. A service provider is typically a software-as-a-service app. The client manages core identity information that apps need to grant or refuse access.
SCIM uses a REST API to perform the actions needed to manage identity lifecycles. The database operation acronym CRUD describes the basic REST actions SCIM provisioning uses:
Create - add new users in applications.
Read - retrieve or search for information from existing identities and groups.
Update - synchronize updated identity information between the client and apps.
Delete - deprovision identities.
SCIM vs. SAML
Security Assertion Markup Language (SAML) and SCIM are both open-standard protocols that streamline the exchange of identity data. SAML is commonly used to provide SSO for enterprise applications and to extend SSO across security domains. Similar to SCIM, it plays a role in enabling people to use the same credentials to access multiple services. SCIM lays the foundation for SAML to work by creating, updating, or deleting user profiles in the target system with the necessary information for the user to sign in to an app.
SAML is based on Extensible Markup Language (XML) and uses it to make security assertions, which are statements that service providers use to decide whether to grant access to a resource. When SAML authenticates that your identity can have access to a resource, it gives you an access token for a single session in your browser. Both SCIM and SAML are underlying technologies commonly used in enterprise IAM solutions.
More information can be found at Fluid SAML
SCIM vs. SSO
SCIM and SSO are two different technologies that play slightly different roles in managing identities and access. SCIM is for provisioning identities across multiple applications, and SSO is for authenticating users in multiple applications with a single set of credentials.
SCIM supports SSO and works together with it. SSO requires user provisioning to function. Enterprise IAM systems tend to use a complex mix of technology to make the user experience seamless, and SCIM, SSO, and SAML are all technologies that help achieve that aim.
Setting up SCIM in Fluid
1. Login to Okta Admin Console
Sign in to your Okta organization as an administrator.
2. Navigate to Applications
From the left navigation menu, click Applications → Applications.
3. Browse App Catalog
Click Browse App Catalog to search for available integrations.
4. Search for SCIM 2.0 Test App (Header Auth)
In the search box, type "SCIM 2.0 Test App (Header Auth)" and select it from the results.
5 . Add Integration
Click Add Integration to begin the setup process.
6 . Configure General Settings
Application label: Enter a recognizable name such as "Fluid SCIM" or "Fluid User Provisioning"
Leave the visibility checkboxes as default (unchecked)
Click Next
7. Configure Sign-On Options
Select your preferred sign-on method:
SAML 2.0 (recommended if you have SSO configured)
Click Done to create the application.
Note: This sign-on configuration is separate from the SCIM provisioning. If you already have Fluid SSO configured, ensure consistency with your existing setup.
8. Configure SCIM Secret Token in Fluid
Before connecting Okta to Fluid, you need to generate and configure the shared SCIM secret token in Fluid.
Login to Fluid with an account that has administrator privileges.
Navigate to Administration Console by clicking the settings icon.
Select Authentication Providers from the left menu.
Scroll to the SCIM Configuration section:
Ensure that "Disable SCIM User Sync" is NOT enabled (it should be unchecked)
Enter a SCIM Secret Token. This is a shared secret between Fluid and Okta.
Important Security Note:
This token acts as a bearer token and will be included by Okta with every SCIM request sent to Fluid. Fluid validates the token before granting access to the SCIM API.To help protect your environment, ensure the token complies with your organisation’s security policies for secret generation and storage. We recommend using a strong, randomly generated token with a minimum length of 32 characters, including a combination of uppercase letters, lowercase letters, numbers, and special characters.
Click Save
Copy the token immediately – you'll need it in the next step and won't be able to view it again
Note: Secrets are stored in a secure encrypted keyvault in Fluid.
9 . Configure API Integration in Okta
Return to your Okta Admin Console where you created the SCIM application.
Click the Provisioning tab.
Click Configure API Integration.
Check the box Enable API integration.
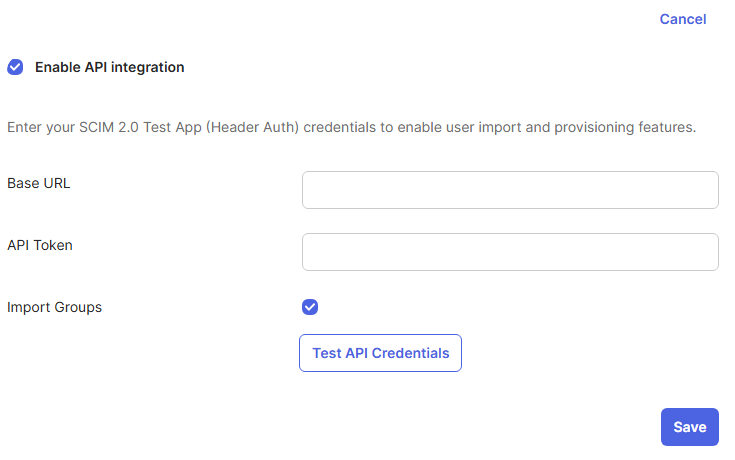
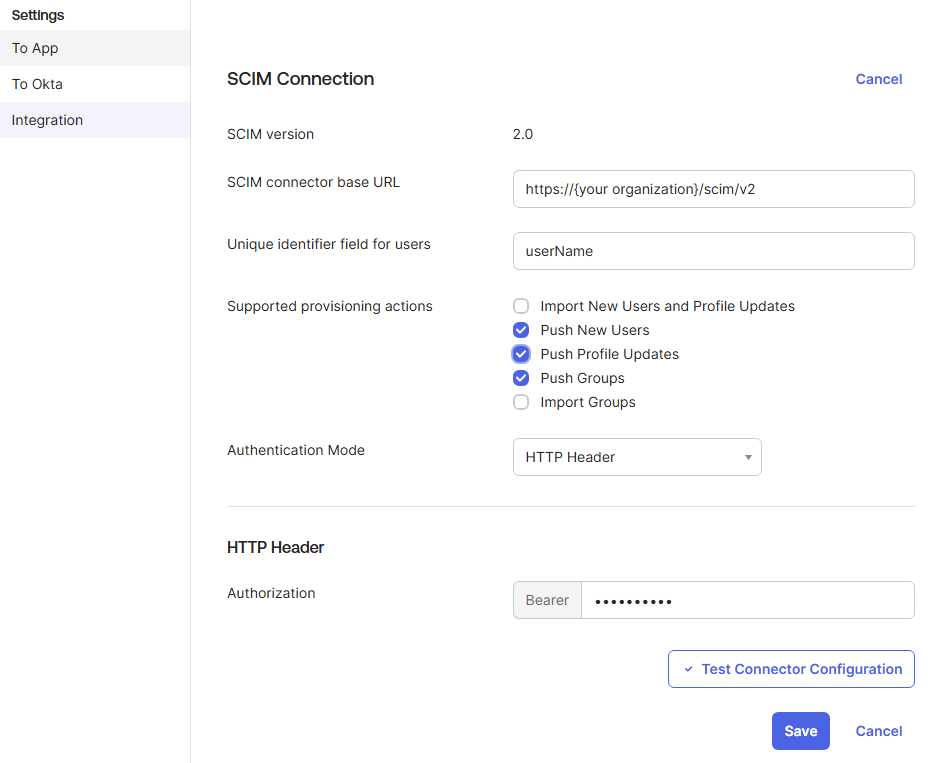
Configure the connection settings:
SCIM Base URL: Enter
https://{organisation}.fluid.work/scim/v2Replace
{organisation}with your Fluid instance nameYou can find this by looking at the URL when logged into Fluid (e.g., if your Fluid URL is
https://acme.fluid.work, useacme)
API Token: Paste the SCIM Secret Token you generated in Fluid (Step 8)
Authentication Method: The default "HTTP Header" authentication is correct
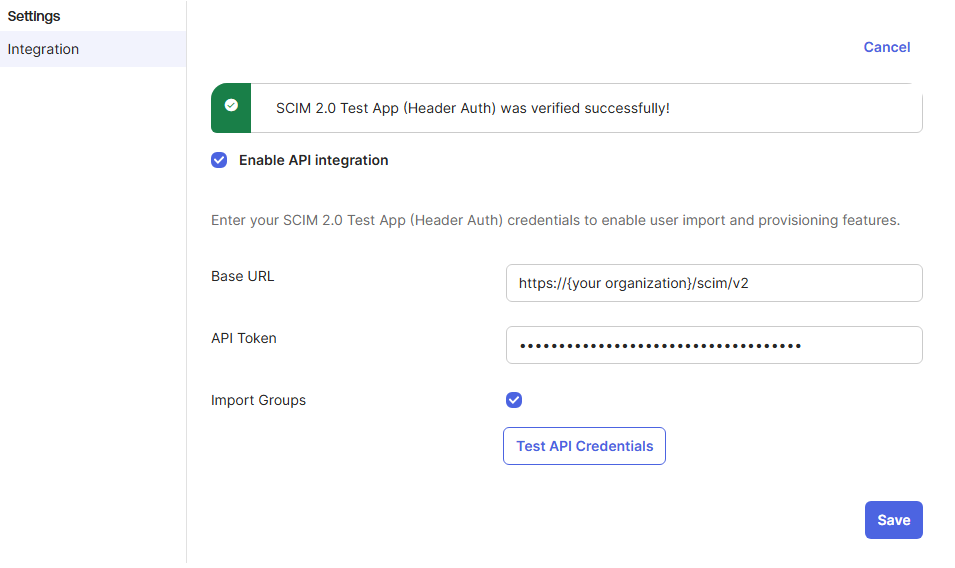
Click Test API Credentials to verify the connection.
If successful, you'll see a verification message
If unsuccessful, verify:
The base URL is correct (check your organization name)
The token was copied correctly from Fluid
SCIM is enabled in Fluid (not disabled)
Click Save once the test is successful.
10. Configure Provisioning Settings
After saving the API integration, you'll see additional provisioning options.
Click To App in the left sidebar under Provisioning.
Click Edit to configure provisioning features.
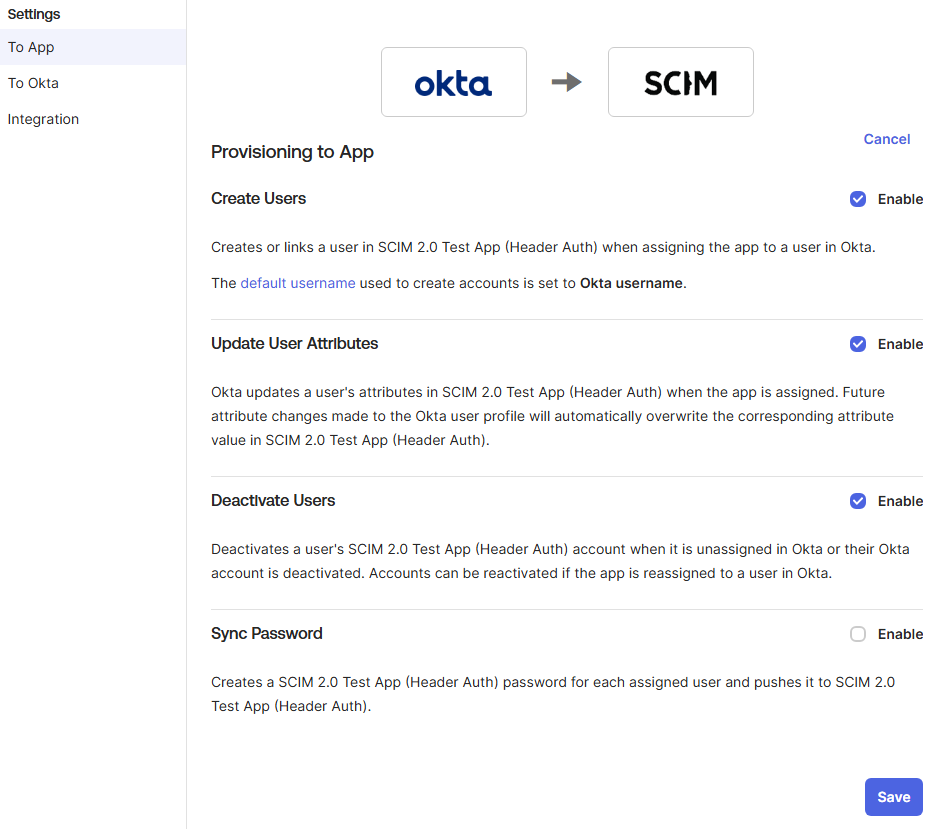
Enable the following options:
Create Users - Automatically create users in Fluid when assigned in Okta
Update User Attributes - Sync attribute changes from Okta to Fluid
Deactivate Users - Automatically deactivate users in Fluid when unassigned in Okta
Leave the following disabled:
Sync Password - Not supported (users will use SSO)
Click Save.
Click integration to review configured provisioning features.
11. Configure Attribute Mappings
Navigate to Provisioning → To App → Attributes (or scroll down to see attribute mappings).
Verify the default mappings are correct. The required minimum mappings should be:
Note: The default attribute mappings for SCIM 2.0 are typically correct and shouldn't need modification. Only adjust if you have custom attributes or specific requirements.
User Attributes:
Okta Attribute | Fluid Attribute | Required |
|---|---|---|
userName | userName | Yes |
givenName | name.givenName | Yes |
familyName | name.familyName | Yes |
emails[primary].value | Yes | |
displayName | displayName | No |
active | active | Yes |
Group Attributes:
Okta Attribute | Fluid Attribute | Required |
|---|---|---|
name | displayName | Yes |
members | members | Yes |
If you need to modify any mapping:
Click the pencil icon next to the attribute
Select the appropriate Okta attribute to map
Choose Apply on: Create and update
Click Save
12. Assign Users to the Application (User Creation)
Okta uses Assigned Groups to manage user provisioning and deactivation in Fluid.
When a user is added to an Assigned Group in Okta, Okta sends a SCIM user creation request to Fluid, automatically creating the user account. Similarly, when a user is removed from the Assigned Group, Okta sends a deactivation request, and the user is deactivated in Fluid.
Important: Only users or groups explicitly assigned to the Fluid application in Okta will be provisioned to Fluid. Users who are not assigned to the application will not be created or managed through SCIM provisioning.
Navigate to the Assignments tab of your Fluid SCIM application.
Click Assign and choose either:
Assign to People - Assign individual users
Assign to Groups - Assign entire groups (recommended)
To assign individual users:
Search for or select users from the list
Click Assign next to each user
Verify the username and attributes
Click Save and Go Back
Click Done when finished
To assign groups:
Search for or select groups from the list
Click Assign next to each group
Click Save and Go Back
Click Done when finished
13. Configure Push Groups (User Permissions and Roles)
Push Groups allows you to sync Okta groups directly with Fluid, automatically maintaining group membership over time. In Fluid, Push Groups are used to manage Roles — every member of a Push Group is automatically assigned the corresponding role in Fluid.
To manage roles via SCIM, we recommend creating a dedicated Okta Push Group for each Fluid role you want to provision.
When users are added to a configured Okta Push Group, they are automatically assigned the equivalent role in Fluid. Likewise, when users are removed from the Push Group, the associated role is also removed from their Fluid account. For more information, see Assigning user permissions and roles via SCIM in Fluid
Important: The name of each Push Group must exactly match the role name specified by Fluid in Assigning user permissions and roles via SCIM in Fluid.
If your organisation uses a different naming convention or policy for Push Groups, please contact your Customer Success Manager or raise a support ticket. We can configure custom Push Group name mappings for your Fluid instance.
We strongly recommend completing this mapping configuration before enabling SCIM provisioning for the groups. SCIM provisioning is sensitive to incorrect or unmapped group names, which can result in provisioning errors. Configuring mappings in advance helps ensure a smooth and reliable provisioning experience.
Click the Push Groups tab.
Click Push Groups dropdown and select either:
Find groups by name - Search for specific groups to push
Find groups by rule - Push groups matching certain criteria
To push a group by name:
Enter the group name in the search box
Select Create Group
Click Save
The group and its members will now be synchronized to Fluid automatically.
Best Practice: Create dedicated groups in Okta for Fluid access (e.g., "Fluid User", "Fluid Application Administrator") to make management easier.
SCIM Provisioning Complete
This concludes the setup for SCIM provisioning between Okta and Fluid. Changes made to users and groups in Okta will now be automatically reflected in Fluid.
What happens now:
When you assign a user in Okta:
Okta checks if the user exists in Fluid
If not, Okta creates the user with the mapped attributes
If yes, Okta links the accounts and updates any changed attributes
The user receives access to Fluid according to their permissions
When you update a user in Okta:
Changes to mapped attributes (name, email, etc.) sync to Fluid automatically
Updates typically occur within minutes
When you unassign or deactivate a user in Okta:
The user is deactivated in Fluid
They can no longer access the application
Their data remains in Fluid for audit purposes
When you push groups:
Group membership syncs automatically
Adding/removing users from groups in Okta updates Fluid roles accordingly
Troubleshooting
Connection Test Fails
If the API credential test fails:
Verify the Base URL format:
https://{organisation}.fluid.work/scim/v2Check for typos in your organization name
Ensure you're using
https://nothttp://Do not include a trailing slash
Verify the Secret Token:
Copy the token again from Fluid (you may need to generate a new one)
Ensure no extra spaces were copied
The token should match exactly between Fluid and Okta
Check Fluid SCIM Settings:
Log into Fluid as an admin
Go to Administration → Authentication Providers
Ensure "Disable SCIM User Sync" is unchecked
Verify the token is saved in Fluid
Network/Firewall Issues:
Ensure your network allows outbound connections to your Fluid instance
Check if any corporate firewall rules might block the connection
Users Not Provisioning
If users aren't being created in Fluid:
Check Assignment:
Go to Assignments tab in Okta
Verify the user or their group is assigned to the application
Okta recommends that Push Groups are not also used as assignment groups. Ensure your assignment groups are separate from Push Groups.
Check Provisioning Features:
Go to Provisioning → To App → Edit
Ensure "Create Users" is enabled
Review Logs:
In Okta, go to Applications → Your Fluid App → View Logs
Look for error messages related to provisioning
Common issues: Invalid attribute mappings, required fields missing
Check Fluid Logs:
Contact Fluid support to review server-side logs
They can identify if requests are reaching Fluid and any errors
Attribute Updates Not Syncing
If changes to users in Okta aren't reflecting in Fluid:
Check Fluid SCIM settings:
Confirm the SCIM update feature is enabled for the attribute you are attempting to update.
Check Update Setting:
Go to Provisioning → To App → Edit
Ensure "Update User Attributes" is enabled
Verify Attribute Mappings:
Go to Provisioning → To App → Attributes
Ensure the attribute you're trying to sync has a valid mapping
Click the pencil icon and verify "Apply on: Create and update" is selected
Force Sync:
Go to Assignments tab
Click on the user
Click Update User to force an immediate sync
Group Push Not Working
If groups aren't syncing:
Verify Group Push Configuration:
Go to Push Groups tab
Ensure the group shows "Active" status
Try unlinking and re-pushing the group
Check Group Membership:
Ensure users are members of the group in Okta
Group membership changes may take a few minutes to sync
Review Attribute Mappings:
Ensure group attribute mappings are correct
The default mappings should work for most scenarios