
Excel and Power BI using OAuth 2.0
This article explains how to pull live Fluid data into Microsoft Excel and Power BI using secure OAuth 2.0 sign‑in with Microsoft Entra ID (formerly Azure AD). Each person signs in with their own Microsoft work account ("Organizational account") – there are no API tokens to copy or store.
The steps below use Excel, but the connection and sign‑in steps are identical in Power BI Desktop – simply use Get Data in place of From Web.
How it works
When you connect Excel or Power BI to a Fluid data URL, Fluid replies "please sign in" and tells your tool where to do that. Excel/Power BI opens a Microsoft sign‑in window, you sign in with your work account, and Microsoft hands back a secure access token for your Fluid site. Excel/Power BI then uses that token to load your data. The token refreshes automatically, so the connection keeps working without you re‑entering anything.
Because you sign in as yourself, you only ever see the Fluid data your own Fluid account is allowed to see.
NOTE for administrators: Fluid publishes a single, Microsoft‑verified "Fluid API" application (registered and maintained by Fluid). You do not register your own app or manage Application ID URIs, scopes, or client secrets. Your only Entra task is a one‑time admin consent so the Fluid API can operate in your tenant (Step 2). When Excel/Power BI sign in, they request a token for your Fluid site's web address – Fluid has already configured its application to accept that address.
Before you begin
You will need:
Role | Used for |
|---|---|
A Microsoft Entra / Azure administrator | Granting one‑time admin consent (Part 1, Step 2) |
Your Fluid Account Manager (Fluid side) | Enabling OAuth 2.0 for your site and registering your site's web address with the Fluid API (Part 1, Step 1) |
A report builder | Connecting Excel/Power BI (Part 2) – no special permissions needed |
Part 1 One‑time setup (administrator)
Step 1. Enable OAuth 2.0 for your site
OAuth 2.0 reporting must be switched on for your Fluid site, and your site's web address (for example https://yourcompany.fluid.work) must be registered with the Fluid API application so Microsoft will issue tokens for it.
Sign in to your Fluid instance as a Fluid administrator and click on your profile picture in the top right, choose Admin Console > Authentication Provider (or navigate to
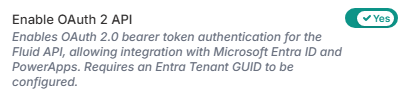
/Config/AuthenticationProvider).Enable OAuth2 API
Step 2. Grant admin consent to the Fluid API in your tenant
So that Microsoft will let Excel and Power BI obtain a token for Fluid, a Microsoft Entra administrator in your organization grants one‑time consent to the Fluid API application. You generate the consent link directly from your Fluid admin console.
Sign in to your Fluid instance as a Fluid administrator and click on your profile picture in the top right, choose Admin Console > Authentication Provider (or navigate to
/Config/AuthenticationProvider).Locate the Your Entra Tenant GUID field and enter your Microsoft Entra tenant ID — a GUID in the form
xxxxxxxx-xxxx-xxxx-xxxx-xxxxxxxxxxxx. You can find this in the Azure Portal under Microsoft Entra ID > Overview.Once you have entered your tenant ID, the Fluid API Consent Url field automatically builds the correct admin‑consent link for your tenant.
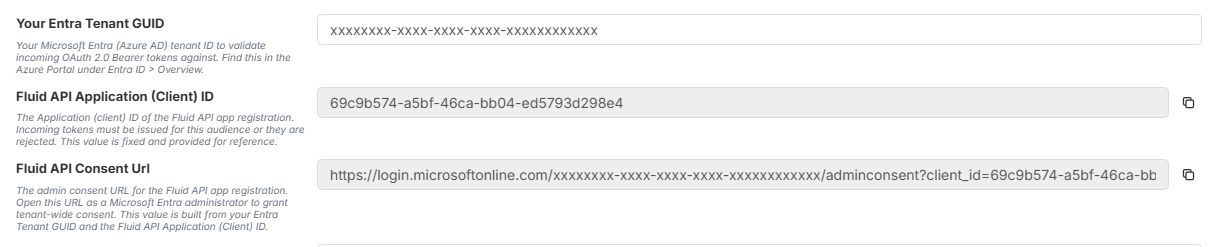
Click the copy icon next to the Fluid API Consent Url field to copy the link to your clipboard. It will look similar to below:
https://login.microsoftonline.com/xxxxxxxx-xxxx-xxxx-xxxx-xxxxxxxxxxxx/adminconsent?client_id=69c9b574-a5bf-46ca-bb04-ed5793d298e4&redirect_uri=https://www.fluid.workSend the copied link to a Microsoft Entra administrator in your organization (or open it yourself if you hold that role). The administrator opens the link, signs in, and accepts the permissions prompt. This registers the Fluid API in your tenant so your users can sign in to it from Excel and Power BI.
NOTE: This is a consent step, not an app registration. You are approving Fluid's published application – you don't create or own it. Without this consent, sign‑in may fail with
AADSTS650057or "Need admin approval".
Setup is now complete. Report builders can connect at any time using Part 2.
Part 2 Connect Excel or Power BI
Step 3. Get your Fluid data URL
You need the web address (URL) of the Fluid data you want to report on. This is a normal Fluid address that begins with your Fluid site, for example:
https://yourcompany.fluid.work/api/...Many Fluid pages and lists offer this via Tools > Export (or a Get data / feed option) – use that to obtain the URL.
If you're not sure which URL to use, ask your Fluid Account Manager or administrator for the reporting/feed URL.
TIP: Open Notepad and paste the URL there so you can copy it cleanly into Excel or Power BI in the next step.
Step 4. Connect from Excel
In Excel, go to the Data tab > Get Data > From Other Sources > From Web. (For a simple list you can also use From OData Feed if Fluid provides one.)
Paste your Fluid data URL into the From Web dialog and select OK.
When prompted to sign in, select Organizational account on the left, then select Sign in.
NOTE: Choosing Organizational account is what triggers the secure OAuth 2.0 sign‑in. Do not choose Anonymous or Windows – those won't be accepted by Fluid.
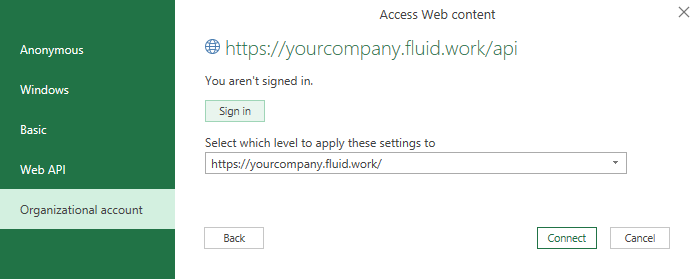
The From Web sign‑in dialog with Organizational account selected and the Sign in button highlighted.
Sign in with your Microsoft work account. The first time, you may be asked to accept a permission prompt.
Select Connect.
In the Navigator / Power Query Editor, shape the data if needed (for example, select To Table, then OK to expand the rows into columns), then choose Close & Load to bring the data into your worksheet.
Step 5. Connect from Power BI Desktop
The steps are the same, using Power BI's ribbon:
On the Home tab, select Get Data > Web (or OData feed).
Paste your Fluid data URL and select OK.
When prompted, select Organizational account > Sign in, sign in with your work account, and select Connect.
Shape the data in the Power Query Editor if needed, then select Close & Apply.
Step 6. Refresh and schedule
Manual refresh: in Excel use Data > Refresh All; in Power BI Desktop use Home > Refresh. Your saved sign‑in is reused automatically.
Scheduled refresh in the Power BI service: after publishing your report, open the semantic model (dataset) Settings > Data source credentials, select Edit credentials, choose OAuth2, and sign in.
NOTE: Scheduled refresh runs as the account that signed in for the data source credentials, so that account must have a matching, active Fluid user with permission to the data. For full setup (including using a dedicated refresh account and handling credential expiry), see Scheduling automatic Power BI refresh from Fluid.
Troubleshooting
What you see | Likely cause and fix |
|---|---|
| Your Fluid site's web address has not been registered with the Fluid API application, or OAuth 2.0 isn't enabled for your site. Complete Step 1 – contact your Fluid Account Manager. (This is the most common cause and is a Fluid‑side configuration, not something you fix in Entra.) |
| Admin consent to the Fluid API hasn't been granted in your tenant. Complete Step 2. |
It keeps asking for credentials / won't connect | Make sure you selected Organizational account (not Anonymous or Windows). In Excel/Power BI, use Data source settings > Edit Permissions to clear a wrong saved credential and try again. |
| Your work account may not match an active Fluid user. Confirm your Fluid username matches your work email, and that OAuth 2.0 is enabled for your Fluid site. |
You can sign in but see no data, or a | You're signed in, but your Fluid account lacks permission to that data. Ask your Fluid administrator to review your Fluid roles. |
Scheduled refresh fails in the Power BI service | Confirm the dataset's data source credentials are set to OAuth2 and that the signing‑in account has an active Fluid user with access to the data. |
Need help?
For the Fluid side (enabling OAuth 2.0, registering your site's address, the correct data URL, user accounts and permissions), contact your Fluid System Administrator or Fluid Account Manager.
For the Microsoft Entra side (admin consent, conditional access, your users' work accounts), contact your Microsoft 365 / Azure administrator.