
Setting up Power Automate to call the Fluid API using OAuth 2.0
This guide shows you, step by step, how to make a Microsoft Power Automate flow call the Fluid API securely using OAuth 2.0 with a client secret (the client‑credentials sign‑in).
This is the right guide when your flow runs on a schedule or in the background with nobody signed in (for example, a nightly update).
How it works
Component | What it is | Who creates it |
|---|---|---|
The Fluid API | The thing you want to call. Fluid owns it. | Fluid (you just get its ID) |
Your application | The "service user" your flow signs in as. | Your Entra administrator (Part 1) |
Your flow | The Power Automate flow that does the work. | You (Part 3) |
Every time the flow runs it does two requests:
1) Flow  →  Microsoft   :  "Here is my ID and secret. Give me a pass for the Fluid API."
   Flow  ←  Microsoft   :  a temporary access token (the pass)

2) Flow  →  Fluid API   :  "Here is my pass. Please do this for me."
   Flow  ←  Fluid API   :  the data / result
That's the whole idea. Part 3 just builds those two requests with clicks.
Before you begin
You will need help from three people (they might be the same person):
Who | What they do |
|---|---|
Your Fluid Account Manager | Turns on OAuth 2.0 for your Fluid site and gives you the Fluid API Application (client) ID |
Your Microsoft Entra / Azure administrator | Does the one‑time setup in Part 1 (creating the application and secret) |
You (the flow maker) | Builds the flow in Part 3 |
Part 1 One‑time setup in Microsoft Entra (administrator)
This whole part is done once, by an administrator. If your administrator has already created an application and client secret for Fluid, you can skip to The five values to write down and just collect those values.
Part 1 One‑time setup (administrator)
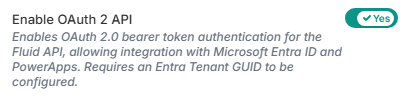
Enable OAuth 2.0 for your site
OAuth 2.0 reporting must be switched on for your Fluid site, and your site's web address (for example https://yourcompany.fluid.work) must be registered with the Fluid API application so Microsoft will issue tokens for it.
Sign in to your Fluid instance as a Fluid administrator and click on your profile picture in the top right, choose Admin Console > Authentication Provider (or navigate to
/Config/AuthenticationProvider).Enable OAuth2 API
Grant admin consent to the Fluid API in your tenant
So that Microsoft will let Excel and Power BI obtain a token for Fluid, a Microsoft Entra administrator in your organization grants one‑time consent to the Fluid API application. You generate the consent link directly from your Fluid admin console.
Sign in to your Fluid instance as a Fluid administrator and click on your profile picture in the top right, choose Admin Console > Authentication Provider (or navigate to
/Config/AuthenticationProvider).Locate the Your Entra Tenant GUID field and enter your Microsoft Entra tenant ID — a GUID in the form
xxxxxxxx-xxxx-xxxx-xxxx-xxxxxxxxxxxx. You can find this in the Azure Portal under Microsoft Entra ID > Overview.Once you have entered your tenant ID, the Fluid API Consent Url field automatically builds the correct admin‑consent link for your tenant.
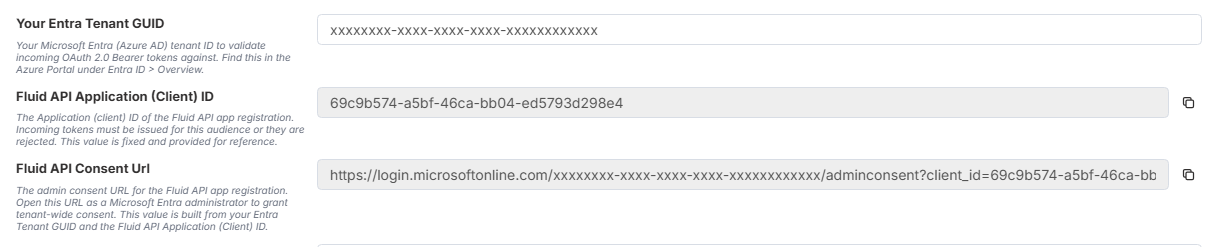
Click the copy icon next to the Fluid API Consent Url field to copy the link to your clipboard. It will look similar to below:
https://login.microsoftonline.com/xxxxxxxx-xxxx-xxxx-xxxx-xxxxxxxxxxxx/adminconsent?client_id=69c9b574-a5bf-46ca-bb04-ed5793d298e4&redirect_uri=https://www.fluid.workSend the copied link to a Microsoft Entra administrator in your organization (or open it yourself if you hold that role). The administrator opens the link, signs in, and accepts the permissions prompt. This registers the Fluid API in your tenant so your users can sign in to it from Excel and Power BI.
NOTE: This is a consent step, not an app registration. You are approving Fluid's published application – you don't create or own it. Without this consent, sign‑in may fail with
AADSTS650057or "Need admin approval".
Step 2. Create the application that your flow will sign in as
Go to the Microsoft Entra admin center and sign in as an administrator.
On the left, choose Manage > App registrations.
Select + New registration.
Name: type something clear, for example
Fluid Power Automate.Supported account types: choose Single Tenant Only.
Leave Redirect URI empty.
Select Register.
You are now on the Overview page. Copy and keep two values:
Application (client) ID
Directory (tenant) ID
Step 3. Create the client secret
Still inside your new application, select Manage > Certificates & secrets on the left.
Select + New client secret.
Type a description (for example
Power Automate secret) and choose an expiry (for example 12 months — your organisation may have a policy).Select Add.
Immediately copy the value in the Value column. This is your client secret.
WARNING: You can only see the secret once. If you leave the page without copying it, you must delete it and create a new one. Also write down the expiry date — the flow will stop working on that date until you create a new secret (see Keep your secret safe).
Step 4. Give the application permission to the Fluid API
Still inside your application, select API permissions on the left.
Select + Add a permission.
Choose the APIs my organization uses tab.
Search for Fluid API (by name, or paste the Fluid API client ID), and select it.
Choose Application permissions (not Delegated).
Tick
Api.Access, then select Add permissions.Back on the permissions list, click Grant admin consent for [your organisation] and confirm. You should see a green tick next to the permission.
WARNING: The Grant admin consent step is required. Without the green tick, the flow's first request in Part 3 will fail. The Fluid API only appears in the list after Step 1 has been completed.
The five values to write down
Give these five values to whoever builds the flow. (Keep the secret private — treat it like a password.)
# | Value | Where it comes from | Example |
|---|---|---|---|
1 | Fluid web address | Your Fluid site URL |
|
2 | Directory (tenant) ID | Step 2 |
|
3 | Application (client) ID (your app) | Step 2 |
|
4 | Client secret value (your app) | Step 3 |
|
5 | Fluid API – Application (client) ID | From Fluid |
|
WARNING: Numbers 3 and 5 are both "Application (client) IDs" but they are different things. Number 3 is your application (the one signing in). Number 5 is the Fluid API (the thing you're calling). Mixing them up is the most common mistake — keep them clearly labelled.
Part 2 One‑time setup in Fluid
Because the flow signs in as an application (not a person), Fluid needs to know which Fluid account that application should act as. This link is created inside Fluid by a Fluid administrator.
What the flow maker sends to the Fluid administrator
Your Application (client) ID — value #3 from the table above. (This is the caller — not the Fluid API ID, value #5.)
The Fluid service account the flow should act as: a dedicated Fluid user created just for this automation, given only the permissions the flow needs.
Step A. Create (or confirm) the Fluid service account
Click on your profile picture top right and choose User & Resource Management. Create a dedicated user for the automation (do not reuse a real person's account). For example username
svc-power-automatewith a display name likePower Automate Service Accountand emailsvc-power-automate@youroganization.comMake sure the account is active and grant it only the Fluid permissions/roles the flow needs (least privilege) i.e. If It will be used to query for projects, then at least Project Viewer role etc.
Note the account's username or email — you'll use it to find its internal ID next.
Step B. Add your Application client ID as a secondary username for the Fluid service account
Click on your profile picture top right and choose User & Resource Management
Locate the Fluid user account you want to use as the account you want your automation to run as.
Click on the user to edit its details
Next to the username, click the button Add Oauth2 Client ID
Enter your Client ID, value #3 from the table above
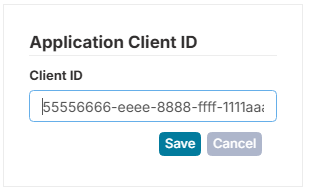
Click Save to save the client ID
Click Update to save the User details.
Now, when power automate passes the authentication token, Fluid is able to match the token to a user and run the API using that user account.
NOTE: Until this link exists, Fluid rejects every request from the flow with a 401 error and a
ClientAppNotMappedsecurity event. This is intentional — it makes sure only approved automations can run.
Part 3 Build the flow in Power Automate
Now you'll build the flow. Have the five values from Part 1 in front of you.
Step 5. Create a flow and add the "Get a token" action
Go to make.powerautomate.com and check (top‑right) that you are in the correct environment.
Create a flow as usual (for example + Create > Scheduled cloud flow for a nightly job, or any trigger you like).
Inside the flow, select + New step, search for HTTP, and choose the HTTP action.
Fill the HTTP action in exactly like this:
Box | What to enter |
|---|---|
Method |
|
URI |
|
Headers | Key: |
Body | The single line shown below, with your values pasted in |
Body (type as one line, no line breaks):
client_id=<your-app-client-id>&client_secret=<your-secret>&scope=api://<fluid-api-client-id>/.default&grant_type=client_credentialsReplace:
<your-app-client-id>with value #3<your-secret>with value #4<fluid-api-client-id>with value #5
A finished body looks like:
client_id=55556666-eeee-8888-ffff-1111aaaa2222&client_secret=abc8Q~exampleSecretValue...&scope=api://00001111-aaaa-2222-bbbb-3333cccc4444/.default&grant_type=client_credentialsRename this action to
Get token(use the … menu > Rename) so it's easy to find in the next step.
TIP: The
scopemust beapi://<fluid-api-client-id>/.default, using value #5 (the Fluid API). The/.defaultpart is important — don't remove it.
Step 6. Pull the token out of the response
Microsoft replies with a small bundle of text that contains the access token under the name access_token. We'll grab just the token.
Select + New step, search for Parse JSON, and add the Parse JSON action.
In Content, select the dynamic value Body that belongs to your Get token action.
In Schema, paste this:
{
  "type": "object",
  "properties": {
    "access_token": { "type": "string" },
    "expires_in": { "type": "integer" },
    "token_type": { "type": "string" }
  }
}
After this step, Power Automate gives you an access_token value you can use in the next action.
Step 7. Call the Fluid API
Select + New step, search for HTTP, and add another HTTP action.
Fill it in like this:
Box | What to enter |
|---|---|
Method |
|
URI |
|
Headers | Key: |
NOTE: Make sure there is a single space after the word
Bearerand before the token. The value should read likeBearer <token>.
If you are sending data (for a
POST/PATCH), add a second headerContent-Type=application/jsonand put your JSON in the Body box.
Step 8. Save and test
Select Save.
Select Test > Manually > Test (or wait for the schedule).
Open the run and check each action:
Get token should show
200and a response containingaccess_token.Call the Fluid API should show
200and your Fluid data.
If anything shows a red error, jump to Troubleshooting — the status code tells you exactly which character in the story is unhappy.
TIP: A token lasts about an hour. For a simple flow that runs and finishes, just get a fresh token at the start of each run (as above). You don't need to store or reuse it.
Keep your secret safe
The client secret is a password. Treat it like one:
Don't email it or paste it into chat. Hand it over securely.
Prefer Azure Key Vault. Instead of typing the secret straight into the flow, store it in Azure Key Vault and read it with the Key Vault connector. This keeps the secret out of the flow's history.
Set a renewal reminder. The flow stops working the day the secret expires. Note the expiry date from Step 3 and create a new secret before then (in Certificates & secrets), then update it in the flow.
One application per automation. If you have several automations, ask your administrator for a separate application each, so they can be turned off individually.
Troubleshooting
Find the action that failed and match its message below.
What you see | What it means and how to fix it |
|---|---|
| The secret (value #4) is wrong, has a typo, or has expired. Create a new secret (Step 3) and paste it in again. |
| The client_id (value #3) or tenant (value #2) is wrong. Re‑check both. |
| The Fluid API permission wasn't added or admin consent wasn't granted. Redo Step 1 and Step 4, including Grant admin consent (look for the green tick). |
| The scope is wrong. It must be |
| Fluid didn't accept the pass. Most often this is because Part 2 (linking the application to a Fluid service account) isn't done yet — confirm with your Fluid administrator that they used value #3 (your application), not the Fluid API. Also check OAuth 2.0 is enabled on your Fluid site. |
| Fluid accepted the pass but the service account isn't allowed to do that action. Ask your Fluid administrator to give the service account the right Fluid permissions. |
Worked for months, then stopped | The client secret expired. Create a new one (Step 3) and update the flow. |
You can't find the HTTP action | The HTTP action is premium. Ask your administrator whether your environment includes premium connectors. |
Need help?
For the Fluid side (enabling OAuth 2.0, the Fluid API client ID, creating and linking the service account, permissions), contact your Fluid System Administrator or Fluid Account Manager.
For the Microsoft Entra side (admin consent, the application, the client secret, permissions), contact your Microsoft 365 / Azure administrator.
Related articles