
Programmatic access to the Fluid API using OAuth 2.0
This article explains how to let an application, script, or scheduled automation call the Fluid API without a person signing in, using the OAuth 2.0 client-credentials flow with Microsoft Entra ID (formerly Azure AD).
Use this when there is no interactive user – for example a nightly data sync, a back-end integration, an Azure Function/Logic App, or an unattended Power Automate flow. Instead of a person, your application authenticates as itself and Fluid runs the request as a dedicated Fluid service account that an administrator links to your application.
NOTE: If a real person is signing in (Power Apps, Excel, Power BI, attended Power Automate), you do not want this flow – use the matching delegated-access article instead Excel and Power BI using OAuth 2.0 . This flow is only for machine-to-machine, no-user scenarios.
How it works
In this flow there is no user to sign in, so your application proves its own identity to Microsoft Entra ID using its Application (client) ID plus a client secret (or certificate). Entra issues an application-only access token for the Fluid API. Your application sends that token to Fluid as a Bearer token.
Fluid recognises the token as application-only (it has no user), and looks up which Fluid service account the application is linked to. The request then runs as that service account, with exactly the Fluid permissions it has been given.
Your app  --(client id + secret)-->  Microsoft Entra ID
Your app  <--(application access token)--  Microsoft Entra ID
Your app  --(Bearer token)-->  Fluid API   →  runs as the mapped Fluid service account
Three things must be true for this to work:
Your application is registered in Entra and allowed to request a token for the Fluid API (Part 1).
OAuth 2.0 is enabled in Fluid.
Your application is linked to a Fluid service account (Part 2). Until this link exists, Fluid rejects the token.
Before you begin
You will need:
Role | Used for |
|---|---|
A Microsoft Entra / Azure administrator | Registering the application and granting permission (Part 1) |
A Fluid System Administrator (or Fluid support) | Creating the service account and linking it (Part 2) |
A developer / automation owner | Requesting tokens and calling the API (Part 3) |
This guide assumes the Fluid API application has already been registered in Entra and OAuth 2.0 has been enabled in Fluid (the one-time setup shared by all Fluid + Microsoft integrations). If not, complete that first; you'll need the Fluid API's Application (client) ID and your Directory (tenant) ID.
Part 1 – Register the automation application (administrator)
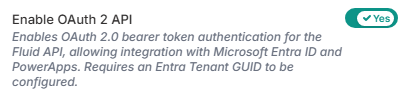
Enable OAuth 2.0 for your site
OAuth 2.0 reporting must be switched on for your Fluid site, and your site's web address (for example https://yourcompany.fluid.work) must be registered with the Fluid API application so Microsoft will issue tokens for it.
Sign in to your Fluid instance as a Fluid administrator and click on your profile picture in the top right, choose Admin Console > Authentication Provider (or navigate to
/Config/AuthenticationProvider).Enable OAuth2 API
Grant admin consent to the Fluid API in your tenant
So that Microsoft will let Excel and Power BI obtain a token for Fluid, a Microsoft Entra administrator in your organization grants one‑time consent to the Fluid API application. You generate the consent link directly from your Fluid admin console.
Sign in to your Fluid instance as a Fluid administrator and click on your profile picture in the top right, choose Admin Console > Authentication Provider (or navigate to
/Config/AuthenticationProvider).Locate the Your Entra Tenant GUID field and enter your Microsoft Entra tenant ID — a GUID in the form
xxxxxxxx-xxxx-xxxx-xxxx-xxxxxxxxxxxx. You can find this in the Azure Portal under Microsoft Entra ID > Overview.Once you have entered your tenant ID, the Fluid API Consent Url field automatically builds the correct admin‑consent link for your tenant.
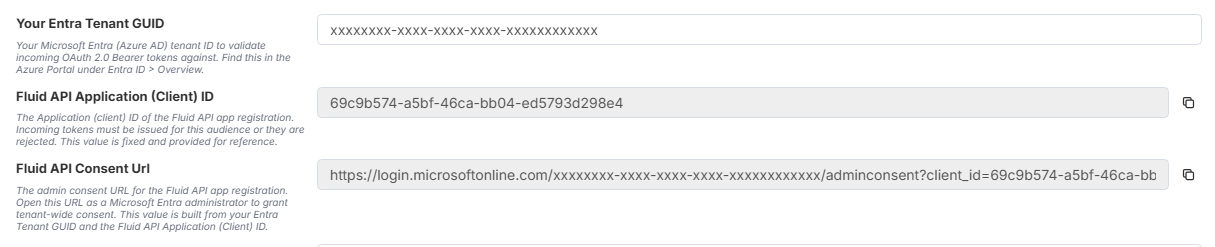
Click the copy icon next to the Fluid API Consent Url field to copy the link to your clipboard. It will look similar to below:
https://login.microsoftonline.com/xxxxxxxx-xxxx-xxxx-xxxx-xxxxxxxxxxxx/adminconsent?client_id=69c9b574-a5bf-46ca-bb04-ed5793d298e4&redirect_uri=https://www.fluid.workSend the copied link to a Microsoft Entra administrator in your organization (or open it yourself if you hold that role). The administrator opens the link, signs in, and accepts the permissions prompt. This registers the Fluid API in your tenant so your users can sign in to it from Excel and Power BI.
NOTE: This is a consent step, not an app registration. You are approving Fluid's published application – you don't create or own it. Without this consent, sign‑in may fail with
AADSTS650057or "Need admin approval".
Step 1. Expose an application role on the Fluid API
So that Entra will issue an application-only token for the Fluid API, the Fluid API app registration must offer at least one application role.
In the Microsoft Entra admin center, open App registrations > your Fluid API application.
Select App roles > + Create app role and enter:
Display name:
Access Fluid APIAllowed member types: Applications
Value:
Api.AccessDescription: "Allows an application to call the Fluid API as a service account."
Make sure Do you want to enable this app role? is ticked, and select Apply.
NOTE: Fluid does not require a specific role name – it identifies your application by its Application (client) ID (see Part 2). This role exists only so Microsoft Entra will issue an application-only token for the Fluid API.
Step 2. Register the automation (client) application
Register a separate application to represent your automation (one per integration is recommended, so each can be linked and revoked independently).
In App registrations, select + New registration.
Name: something descriptive, for example
Fluid Nightly Sync.Supported account types: Accounts in this organizational directory only.
Leave Redirect URI blank and select Register.
On the Overview page, copy the Application (client) ID – this is the identity Fluid will map to a service account.
Select Certificates & secrets > + New client secret, add a secret, and copy the secret Value immediately.
TIP: A certificate is more secure than a client secret and is recommended for production. You can upload one under Certificates & secrets > Certificates instead of creating a secret.
Step 3. Grant and consent the application permission
Still in the automation application, select API permissions > + Add a permission > My APIs.
Choose your Fluid API application.
Select Application permissions, tick
Api.Access, and select Add permissions.Select Grant admin consent for [your organisation] and confirm. The permission's status should show a green tick.
WARNING: Application permissions always require admin consent. Without the Grant admin consent step, your token request in Part 3 will fail.
Information to record
Item | Where it comes from | Example |
|---|---|---|
Fluid web address | Your Fluid site URL |
|
Directory (tenant) ID | Entra > Overview |
|
Fluid API – Application (client) ID | Fluid API app (the resource) |
|
Automation app – Application (client) ID | Step 2 (the caller) |
|
Automation app – client secret value | Step 2 |
|
WARNING: Keep the two Application (client) IDs straight. The token is requested for the Fluid API client ID (the resource), but Fluid links the service account to the automation app's client ID (the caller). They are different values.
Part 2 – Link the application to a Fluid service account (Fluid)
Because the link lives inside Fluid, this step is performed by a Fluid System Administrator (or Fluid support). Provide them with:
Your automation app's Application (client) ID (from Step 2).
The Fluid service account you want the automation to run as – ideally a dedicated, non-person Fluid user created for this integration with the least access it needs.
Step A. Create (or confirm) the Fluid service account
In the Fluid Administration Console, create a dedicated user for the automation (do not reuse a real person's account). For example name it
svc-power-automatewith a display name likePower Automate Service Account.Make sure the account is active and grant it only the Fluid permissions/roles the flow needs (least privilege).
Note the account's username or email — you'll use it to find its internal ID next.
Step B. Add your Application client ID as a secondary username for the Fluid service account
Click on your profile picture top right and choose User & Resource Management
Locate the Fluid user account you want to use as the account you want your automation to run as.
Click on the user to edit its details
Next to the username, click the button Add Username
Check the box Is OAuth2 Client ID, and enter the your Client ID, value #3 from the table above
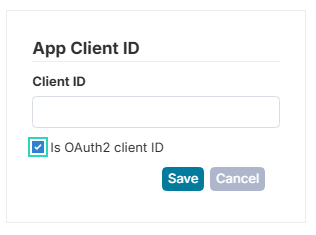
Click Save to save the client ID and then Update to save the User details.
Now, when power automate passes the authentication token, Fluid is able to match the token to a user and run the API using that user account.
WARNING: Until this link exists, every request from the automation is rejected with
401and aClientAppNotMappedsecurity event. This is by design – only explicitly approved applications can run unattended.
Part 3 – Get a token and call the Fluid API
Step 4. Request an access token
Your automation requests an application-only token from Entra, targeting the Fluid API. Use the .default scope (built from the Fluid API's Application ID URI).
HTTP request:
POST https://login.microsoftonline.com/{tenant-id}/oauth2/v2.0/token
Content-Type: application/x-www-form-urlencoded

client_id={automation-app-client-id}
&client_secret={automation-app-secret}
&scope=api://{fluid-api-client-id}/.default
&grant_type=client_credentials
PowerShell example:
$tenant   = "99998888-dddd-7777-cccc-6666eeee5555"
$clientId = "55556666-eeee-8888-ffff-1111aaaa2222"      # the automation app
$secret   = "abc8Q~exampleSecretValue..."
$fluidApi = "00001111-aaaa-2222-bbbb-3333cccc4444"      # the Fluid API app (resource)

$body = @{
    client_id     = $clientId
    client_secret = $secret
    scope         = "api://$fluidApi/.default"
    grant_type    = "client_credentials"
}
$resp  = Invoke-RestMethod -Method Post -Uri "https://login.microsoftonline.com/$tenant/oauth2/v2.0/token" -Body $body
$token = $resp.access_token
NOTE: The
scopemust beapi://{fluid-api-client-id}/.default– the Fluid API's own identifier – not a custom scope name. The token's audience is then the Fluid API, which is what Fluid validates.
Step 5. Call the Fluid API
Send the token in the Authorization header on every request:
$headers = @{ Authorization = "Bearer $token" }
$data = Invoke-RestMethod -Method Get -Uri "https://yourcompany.fluid.work/api/..." -Headers $headers
A successful call returns Fluid data (HTTP 200), running as your mapped service account.
TIP: Reuse the token until it nears expiry (typically ~60–75 minutes) rather than requesting a new one for every call. Cache it and refresh only when needed.
Step 6. Using it from Power Automate, Logic Apps, or a gateway
The same two requests (get token, then call Fluid) work from any unattended host:
Power Automate (unattended) / Azure Logic Apps: use an HTTP action to POST to the token endpoint, store
access_tokenin a variable, then use a second HTTP action to callhttps://yourcompany.fluid.work/api/...withAuthorization: Bearer <token>. Store the secret in Azure Key Vault and read it with the Key Vault connector rather than hard-coding it.Azure Functions / Web Jobs / services: use MSAL (
ConfidentialClientApplication) withAcquireTokenForClientand scopeapi://{fluid-api-client-id}/.default; it handles token caching and renewal for you.
Security best practices
Least privilege: give the linked Fluid service account only the permissions the automation needs. The application can do anything that account can do.
One app per integration: register a separate automation app for each integration so they can be monitored, rotated, and revoked independently.
Prefer certificates over client secrets for production, and rotate credentials on a schedule – the integration stops working the moment a secret/certificate expires.
Store secrets safely (for example, Azure Key Vault); never embed them in code or flow definitions.
Monitor and review: failed attempts appear in Administration Console > Security Events in Fluid. Periodically confirm each mapped application is still required, and remove links that aren't.
Revoking access: to immediately cut off an automation, either remove its link in Fluid or disable/delete its Entra application (or its credential).
Troubleshooting
What you see | Likely cause and fix |
|---|---|
| The client secret is wrong or expired. Create a new secret (Step 2) and update your automation. |
| Wrong client_id or tenant. Re-check the automation app's Application (client) ID and your tenant ID. |
| The application permission wasn't granted or consented. Complete Step 3, including Grant admin consent. |
| The scope must be |
Fluid | The application isn't linked to a Fluid service account yet. Complete Part 2. Confirm you gave Fluid the automation app's client ID (the caller), not the Fluid API's. |
Fluid | The token targets the wrong resource or tenant. Confirm the |
Fluid | The token is accepted but the service account lacks permission for that action. Ask your Fluid administrator to adjust the service account's Fluid permissions. |
Need help?
For the Fluid side (enabling OAuth 2.0, creating and linking the service account, permissions), contact your Fluid System Administrator or Fluid Account Manager.
For the Microsoft Entra side (app registration, app roles, secrets/certificates, admin consent), contact your Microsoft 365 / Azure administrator.