User roles: ✔ Benefit Administrator ✔ Application Administrator
A benefits register is only as useful as the way its benefits are classified. When every project manager describes value in their own words, nobody can answer simple questions: how much of our cost-reduction target is covered, which objectives have no benefits at all, which kinds of benefit keep slipping.
The benefits taxonomy fixes that. You set up the benefit types that describe the kind of value and, if you want them, the strategic pillars and objectives benefits are aligned to and the classes that add detail. Project managers then pick from those lists on every benefit, and every dashboard rolls up by the same structure. Only the benefit types are required, so you can start small and add the rest when you are ready.
In this article you will learn which parts of the taxonomy are required, how to build it, how to limit an objective to some benefit types, how to retire items without losing history, and how to build or copy the whole configuration in one Excel workbook.
Before You Start
You need the Benefit Administrator role. The page is Administration Console → Benefits → Benefits Administration, and needs the Show Benefits feature. See Benefits Framework: Getting Started.
Agree the lists with finance and the PMO before you go live. Renaming later is safe; reclassifying benefits that are already recorded is work.
How the Taxonomy Fits Together
Every benefit is classified in two directions. Upwards, it is aligned to the strategy it serves. Across, it is described by the kind of value it delivers.
Level | What it is | Required? | Example |
Strategic Pillar | A long-term theme of your strategy. | Optional | Operational Excellence |
Strategic Objective | A goal, usually under a pillar, with a time window and a target. Benefits are aligned to objectives. | Optional, but needed for strategic reporting | Reduce cost to serve by 15% |
Quantitative / Qualitative | Whether the benefit carries a money value. Chosen when the benefit is created and fixed once it is saved. | Built in: nothing to set up | Quantitative |
Benefit Type | The kind of value the benefit delivers. | Required: every benefit has one | Cost Reduction |
Class | A finer cut within a benefit type. | Optional | Third-party spend |
Benefit P&L Category and Type | The budget line a financial benefit is booked to. | Required only with Show Benefit P&L Fields on | Financial Benefits, Cost Reduction |
The minimum to start recording benefits is a list of active benefit types, plus Benefit P&L categories and types if Show Benefit P&L Fields is on. Pillars, objectives, classes and objective limits add alignment and detail, and can be added later. Adding them does not change the benefits already recorded.
On the benefit form, a project manager picks in this order: Strategic Objective, then Benefit Type, then Class. Each choice narrows the next.
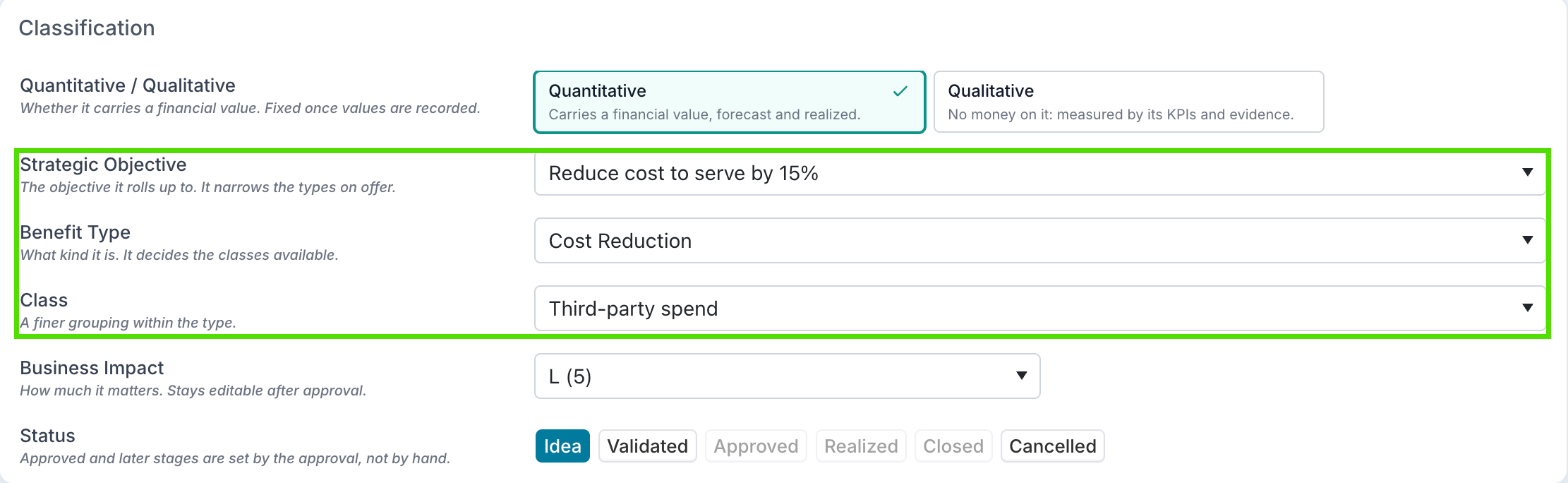
To call the two kinds of benefit something else, such as Tangible and Intangible, use the Labels and Terms panel. See Benefits Framework: Getting Started.
Plan It Before You Build It
Keep benefit types few and distinct. Six to ten is usually enough, each with a one-line description a project manager can choose by.
Use classes for detail that only some types need, rather than adding more benefit types.
Write each objective as an outcome with a target and a time window, not as the name of a project.
Fill in every Description. Descriptions are shown under each option in the benefit form's pickers, so they guide people at the moment they choose.
Step 1: Add Strategic Pillars
Optional. Without pillars, objectives still roll up, and objectives with no pillar are grouped together.
In Benefits Administration, go to Strategic Pillars and click Add Pillar.
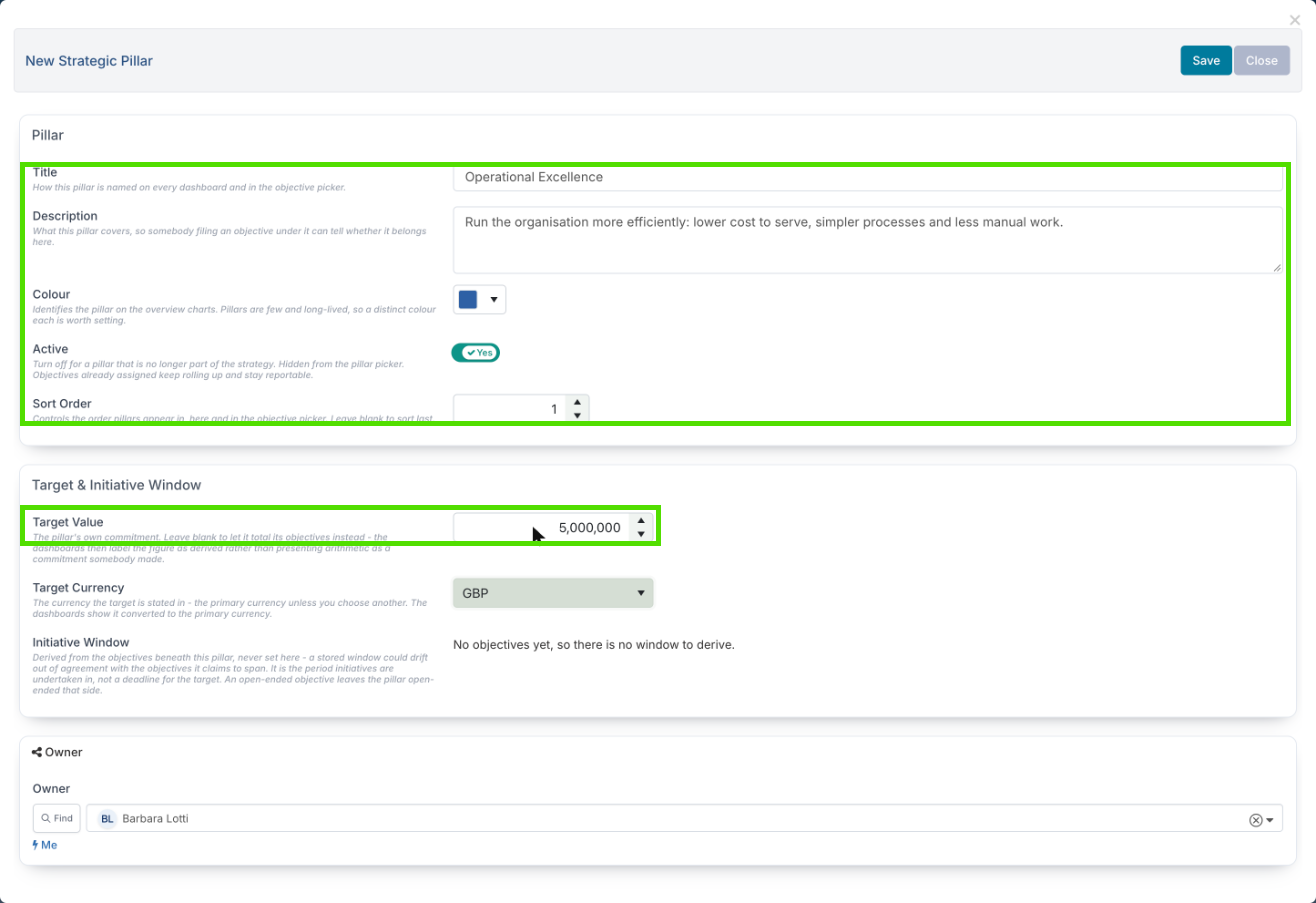
Under Pillar, enter a Title and Description. Choose a Colour for the overview charts and, optionally, a Sort Order.
Under Target & Initiative Window, enter a Target Value and Target Currency if the pillar has a target of its own. Leave it blank to let the pillar total its objectives' targets.
Under Owner, choose the person accountable for the pillar.
Click Save.
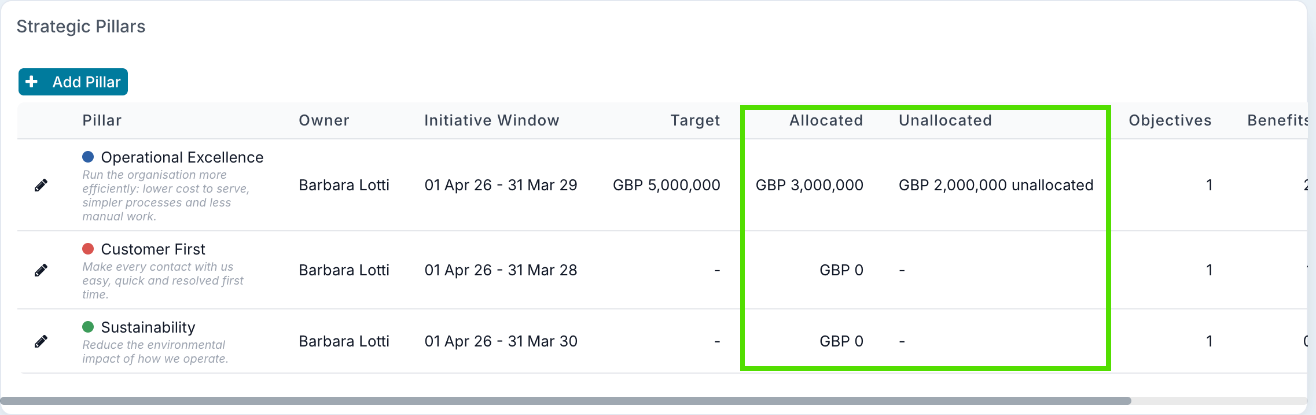
You do not enter a pillar's Initiative Window: it is the span of the objectives beneath it. The list shows how much of the pillar's target is Allocated to its objectives' targets and how much is Unallocated. Pillar titles must be unique.
Step 2: Add Strategic Objectives
Optional, but needed for strategic reporting. Without objectives, the benefit form has no Strategic Objective picker, and the Strategic Objectives and Strategic Pillars dashboards have nothing to show. Once objectives exist, a benefit can still be left Not aligned to an objective.
Go to Strategic Objectives and click Add Objective.
Under Objective, enter a Title and Description, and choose its Pillar (or No pillar). Leave Benefit Types empty for now; step 4 covers it.
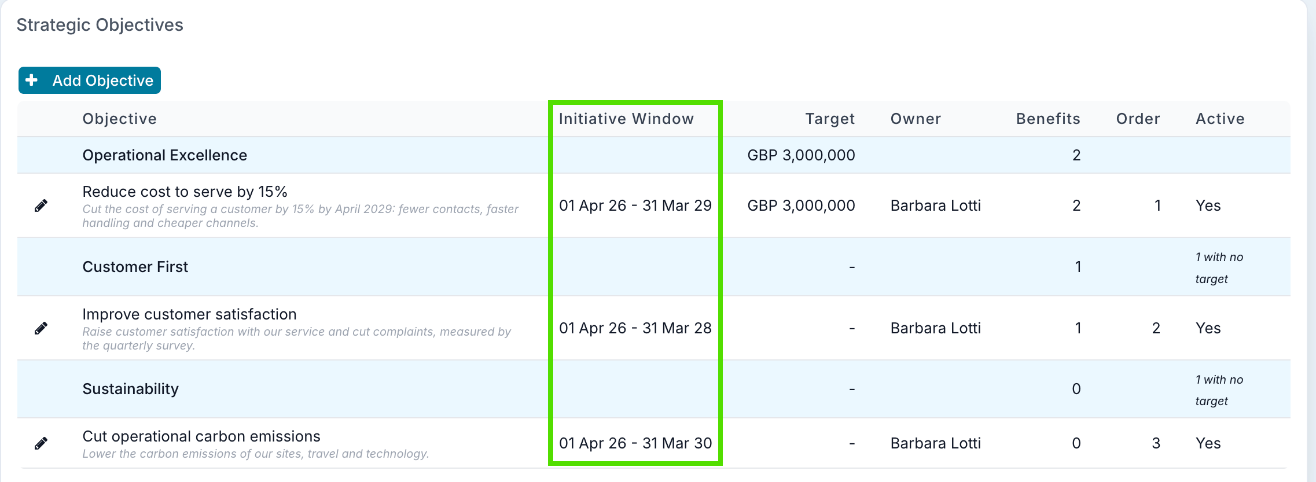
Under Window & Target, set the Initiative Window (From and To), and a Target Value and Target Currency if the objective has a money target.
Under Owner, choose the person accountable.
Click Save.
Objective titles must be unique, and a window cannot end before it starts. The initiative window decides which objectives are offered when a benefit is aligned: it is matched against the benefit's realization start date. It never cuts a benefit's value off once it is aligned.
Step 3: Add Benefit Types
Required. Every benefit needs a benefit type, so add at least one active benefit type before project managers record benefits.
Go to Benefit Types and click Add New. Each benefit type has a name (Display), an Active flag and a Description. Names must be unique.
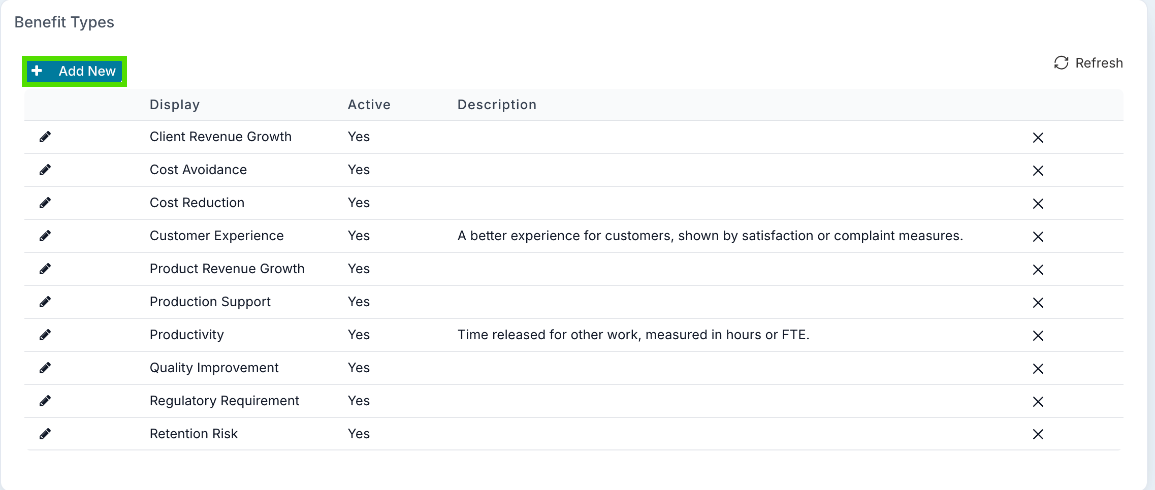
Renaming a benefit type renames it on every benefit that holds it. A benefit type in use cannot be deleted; make it inactive instead.
Step 4: Choose Which Benefit Types Each Objective Allows
Optional. By default an objective accepts any benefit type. Narrow it when only some kinds of value make sense under it: an objective about the cost to serve should not collect benefits typed as revenue growth.
Open the objective from the Strategic Objectives list.
In Benefit Types, select the types it allows. Select none to allow all of them.
Check the line beneath the picker, which states the result, for example Benefits aligned to this objective can take 3 benefit types only.
Click Save.
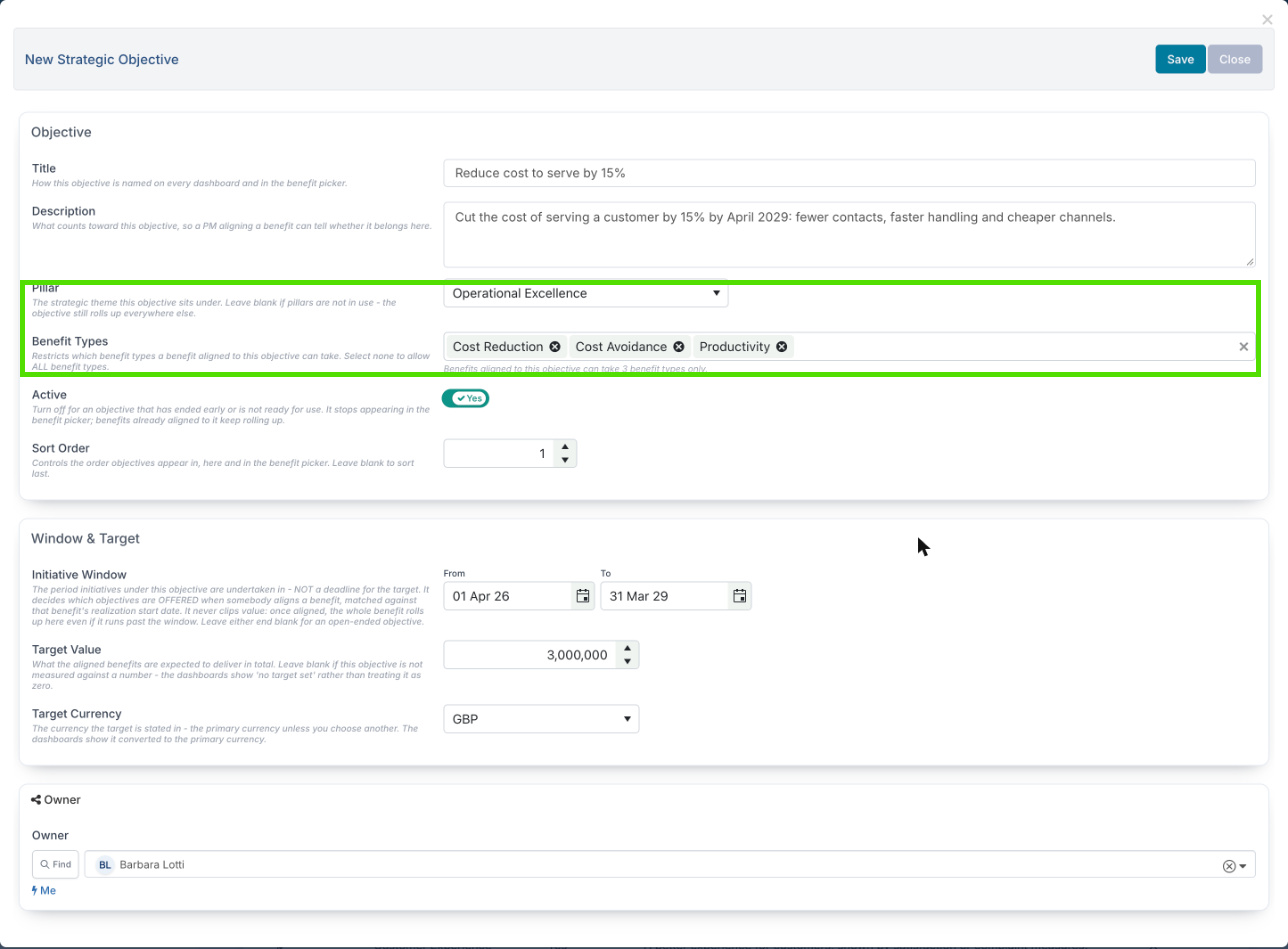
Objective | Benefit types it allows |
Reduce cost to serve by 15% | Cost Reduction, Cost Avoidance, Productivity |
Improve customer satisfaction | Customer Experience, Client Revenue Growth |
Cut operational carbon emissions | Any benefit type (none selected) |
What project managers see
On the benefit form, choosing Reduce cost to serve by 15% leaves only Cost Reduction, Cost Avoidance and Productivity in the Benefit Type list. If the benefit already had a type the objective does not allow, the first allowed type takes its place, and a class that no longer applies is cleared. With no objective chosen, every benefit type is offered.
Benefits that already exist
Narrowing an objective never changes a saved benefit. A benefit keeps its type for as long as its objective is unchanged. When you narrow an objective that benefits are already aligned to, the dialog warns you how many there are.
Deleting a benefit type takes it off every objective's list. An objective whose only allowed type is deleted goes back to allowing every type. Bulk Edit Benefits follows the same rule: its type dropdown lists the types the row's objective allows, and an upload refuses a type the objective does not allow.
Step 5: Add Benefit Classes
Optional. A benefit type with no classes simply shows no Class picker on the benefit.
Go to Benefit Classes and click Add Class. Enter the Class name and a Description, choose its Applicable Benefit Types (select none to make it available to all of them) and click Save.
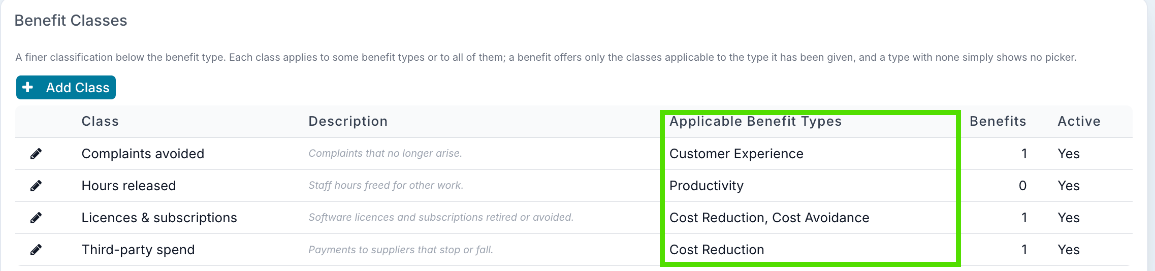
A benefit only offers the classes that apply to its benefit type. A benefit type with no classes shows no Class picker at all.
Renaming a class renames it everywhere, because benefits hold the class itself rather than its name.
If a benefit's type is changed to one its class does not apply to, the class is cleared when the benefit is saved.
A class in use cannot be deleted; make it inactive instead. Deleting a benefit type also deletes any class that applied only to that type, and is refused if benefits still carry such a class.
Ongoing Cost Types and Classes
Required when Show Ongoing Costs is on. Every ongoing cost needs an Ongoing Cost Type; ongoing cost classes are optional.
With Show Ongoing Costs on, ongoing costs are classified the same way: an Ongoing Cost Type (Add New on the Ongoing Cost Types panel), then an optional class (Add Class on the Ongoing Cost Classes panel), with Applicable Ongoing Cost Types on each class.
Make Items Inactive Rather Than Deleting Them
Pillars, objectives, benefit types and classes can all be made inactive. An inactive item is no longer offered for new benefits, but every benefit that already holds it keeps it and still reports under it. Deleting is refused while anything uses an item, and the message tells you how many records do. A pillar cannot be deleted while objectives sit under it.
Benefit P&L Categories and Types
Required when Show Benefit P&L Fields is on. Every financial benefit must then have a Benefit P&L Category and Type, so set the lists up before you switch the feature on. With it off, you can skip this section.
With the Show Benefit P&L Fields feature on, each benefit has a P&L Line: a Benefit P&L Category and a Benefit P&L Type within it, plus a Cost Center. Resourcing benefits do not use it. They are a separate list from project expense types, so they can include lines with no cash behind them, such as cost avoidance. Ongoing costs have their own list, Ongoing P&L Type Management, and their own feature, Show Ongoing Cost P&L Fields.
Go to Administration Console → Benefits → Benefit P&L Type Management.
Click Add Benefit P&L Category to add each category.
Click Add Benefit P&L Type to add the types within each category. Each type has a Class and an Order, which sets its place in the list.
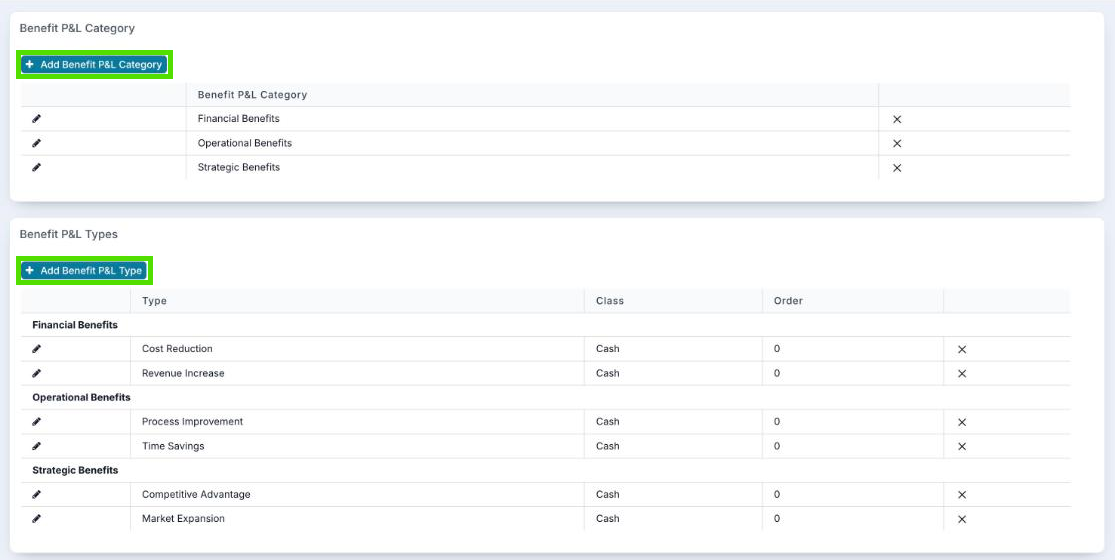
A benefit's P&L line says which budget line it is booked to. Its benefit type and class say what kind of benefit it is. Neither says who gains the value: that is the benefit's Receiving Portfolio. See Reporting on Benefits and KPIs.
Build or Copy Everything in One Workbook
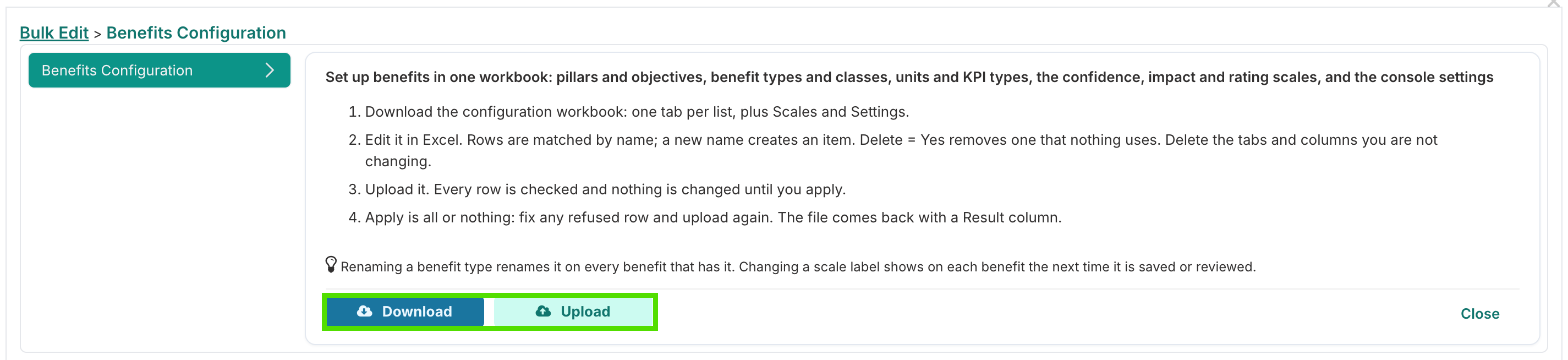
Bulk Edit Configuration (Benefits Administration → Tools, shown with the Allow Bulk Edit feature) exports the whole benefits configuration to Excel and loads it back. Use it to draft a first configuration in a spreadsheet, to review it with stakeholders, or to copy it from a test environment to production.
Tab | What it holds |
Pillars, Objectives, Benefit Types, Benefit Classes | One row per item. Each objective names its Pillar. |
Class Applicability, Objective Applicability | One row for each class and a benefit type it applies to, and for each objective and a benefit type it allows. |
Ongoing Cost Types, Ongoing Cost Classes, Ongoing Class Applicability | The same for ongoing costs. Exported while Show Ongoing Costs is on. |
Units of Measure, Unit Applicability, KPI Types | The building blocks for KPIs. See Setting Up KPIs to Measure Benefits. |
Scales | The confidence, business impact and rating scales. |
Settings | Field names, labels and terms, the review cadence, the waterline, guidance and the reminder timings. |
Read Me, Lists | Instructions, and the values the dropdowns offer. |
Download the workbook, edit it, upload it, check the preview, then click Apply. The rules:
Each exported row carries a hidden key. In the same environment the key identifies the item, so changing the name in its row renames it. A row with no key is matched by Title (pillars and objectives) or Name (the other lists); a new name creates a new item.
A row, column or tab you delete from the file changes nothing. Delete the tabs you are not editing.
On the applicability tabs, each row is one link, and Delete = Yes removes a link. A class with no links applies to every benefit type; an objective with no links allows every benefit type.
Delete = Yes on a list row deletes that item, and is refused while anything uses it.
A new pillar and its objectives, or a new benefit type and its links, can go in the same file.
Apply is all or nothing. If any row is refused, nothing is applied. Fix the rows the preview names and upload again.
Keys from another environment are ignored, and those rows are matched by name. So a rename made in one environment does not carry to another: rename the item in the target environment first, then copy.
Good to Know
Do we need pillars and objectives before we can record benefits?
No. Only benefit types are required, plus Benefit P&L categories and types if Show Benefit P&L Fields is on. Add pillars and objectives when you want benefits to roll up to strategy.
A project manager cannot find a benefit type on the benefit form.
Check the benefit's Strategic Objective: it may not allow that type. Otherwise the type may be inactive.
Why is there no Class picker on the benefit?
No active class applies to the benefit type chosen.
We narrowed an objective. What happens to the benefits already aligned to it?
Nothing. They keep their benefit type until someone changes the benefit's type or objective. New benefits under the objective are offered only the types it allows.
Why can't I change the objective or type of a benefit?
The benefit has been approved or baselined. Its classification is fixed with the plan. See Setting Up Benefit Baselines and Approval.
Why can't I delete this objective?
Benefits are aligned to it. Make it inactive instead, or realign those benefits first.